DIY laser rifle doing damage long distance

DIY Long Distance Laser Telescope Does Some Damage

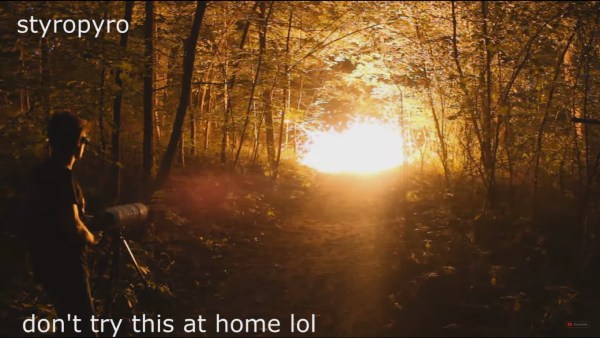
Here’s a DIY laser rifle which can explode a balloon at around 150 feet (45 meters) as well as some angry chemicals at a similar distance. Since there are plenty of videos of lasers doing that at around a meter, why shouldn’t doing so farther away be easy? Despite what many expect, laser beams don’t remain as straight lines forever. All light diverges over a distance. This makes it hard to create a laser which can do damage from more than around a meter and is why most demonstrations on YouTube are that distance or less.

Galilean telescope and laser idea
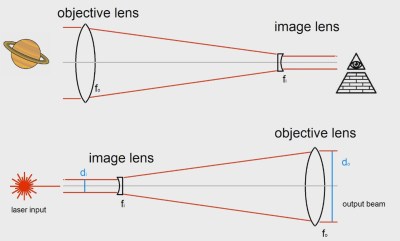
[Styropyro’s] handheld, DIY laser rifle, or Laser Telescope Blaster as he calls it, works for long distances. His solution lies in some surprising physics: the larger the diameter of the beam, the more slowly it will diverge. So he used the opposite of a Galilean telescope to take the small beam of his 405-nanometer laser and increase its diameter. His best result was to explode a balloon at 150 feet (45 meters).

He did run into another issue first though. Anyone who’s tried to keep a camera aimed at a target through a telephoto lens while holding the camera in their hands knows that even a tiny movement will throw the camera off target. For a laser beam to sufficiently heat up the balloon in order to make it explode, the beam has to stay on it for a short period of time. But at a long distance, small movements of his rifle made the beam wander. Putting the rifle on a tripod fixed that. In the video below you can see him work through his design and these issues to finally get his big success.

We can guess what spurred on this interest in long-distance laser rifles. Back in July, a Chinese company made bold claims to building one which could do damage at 800 meters.

Continue reading “DIY Long Distance Laser Telescope Does Some Damage”

Hummingbirds, 3D Printing, And Deep Learning

Setting camera traps in your garden to see what local wildlife is around is quite popular. But [Chris Lam] has just one subject in mind: the hummingbird. He devised a custom setup to capture the footage he wanted using some neat tech.

To attract the hummingbirds, [Chris] used an off-the-shelf feeder — no need to re-invent the wheel there. To obtain the closeup footage required, a 4K action cam was used. This was attached to the feeder with a 3D-printed mount that [Chris] designed.

When it came to detecting the presence of a hummingbird in the video, there were various approaches that could have been considered. On the hardware side, PIR and ultrasonic distance sensors are popular for projects of this kind, but [Chris] wanted a pure software solution. The commonly used motion detection libraries for this type of project might have fallen over here, since the whole feeder was swinging in the air on a string, so [Chris] opted for machine learning.

A RESNET architecture was used to run a classification on each frame, to determine if the image contained a hummingbird or not. The initial attempt was not greatly successful, but after cropping the image to a smaller area around the feeder, classification accuracy greatly increased. After a bit of FFmpeg magic, the selected snippets were concatenated to make one video containing all the interesting parts; you can see the result in the clip after the break.

It seems that machine learning and wildlife cams are a match made in heaven. We’ve already written about a proof-of-concept project which identifies different animals in the footage when motion is detected.

Continue reading “Hummingbirds, 3D Printing, And Deep Learning”

Knock-Off AirPods Merged Into Bluetooth Receiver

Whether or not you personally like the concept of the AirPod Bluetooth headphones is irrelevant, as an Apple product one thing is certain: all the cool kids want them. That also means that plenty of overseas manufacturers are pumping out janky clones for a fraction of the price for those who are more about the Apple look than the Apple price tag. Are they any good? No, of course not. But that doesn’t mean you can’t do something interesting with them.

[Igor Kromin] took apart a pair of fake AirPods and was predictably underwhelmed. So much so that he didn’t even bother putting the things back together. Instead, he took the two poor Bluetooth audio receivers and combined them into one slightly less poor Bluetooth audio receiver. It probably doesn’t meet the classical definition of a “good” use of time and/or money, but at least he got some entertainment out of a product that was otherwise destined for the trash.

As you might imagine, the left and right “AirPod” each has its own battery, Bluetooth receiver, and speaker. It has to, as they have no physical connection to each other. That also means that each receiver is only playing one channel, making them useless individually. What [Igor] realized was that he could put together a little PCB that combines the two audio channels back into a regular stereo 3.5 mm audio jack.

While he was at it, he also wired the individual buttons on each headphone to a center button on the PCB which would allow him to physically synchronize them. Even still, [Igor] mentions that occasionally they don’t come on at the same time. But what do you expect for something that’s nearly a 20th the price of the original?

The last time we saw a hack related to the Apple AirPod, it was when somebody threw them out the window, so one might presume most hackers prefer their iDevice tethered.

Dumping A Zelda SNES ROM, And Learning A Few Things Along The Way

For many of us, being given a big old DIP ROM from nearly thirty years ago and being told to retrieve its contents would be a straightforward enough task. We’d simply do what we would have done in the 1980s, and hook up its address lines to a set of ports, pull its chip select line high, and harvest what came out of the data lines for each address.

But imagine for a minute that an old-fashioned parallel ROM is a component you aren’t familiar with, as [Brad Dettmer] did with the ROM from a SNES Zelda cartridge. We’ve seen plenty of reverse engineering stories with ancient computing gear as their subject, but perhaps it’s time to accept that some of the formerly ubiquitous devices are edging towards that sort of status.

So [Brad] takes us through the process of using the Saleae logic analyser to interrogate the chip while an Arduino stepped through its address lines, and the lesson is probably that while it seems like a sledgehammer to crack a nut it is important to factor in that unfamilarity. If you’d never worked with a 1980s ROM, it would make sense to use the tool you are familiar with, wouldn’t it?

Anyway, all’s well that ends well. While we’re on the subject of Nintendo ROMs, have a read about extracting the boot ROM from a cloned Game Boy.

Optimizing Screen Time To Heart Beats

Kids spend too much time in front of a screen these days. They also won’t get off my lawn, and music today is just a bunch of static. They don’t respect their elders, either. While kids today are terrible, we can fix that first problem — sitting in front of a screen all day. For his Hackaday Prize entry, [Donovan] has created a device that optimizes screen time to reduce sensory overload. It’s the Optimote, the combination of a remote control and biofeedback.

The idea behind the Optimote is to actually to reduce stimulation when watching something on a screen. For many people, including people on the autism spectrum, watching TV or YouTube videos can often result in debilitating sensory overload. You can’t relax in this state, you can’t learn, and you certainly can’t get any entertainment value out of the glowing rectangle in front of your face.

The Optimote uses a pulse sensor, an Arduino, an incredible break-away cable that seems to be missing from any other wearable device like this, and a software stack that interacts with VLC. During periods of high pulse rate, the video skips to low-intensity footage. There’s a ‘calm’ mode that puts media volume and tempo in sync with heart rate. The ‘thrill’ mode plays an eerie scene looping with the Jaws theme.

So far, the prototype is a success, and [Donovan] is looking forward to large-scale user experience testing to determine how effective and enjoyable this technology can become.

Learn FPGA With This Persistence Of Vision Hack

Everybody wants to give FPGA development a try and here’s a great way to get into it. You can build your own Persistence of Vision display using a $30 dev board. It’s a fun project, and you’ll learn quite a bit about designing for an FPGA, as well as using the Quartus design software.

The inspiration for this article comes from [vpecanins] who did an example project where you wave the board back and forth and a message appears in mid air. This uses the MAX1000, a pretty powerful yet odd FPGA board for about $30. It contains an Intel MAX10 (when did Intel start making FPGAs? Remember, Intel bought Alterra back in 2015). I find the board odd because it also holds an accelerometer that you can talk to using SPI. That’s a little strange for a generic FPGA board, but paired with eight on-board LEDs it’s perfect for this demo.

Since I didn’t find any written documentation for this example, I thought we’d help out and take you on a step-by-step tour of the project. What’s more, in a future installment, I’ll show you how to make some significant changes to the tutorial that will make it even more practical as a base for other projects.

Continue reading “Learn FPGA With This Persistence Of Vision Hack”

New Mooltipass Begins Development With Call For Collaborators

One of the most interesting aspects of our modern world is the ability to work collaboratively despite the challenges of geography and time zones. Distributed engineering is a trend which we’ve watched pick up steam over the years. One such example is the Mooltipass offline password keeper which was built by a distributed engineering team from all over the world. The project is back, and this time the goal is to add BLE to the mini version of the hardware. The call for collaborators was just posted on the project page so head over and check out how the collaboration works.

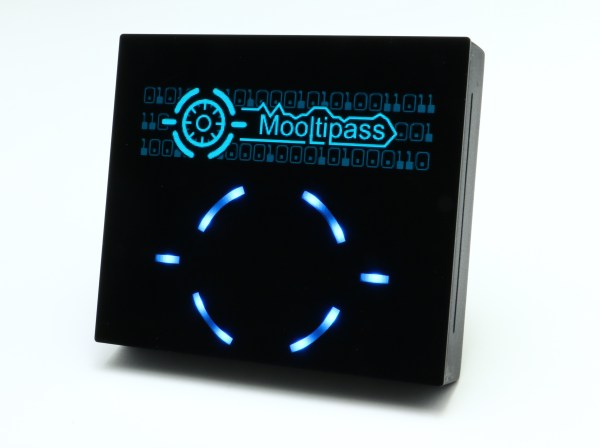
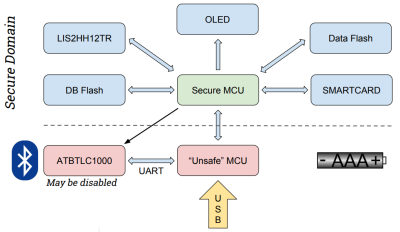
The key to the hardware is the use of a smartcard with proven encryption to store your passwords. Mooltipass is a secure interface between this card and a computer via USB. The new version will be a challenge as it introduces BLE for connectivity with smart phones. To help mitigate security risks, a second microcontroller is added to the existing design to act as a gatekeeper between the secure hardware and the BLE connection.

Mathieu Stephan is the driving force behind the Mooltipass project, which was one of the first projects on Hackaday.io and has been wildly successful in crowd funding and on Tindie. Mathieu and five other team members already have a proof of concept for the hardware. However, more collaborators are needed to help see all aspects of the project — hardware, firmware, and software — through to the end. This is a product, and in addition to building something awesome, the goal is to turn a profit.

How do you reconcile work on an Open Source project with a share of the spoils? Their plan is to log hours spent bringing the new Mooltipass to life and share the revenue using a site like colony.io. This is a tool built on the Ethereum blockchain to track contributions to open projects, assigning tokens that equate to value in the project. It’s an interesting approach and we’re excited to see how it takes shape.

You can catch up on the last few years of the Mooltipass adventure my checking out Mathieu’s talk during the 2017 Hackaday Superconference. If this article has you as excited about distributed engineer as we are, you need to check out the crew that’s building this year’s Open Hardware Summit badge!