New Part Day: ATMegas With Programmable Logic

Since Microchip acquired Atmel, the fields of battle have fallen silent. The Crusaders have returned home, or have been driven into the sea. The great microcontroller holy war is over.

As with any acquisition, there is bound to be some crossover between two product lines. Both Atmel’s AVR platform and Microchip’s PICs have their adherents, and now we’re beginning to see some crossover in the weird and wonderful circuitry and design that goes into your favorite microcontroller, whatever that might be. The newest part from Microchip is an ATMega with a feature usually found in PICs. This is a Core Independent Peripheral. What is it? Well, it’s kinda like a CPLD stuck in a chip, and it’s going to be in the new Arduino board.

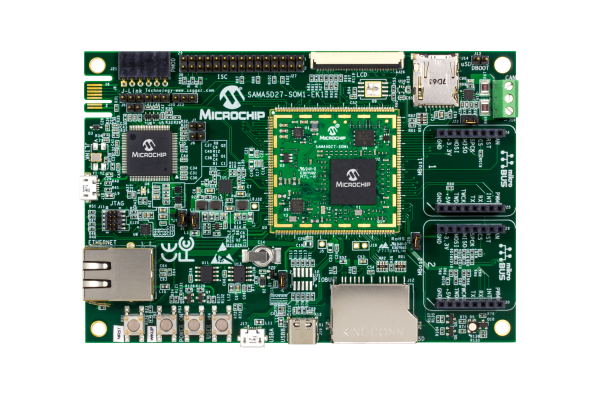
The ATMega4809 is the latest in a long line of ATMegas, and has the features you would usually expect as the latest 8-bit AVR. It runs at 20MHz, has 48 K of Flash, 6 K of SRAM, and comes in a 48-pin QFN and TQFP packages. So far, everything is what you would expect. What’s the new hotness? It’s a Core Independent Peripheral in the form of Configurable Custom Logic (CCL) that offloads simple tasks to hardware instead of mucking around in software.

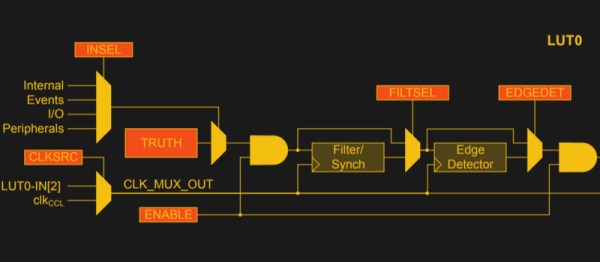
So, what can you do with Configurable Custom Logic? There’s an application note for that. The CCL is effectively a look-up table with three inputs. These inputs can be connected to I/O pins, driven from the analog comparator, timer, UART, SPI bus, or driven from internal events. The look-up table can be configured as a three-input logic gate, and the output of the gate heads out to the rest of the microcontroller die. Basically, it’s a tiny bit of programmable glue logic. In the application note, Microchip provided an example of debouncing a switch using the CCL. It’s a simple enough example, and it’ll work, but there are a whole host of opportunities and possibilities here.

Additionally, the ATMega4809, “has been selected to be the on-board microcontroller of a next-generation Arduino board” according to the press release I received. We’re looking forward to that new hardware, and of course a few libraries that make use of this tiny bit of custom programmable logic.

Friday Hack Chat: Everything PCB

It was not too long ago that all PCB design packages were proprietary. Getting PCBs made was expensive, and if you tried to do this over the Internet, the best way was to download a board house’s proprietary software, design your board in their software suite, and send your boards off to be made. A 5 cm square board would cost two hundred dollars. I know this to be true because I’ve said it before, and no one has corrected me.

For this week’s Hack Chat, we’re talking Everything PCB with OSH Park. OSH Park is the leading creators of perfect purple PCBs. They have POGs, and for the last two weeks, they’ve been one of the few places you can send some Gerbers to and have it manufactured in a timely manner if you live in the US. Because China was closed.

For this week’s Hack Chat, we’re going to be talking about everything PCB. How do you do castellated holes? How do you mill slots and square or otherwise non-round holes? Internal cutouts? Stop mask expansion? Artwork? Panelization? Why purple? More POGs!

Our guests for this chat will be [Dan Sheadel] and [Drew Fustini] of OSH Park, and they’re going to be there answering all your questions. [Dan] has been around OSH Park from the beginning and enjoys designing tiny useless robots and mentoring students building better ones. [Drew] is an Open Source hardware developer, firmware designer, a BeagleBoard board member, and is usually found at hardware meetups wearing purple.

join-hack-chat

Our Hack Chats are live community events on the Hackaday.io Hack Chat group messaging. This Hack Chat is going down Friday, March 2nd at noon, Pacific time. Want to know what time this is happening in your neck of the woods? Have a countdown timer!

Click that speech bubble to the right, and you’ll be taken directly to the Hack Chat group on Hackaday.io.

You don’t have to wait until Friday; join whenever you want and you can see what the community is talking about.

Detoured: Fabbing At The Art Institute Of Chicago

[Majenta Strongheart] is one of the talented folks who works at the SupplyFrame Design Lab, home to dozens of Hackaday meetups, the Hackaday Superconference, and when the shop floor isn’t filled with chairs, is the place where tons of awesome projects are fabricated. [Majenta]’s role at the Design Lab is a Staff Designer, where she’s responsible for working the machines, and holds the distinction of being in the room when the SawStop kicked for the first time. Don’t fret: it was mirrored acrylic.

Among [Majenta]’s other duties at the Design Lab is on the social media front, showing off the capabilities of other design spaces around the country. Her first video in this series is from her alma mater, the Art Institute of Chicago. In this video, [Majenta] takes a look at the incredible fabrication facilities found here.

The tour begins in an exceptionally well-equipped wood shop kitted out with panel saws, spindle sanders, bandsaws, and not enough clamps. From there, the tour moves over to the metal shop and — unique for the city of Chicago — a forge. A long time ago, after Philadelphia and New York were the tech centers of America, and before the Bay Area was the tech center of America, Chicago made everything. The forge at the Art Institute of Chicago is the last remaining place in the city where metal casting takes place. This space was grandfathered in, and still remains a place where students can cast objects out of bronze and aluminum.

The Art Institute of Chicago is a very, very well equipped space full of enough tools to make anything you want. If you’re looking for some inspiration on what your basement, garage, or local hackerspace should look like, you need only look at [Majenta]’s tour. You can check out the entire video below.

Continue reading “Detoured: Fabbing At The Art Institute Of Chicago”

Successful Experiments In Multicolor Circuit Boards

Printed circuit boards have never been cheaper or easier to make. We’re not that far removed from a time where, if you wanted a printed circuit board, your best and cheapest option would be to download some proprietary software from a board house, use their terrible tool, and send your board off to be manufactured. A few copies of a 5x5cm board would cost $200. Now, anyone can use free (as in beer, if not speech) software, whip up a board, and get a beautifully printed circuit board for five dollars. It has never been easier to make a printed circuit board, and with that comes a new medium of artistic expression. Now, we can make art on PCBs.

PCB as Art

For the last year or so, Hackaday has been doing a deep-dive into the state of artistic PCBs. By far our biggest triumph is the Tindie Blinky Badge, an artistic representation of a robot dog with blinking LED eyes. [Andrew Sowa] turned some idiot into PCB coinage, and that same idiot experimented with multicolor silkscreen at last year’s DEF CON.

Others have far surpassed anything we could ever come up with ourselves; [Trammel Hudson] created an amazing blinky board using the standard OSHPark colors, and [Blake Ramsdell] is crafting full panels of PCB art. The work of Boldport and [Saar Drimer] has been featured in Marie Claire. The world of art on printed circuit boards has never been more alive, there has never been more potential, and the artistic output of the community is, simply, amazing. We are witnessing the evolution of a new artistic medium.

Printed circuit boards are a limited medium. Unless you want to shell out big bucks for more colors of silkscreen, weird colors of soldermask, or even multiple colors of soldermask, you will be limited to the standard stackup found in every board house. One color, the fiberglass substrate, will be a pale yellow. The copper layer will be silver or gold, depending on the finish. The soldermask will be green, red, yellow, blue, black, white, and of course purple if you go through OSH Park. The silkscreen will be white (or black if you go with a white soldermask). What I’m getting at is that the palette of colors available for PCB art is limited… or at least it has been.

For a few months now, Hackaday has been experimenting with a new process for adding colors to printed circuit boards. This is a manufacturing process that translates well into mass production. This is a process that could, theoretically, add dozens of colors to any small PCB. It’s just an experiment right now, but we’re happy to report some limited success. It’s now easy — and cheap — to add small amounts of color to any printed circuit board.

Continue reading “Successful Experiments In Multicolor Circuit Boards”

Real-Time Audio For The PocketBeagle

The BeagleBone has long been a favorite for real-time I/O, and now with the release of the PocketBone — the tiny key fob-sized BeagleBone — there are ever increasing uses for this tiny little programmable real-time Linux module. The Bela Mini, just released, is the latest add-on cape to take advantage of the processing power of the micro-sized PocketBone.

The Bela Mini is a shrinkification of the original Bela, a cape add-on for the BeagleBone. The original breaks out eight analog inputs and eight analog outputs, both sixteen-bits deep. With the addition of powered speaker outputs, the Bela turns the BeagleBone into the perfect tiny audio-Linux-thing, with a special emphasis on Pure Data and other audio wizardry.

The Bela Mini does away with the powered speaker outputs, and instead replaces those ports with stereo audio in and stereo audio out on a three-pin connector. Compared to the original Bela, the Mini loses the eight sixteen-bit analog outputs, but still keeps the analog inputs.

There have been many attempts to add real-time audio to microcontrollers and Linux boards, but few examples have lived up to the hype. Most of the time, this comes down to the choice of microcontroller or module; an ATmega-based Arduino doesn’t have real analog outputs and instead relies on PWMing a digital signal. A Raspberry Pi-based Pure Data box does not have a real-time I/O. This is where the choice of the PocketBone shows its strength. The PocketBone uses the same chip as the BeagleBone, and with that comes the Programmable Real-Time Units (PRUs). This enables the Bela to interface with signals with a dedicated controller in real-time. It’s exactly what you want for audio applications.

Hackaday Links Column Banner

Hackaday Links: February 25, 2018

Hipster hardware! [Bunnie] found something interesting in Tokyo. It’s a LED matrix display, with a few PDIP chips glued onto the front. There are no through-holes or vias, and these PDIPs can’t be seen through on the back side of the board. Someone is gluing retro-looking chips onto boards so it looks cool. It’s the ‘gluing gears to everything therefore steampunk’ aesthetic. What does this mean for the future? Our tubes and boxes of 74-series chips will be ruined by a dumb kid with a hot glue gun when we’re dead.

Is it Kai-CAD or Key-CAD? Now you can share your troubles with the greatest problem in Electronic Design Automation with others.

Speaking of unimaginable problems in EDA suites and PCB design tools, here’s a Git-based visual version control thingy for Eagle. Cadlab.io is a version control system for Github and Eagle that offers visual diff of PCB layouts and schematics. Neat? Yes, especially if you have more than one person working on a board.

How about a 3D printed business card embosser? [Taekyeom] designed and printed a pair of 3D rollers, one of which is embossed with the ‘negative’ of a design, the other with the ‘positive’ of a design. When rolled against each other, these rollers mesh and putting a piece of paper through the pinky pinching machine embosses paper. Add a frame, a handle, and a few zip ties for belts, and you have a fully 3D printed paper embosser.

There’s a new ransomware that encrypts your files and won’t allow you to access them until you pay someone some crypto. Big news, huh? Well, yes, actually. The HC7 Planetary ransomware is apparently the first bit of ransomware that accepts Etherium. ETH is all grown up now.

Aw, snap, 3D printers with automatic tool changing. This is a project from E3D that shows off magnetic (?) extruders and hot ends for 3D printers. You can change your hot end (and nozzle, and filament) in mid-print. What does this mean? Well, swapping filament is the most obvious use case, but the Prusa system might have this nailed down. What is more interesting is swapping hotends, allowing you to print in multiple temperatures (and different materials), and maybe even different nozzle sizes. This is coming to MRRF, the greatest 3D printing con on the planet. MRRF is happening in March 23-25th in beautiful scenic Goshen, Indiana.

hardware demoscene? Yes, it’s true! #badgelife is a hardware demoscene wrapped up around wearable conference badges. We just had a meetup in San Francisco this week, and the talks were amazing. [Kerry Scharfglass] talked about scaling one Diamond Age badge to one hundred Diamond Age badges. [Whitney Merrill] talked about building badges for the Crypto and Privacy village at Defcon. If you’re into electronics, you are, by default, into manufacturing and this is the best education in manufacturing and logistics you will ever get. The true pros know how to reduce air freight costs by two hundred percent!

Microchip Introduces Tiny Cheap Linux Modules

Linux is in everything these days, and that means designers and engineers are crying out for a simple, easy-to-use module that simplifies the design of building a product to do something with Linux. The best example of this product category would probably be the Raspberry Pi Compute Module, followed by the C.H.I.P. Pro and its GR8 module. There are dozens of boards with Allwinner and Mali chips stuffed inside that can be used to build a Linux product, and the ‘BeagleBone on a Chip’ is a fantastic product if you need Linux and want to poke pins really, really fast.

Now Microchip is rolling out with their answer to the Linux System on Module. The SAMA5D2 is a single chip in a BGA package with a small footprint that runs Linux. It’s capable, it’s cheap, and if you want to put Linux in a project, this is your newest option.

The core product in this new Microchip lineup is the SAMA5D2 SIP, a system in package that puts an ARM Cortex-A5 CPU and DDR2 memory in a single BGA package that, with a cursory examination, looks easy enough to design a PCB around and reflow. There are four chips in this lineup, with 128 Mbit, 512 Mbit, and 1 Gbit of DDR2 memory. The 128 Mbit chip is meant for bare metal and RTOS applications, with the higher memory chips capable of running Linux at least as well as a repurposed router.

This chip is at the core of Microchip’s ATSAMA5D2 SOM, a system on module that adds power management (that only requires a single 3.3V supply), an Ethernet PHY, and boot memory into a single package that’s effectively as hand-solderable as a QFN package. It’s Linux on a Chip, or at least as close as we’ve gotten to such a concept.

Adding Linux to a project is hard, and while there are modules and systems that can do it, we’re always welcoming more options given to designers. While these modules and systems aren’t exactly cheap compared to a beefy ARM microcontroller — the SIP starts at around $9, the SOM is available for $39 in 100-unit quantities — this price is quite low compared to other Linux-on-Modules available.