Garage Door Opener Used To Automatically Lower A Game Table Top

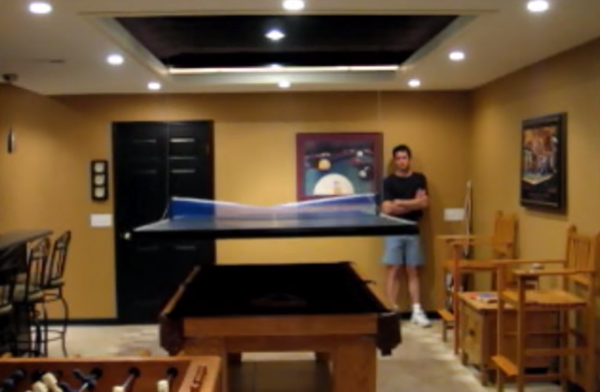
[Lou] is at it again, and this time he wrote in to let us know about his automated ping pong table topper. With no good spot to stash an entire extra table [Lou] decided to take a two in one game table approach and fit the top of the ping pong table to his pool table. A ping pong table top is no small thing though and it turns out the best (or maybe coolest) place to store it is above the ceiling! At the flip of a switch a garage door opener pulls away a section of ceiling tiles and a winch motor lowers the table top into place with two cables.

The system works very smoothly using some pretty easy to find parts. [Lou’s] instructional video (embedded after the break) shows the system in action and explains the concepts behind the automation. We aren’t sure how the winch stops lowering the table, but the ceiling section uses a light switch and spring combo as its limit switch. The only thing really missing is the flashing red light, industrial klaxon, and fog machine needed to compliment the screeching nightmare-howl of that winch motor.

Continue reading “Garage Door Opener Used To Automatically Lower A Game Table Top”

Adding Famicom Audio Channles To An NES Without Messing Up The Console

[Callan Brown] wrote in to show us a really interesting NES audio hack. [Callen] decided that he wanted the full Castlevania III audio experience, which (without modifications) can only be had through the original Japanese Famicom console. [Callen] weighed a few adapter options, and instead decided to come up with his own.

The issue is that the Japanese Famicom and the American NES actually have a different cartridge connector. The change in hardware from a 60 pin to a 72 pin connector added “features” like the 10 pins connected directly to the expansion port (used for stuff like the teleplay modem, who knew). The other two additional pins are used by the annoying 10NES lockout chip. While they were at it, Nintendo decided to route the audio path through the expansion connector instead of the cartridge.

This means that the Japanese cartridges can’t pipe sound to the NES audio channel with just a pin adapter. Good news though, after sourcing a pin adapter hidden inside certain NES games (Stack Up, Gyromite), audio can easily just be pulled from the adapter PCB. This requires the more expensive Famicom Castlevania III cartridge (Akumajou Densetsu). To cleanly route the new audio cable out of his front loading NES [Callan] reuses the sacrificial adapter game’s cart to make some kind of unholy hybrid. To round it off [Callan] also goes over steps to flash a translated ROM to the Japanese game.

What difference could an extra two squares and a sawtooth make? Check out the sound comparison video after the jump! Thanks [Callan].

Continue reading “Adding Famicom Audio Channles To An NES Without Messing Up The Console”

Another Eerily Similar High Power LED Driver Hack

[Maximilian Güntner] dropped us a comment in last week’s globe writeup linking to his own project, which involves a similar high power LED driver mod. This looks like the exact same mod we came up with, and [Güntner] even used the mod to connect a bunch of high power LEDs to a PCA9685 LED driver [pdf]. It’s the same exact concept as Disco Planet!

It should come as no surprise that people have actually been modding high power led drivers in this way for some time. They are a few bucks per handful and take an enormous input voltage range. In [Güntner]’s case he grabbed a bunch of these from Dealextreme.  Actually there are two others on the site, and all three contain comments (dating back a year) with helpful tips on various ways to modify the little PCB.

Our Ebay sourced boards are different though. The boards [Güntner] purchased employ the PowTech PT4115 [pdf] which uses fewer parts and has an easy to follow data sheet. Take, for instance, the pin graciously labeled “DIM” with a little PWM signal next to it. The nerve! The Ebay drivers use the MCP34063 [pdf] which has a much more cryptic data sheet (burned two weeks and several notebook pages to figure out the circuit). Ultimately the two are so similar it makes no difference.

So, if you want to mod some LED drivers on your own, check out the how-to video after the jump. Thanks [mguentner]!

Continue reading “Another Eerily Similar High Power LED Driver Hack”

Disco Planet, A Massive RGBW LED Array In A 6′ Globe

About half a year ago [John] over at Frank’s Kitchens came to me with an idea for a giant lighting project. He had this 6ft diameter aluminum frame globe rescued from the Philadelphia Theater Company and wanted it to be an interactive display of sorts. After a few discussions we got together and somehow managed to order 800 3 watt LEDs in red, green, blue, and white. We had a system that worked great on paper, and managed to get it built by Valentines day for a big show. It failed miserably and hardly even illuminated the LEDs. I, naturally, took this far too personally and set out for a complete redesign, looking in the direction of digitally addressable LED strips.

In addition to building a crazy turbo charged LED array I also spent a lot (a whole lot) of time coding a nice clean fully functioning RGB LED strip controller using an Arduino Pro Mini (5V 16 MHz), the MSGEQ7 audio frequency multiplexer (PDF) , and an IR remote. I plan on using this for other projects so the code can be easily reconfigured to use many different LED strips and a whole slew of IR remotes.

The schematic of the globe is here. The top half  of that schematic be catered to other projects using a variety of pre-built LED strips. The pastebin with code is here,  fastSPI_LED and IRRemote here and here. Some code jockeying was required to get IRRemote.h and FastSPI_LED to play nicely together, so check the code comments.

Continue reading “Disco Planet, A Massive RGBW LED Array In A 6′ Globe”

How Not To Dim EL Panels, TRIACs!

We’ve all been there: an exciting brilliant idea, scratched onto a napkin, hastily plugged into a breadboard, all for naught.  Even the best ideas sometimes suffer from a heavy dose of reality.  [Ch00f] over at ch00ftech recently had a similar experience dimming an EL panel of his using a TRIAC and some clever waveform manipulation. Instead of tossing the parts across the room in a fit aside and moving on he goes into a detailed analysis of what went wrong.

This method differs from the way most EL drivers dim output loads, instead of chopping the output like a PWM controlled LED the TRIAC snips the ends of the waveform and makes an ugly but less powerful output. The issue with this method is that when you cut the waveform during non-zero crossings it causes massive current spikes. These can wreak havoc on a cheap EL inverter and generally cause headaches all around.  [Ch00f ] speculates that his woes may be due to the fact that EL wire is a capacitive load, causing voltage to fall out of phase with the current. This is one of those engineering problems with a thousand and one answers, we can’t wait to see what he comes up with.

Check out the writeup for all the “deets” (as [ch00f] would say) as it is a pretty good primer on TRIAC operation. If there isn’t enough glowy wire in this post you can also check out this sound reactive panel or an informative guide on EL or even more from [ch00f] in general.

DIY Flanagan Neurophone Lets You Hear With Ultrasound

[Andreas] wrote in to let us know about this DIY Neurophone project. Apparently a Flanagan Neurophone uses ultrasound in some manner to transmit audio directly to the body, or nervous system? Needless to say we are a bit skeptical of anyone whose wiki page leads directly to pyramid power. In fact most of the references to this thing start rambling about some pretty pseudo-scientific theories.

At any rate, the schematic is clear and simple enough for anyone who has the parts to easily try.  The only challenge might be tuning the thing with a signal generator or audio feed. So how about it, any one have a TL494 pulse-width modulation controller and want to be a guinea pig?

Bamboo Bike

Reddit user [tkgarrett101] recently did away with expensive exotic materials for his bike frame and opted for a somewhat less processed form of natural building material, bamboo! The bike consists of a regular metal bike frame with a majority of the structural beams cut and replaced with bamboo poles. The bamboo is fit snug first with some expanding gorilla glue then tied in place with  hemp string and fiberglass resin. Instead of running cables along the frame the bike has coaster breaks brakes and a two speed hub, this also preserves the simplistic look of the whole ensemble. [tkgarrett101] says his bike is not so cheap, the overall parts cost was around 800 bucks (USD)! Plus it weighs a whole lot for a fixed gear. Plus the alignment is a bit off on the seat post. Either way this thing would surely turn some heads!

Too rich for your blood? Check out this cardboard bike, or if that green isn’t bright enough for you how about some glowbars for night visibility.

via Reddit