Retrotechtacular: The Apollo Guidance Computer

There is so much amazing technology that came out of the space race. For this week’s Retrotechtacular we’re looking at the guidance computer used in the Apollo program undertaken by NASA in the 1960’s.

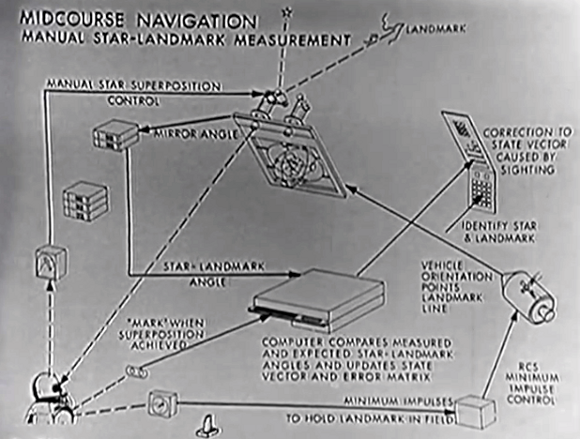
One of the main components of this system is the Inertial Measurement Unit or IMU. That’s a familiar term for hackers who build quadcopters or other devices for which spacial awareness is paramount. In this case the IMU provided critical information about the motion and orientation of the capsule during it’s trip from the Earth to the Moon and back. But it wasn’t just high tech electronics along for the flight. To determine actual position a sextant was used for triangulating position. Yes, this is the same type of measuring device used for centuries. The method of using the sextant is displayed above. The spacecraft was turned until the sextant pointed at a landmark on Earth. The instrument was the adjusted to line up a star as a landmark, then the computer calculated position based on time and the angles of the two points being sighted. There’s a lot more shown in this thirty-minute film including in-depth assembly and testing of the computer components.

Before we point you to a few related articles we’d like to mention that our stash of really cool Retrotechtacular tips is running low. So if you know of some old footage that’s awesome to watch please send us a tip about it.

Now if you can’t get enough about NASA electronics you should check out the LVDC board which [Fran] got her hands on. Also, it’s worth checking out the unbelievable soldering techniques specified in the NASA manual. There’s a pretty good discussion about that going on in the Reddit thread.

Continue reading “Retrotechtacular: The Apollo Guidance Computer”

How FindChips Started As A NASA Engineer’s Hack

A couple of weeks ago I was visiting SupplyFrame to meet the new owners of Hackaday. The CEO, [Steve Flagg] asked me how we can introduce FindChips to the readers. I’m used to people trying to get things on our front page so I had the question ready for him: where’s the hack? Much to my surprise he was ready for me. “What if I tell you that it started as a hack by a NASA Engineer?”

It turns out he was right. He put me in contact with [Randy Sargent], the founder of FindChips.com. If you’ve ever hacked together a script to make your life easier you’ll want to listen to what Randy had to say. You never know when it’ll turn into a full-blown start-up.

Continue reading “How FindChips Started As A NASA Engineer’s Hack”

Jeep Dashboard Display Turned Into A Desk Clock

jeep-dash-display-clock

This display is easily recognizable by the buttons and the outline of a vehicle to the left. It’s a Vehicle Information Center (VIC) from a Jeep Grand Cherokee. [Florlayamp] discovered a row of the vehicles in a junkyard, all with the displays still intact. He grabbed one and turned the VIC into a desk clock. What would you pay for such a fine piece of used electronic hardware? How about six bucks? Yeah!

Getting it running couldn’t be simpler. It’s all set up to be programmed and run on it’s own. A bit of searching around turned up a schematic to figure out which wires are for power. It took some time to figure it out, but the thing draws about 2A so finding a worthy wall wart was a must.

Now that he was sure it would work [Florlayamp] started on the case build. It’s poplar with quarter round to frame the display. On the back you’ll find a single rocker switch.

Usually we see the opposite of this, adding displays to the dashboard instead of salvaging them.


Handmade Stainless Steel Chainmail

stainless-steel-chainmail

We know that armor making is an art form. We know it. Still… it’s really easy to let yourself think that making a chain mail shirt is easy after seeing the skills [KdogCrusader] throws down in this build. His hauberk isn’t quite finished yet, though we don’t blame him from wanting to show off the work having put so much into it.

The process starts with fifty pounds of stainless steel wire. That’s the coil suspended on a rod in the upper left. It’s fed into his hacked together coiling jig where it is wound into coils that set the diameter of the rings (think long springs that aren’t springy). Coils are cut along one side resulting in that mountain of individual rings. From there it’s a matter of interlinking all of the rings. He cut apart an old T-shirt to use as a pattern during the assembly. So far the front and the back are only connected at the shoulders as he has yet to add sleeves and finish the sides.

[via Reddit]

Hackaday Links: September 8, 2013

hackaday-links-chain

“I’m sorry Dave, I’m afraid I can’t open the dorm room door.” Does your dorm room have a peephole? Take [pjensen’s] lead and turn it into a mini HAL 9000 using a red LED.

Mix a little work in with your hobby skills. [Vittore] needed to build a video looper to drive some TV screens for a Hotel contract job. He grabbed a Raspberry Pi and got to work. The final product (translated) even uses a shared folder on the hotel’s network as the source slides.

We’re not sure if anyone noticed last Monday (it was Labor Day in the U.S.).  We had a little fun with coffee themed posts. [Tom] wrote in to remind us about the HTCPCP: Hyper Text Coffee Pot Control Protocol. If you don’t have time to read it all, he suggests you don’t miss his favorite, error code 418.

Maybe funny reading isn’t your thing right now, but we have some more helpful stuff to offer. Check out [John Chandler’s] Commandments for using PIC microcontrollers from a few years back.

[Andy] has some old smart phones which he is using in his projects. His beef with the touchscreens is that there’s no tactile feedback. Since these are going to be dedicated displays he’s outlining the touch controls with tape to let your finger know what it’s doing.

If you’re living in your first home in America there’s a really good chance it’s a 1950’s ranch house considering how many of them were built after World War II. Bring its infrastructure into the information age with a cable retrofit. [Andrew Rossignol] just did so and posted a lot of pictures of the process.

If you liked [Ken Shirriff’s] post about the Sinclair Scientific Calculator we think you’ll love his continuation of a Z80 reverse engineering series.

Use Your New-timey Printer To Make An Old-timey Camera

3d-printed-pinhole-camera

Here’s something to show people who don’t realize the power of 3D printing. This pinhole camera has one moving part which reveals the pinhole, letting in light to expose the 4×5 film inside.

It’s a near perfect roundup of all the qualities a 3D printer has to offer. The build centers around a 4×5 film holder which can be acquired used or as surplus. This drives home the concept of having the power to replace parts (in this case the entire camera) that fit with existing pieces (the film holder). The picture above is big enough that you can see the layers on the pyramid shape, but the structural pieces around the frame also let the uninitiated see that you can print more than just solid blocks. And finally, since it’s up for download on Thingiverse its a good example of how the printing community shares and builds on each others’ work.

Does it take quality photos? We have no idea. So far we didn’t see any example pictures. But really, if you’re looking for top quality you might want to build your own digital camera. Here’s one that uses a 14 megapixel sensor.

We’re Hiring

HaD_help_wanted

The title says it all. We need more writers to keep the fresh hacks coming, now’s your chance to apply for the job.

UPDATE: Thank you for all of the applications. I have made the first round of offers to a select few. Narrowing it down to a handful was difficult as so many highly qualified, avid readers sent in applications. You are still welcome to submit an application which we’ll keep on file, but I don’t anticipate making any more offers at this time.

Continue reading “We’re Hiring”