Penny Auction Hacking; Put On Your Statistician’s Hat

Penny auctions are where you must pay a fee each time you bid. Certainly this alters the behavior of the bidders, but there doesn’t seem to be a lot of info about exactly how. In preparation for an analytics degree, [Jay] decided to study penny auctions and see if he can win a contest based on his findings. Now he’s not necessarily looking to make a living by gaming the auction system. But we were interested to see how he went about getting information, and what he has to say about the results.

Since there really isn’t a large body of data available, he scraped it himself. You’ll want to page through his posts on the topic, but basically he’s using Python on a fast machine. This is made quite a bit easier through the use of Selenium RC, but it also means he’s got a lot of instances of Firefox running to track multiple auctions. Scraped data is stored in CSV files, and posted to his front page daily.

From what he’s captured so far [Jay] suggests that time of day, type of auction, and several other factors dictate when you should bid to attain the best deals.

Embedded Linux Meets Arduino With The Rascal Micro

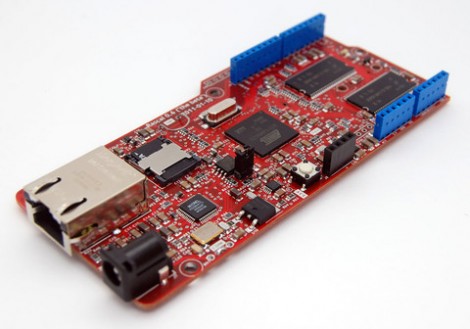
Behold the Rascal Micro. It’s running embedded Linux and has a dual-row of pin headers which probably seem pretty familiar. The idea here is to bring Arduino hardware (ie: shields) to a party with a powerful web server.

The image above is the beta version of the hardware. What’s being shown off in a recent Engadget demo is a version that slides two USB ports in between the barrel jack and the NIC. This makes it easy to jump over to wireless with the use of a USB dongle, or you can figure out what other peripherals you want to include in your project.

The novelty here is that the web server included a built-in editor. So not only can it serve you a webpage to control hardware or display sensor status, but it will let you edit the interface without needing to reflash anything.

The price rings in somewhere around $100-150, and like the popular Raspberry Pi board, you can’t get your hands on it right now.

Raspberry Pi Finds Itself Inside A TRS-80 Model 100

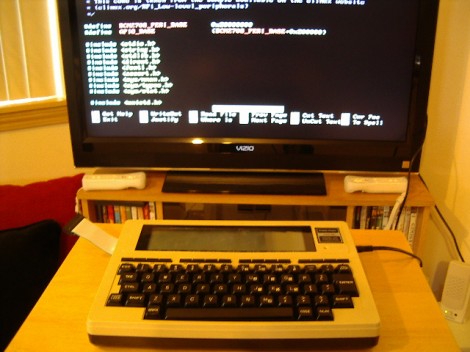
This TRS-80 Model 100 is a lot more powerful than you might think. That’s because [Karl Lunt] is using it as an enclosure for his Raspberry Pi board. Since the ARM-powered device comes sans-enclosure it’s fun to see a retro choice like this one. And having had to go out and buy a USB keyboard to use our own RPi, we appreciate [Karl’s] solution for using the original keyboard as an input device.

Above you can see that he’s using an LCD tv as the display. For now that connection is made using the composite video output, which explains the fuzzy image. To the right of the TRS-80 a standard wall wart connects to the barrel jack to provide power. [Karl] scrapped a USB cellphone charger in order to connect from the barrel jack to the micro-USB jack on the Pi board. The ribbon cable to the left lets him get at the I/O header without opening the case.

In order to use the keyboard he patched into it with a Teensy board. That connects to the USB port on the RPi, sending HID keyboard commands based on what it received from the user. We like this option as it give you the ability to pre-process keystrokes (ie: you can code your own custom macros that the Teensy will listen for). Right now the Model 100’s LCD screen isn’t hooked up but he may add that in the future.

Volumetric Display Looks Like A DaVinci Sketch

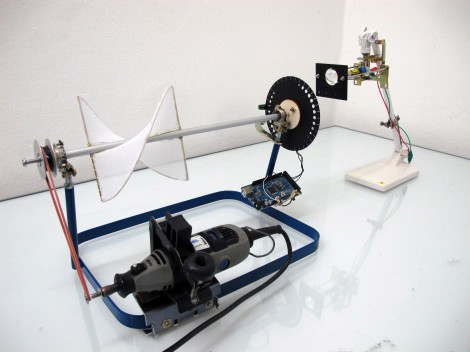
This volumetric display really shows a lot of potential. And it has just the right balance of simplicity and ingenuity. The rig is being developed by [Michel David] and involves a screen shaped like a helix, and a laser which shines through an optical filter disk.

The moving parts of the device are mounted on the same shaft, which is spun by a belt system connected to a Dremel tool. Since the screen and the information disc are mounted on the same shaft, one part of the synchronization process is already taken care of. You can see the separate stand for the projector, which is a laser in this case but is designed to work with other light sources as well. Since the projection surface is moving towards and away from the projector, a laser is preferrable because of focus issues. Unfortunately [Michel] has been having some issues with switching the diode at high enough frequencies. Still, we think the results in the clip after the break are marvelous.

As far as hardware is concerned, this is a lot simpler than trying to spin a large LED matrix.

Continue reading “Volumetric Display Looks Like A DaVinci Sketch”

Using Printf-style Output To Debug Arduino

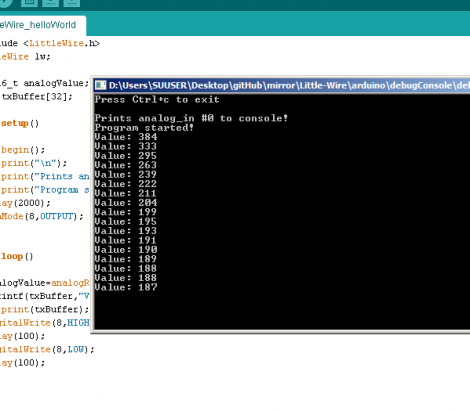
First off, if you’re looking at that title and thinking it’s flame-bait, please hold off. What [Ihsan Kehribar] is working with is another way to get some feedback for what’s going on with your Arduino project. Or really any AVR project that uses an ISP connection. He’s added text output for AVR programs similar to the printf function used for a lot of non-embedded C development.

So, we’d bet you’re asking yourself why he’s not just using outright debugging? The AVR line supports many different types of it. But that can be complicated, and usually requires a proper programmer. If you just want to watch to see what values are changing, and when functions are being executed, this isn’t a bad solution. He uses the computer to continually poll the chip. Whenever the sketch calls the his print library it answers back with the payload to be displayed in the terminal. The overhead shouldn’t be too high, and if you’re smart about it this can be flagged as a debug option at the top of the program file.

MITx 6.002x Wraps Up; Here’s A Review From One Of The Students

[Jorge] just finished MITx 6.002x with the fine score of 99.1%. Congratulations! We just finished reading through this review of his experience (translate) with the 14-week class and it sounds like the program is extremely well executed. For those that don’t remember, this is an intro to circuits and electronics course offered at the Massachusetts Institute of Technology. Except 6.002x is free to all as an online course (but if you actually want a certificate a fee may be involved).

Above is one of the many screenshots which [Jorge] took of the student web interface. It looks great, and offers pretty much everything you need to complete the class. The textbook, which runs at least $65 for a paper copy, is available through the web interface as part of the course. The labs even include web demos you can use to simulate circuits and probe and measure the resulting signals and wave forms. If you have questions there is access to the teachers, but also a set of forums where you can work with other students.

Perhaps most interesting is [Jorge’s] assessment of the time you will spend working on the class. He thinks that if you’re already familiar with electronics the work can be complete in about one afternoon per week. Scheduling is flexible — tests are available for one week, but once you start taking one it must be completed in 24 hours.

He believes this will be offered again in the fall so keep a look out for registration to begin.

[Thanks Pan]

Hands On With Raspbmc

Have you heard of the Raspberry Pi? Surprisingly enough, they’re starting to trickle into the hands of thousands of hackers, and we were fortunate to get our hands on one (second-hand since we didn’t jump in time for the initial preorder). We’ve longed for a tiny embedded option for running XBMC and this is one of the best opportunities we’ve seen yet. The Raspbmc project, created by [Sam Nazarko],  is tailored to getting XBMC on the Raspberry Pi just a few minutes after it arrives in the mail. And that’s exactly what we did.

If you’re familiar with writing an image to an SD card (or any device for that matter) this is a simple process. Raspbmc is distributed as a single image file which starts up the RPi hardware, then copies itself to RAM while it downloads and installs the filesystem for the distribution. Once the card is flashed just pop it in, power up, and wait about 20 minutes until XBMC shows up on the screen. After that it’s a quick boot each time.

The good news is that its works. XBMC runs pretty fast, with just a hint of lag when loading some menus. We felt at home using the confluence skin we’re familiar with, and had no trouble setting up our samba shares to the video library. The one problem is that it won’t play any of the video files we have on hand. None of them. So we downloaded the Big Buck Bunny trailer. It wouldn’t play that either. This is all a codec issue. Although the chip used on the RPi is capable of hardware decoding MPEG2 video, the foundation didn’t license that ability. So it can’t play that format, period. With the movie trailer we tried the OGG format and that’s not currently supported, but the MOV version did play, in full 1080p without trouble.

So the verdict is, if you’re looking to get an RPi just to run XBMC you should wait. So far the package is promising. But we record ATSC video, all of which is MPEG2. If you use MakeMKV to store your DVDs on a server, that also uses MPEG2. Of course there is the option of transcoding everything. But you’ll want to be careful if you have other XBMC frontends which may not be able to play alternative encodings.