Reverse Engineering Shopping Cart Security

All this talk about 555 timers is causing projects to pop out of the woodwork like this one that reverse engineers a shopping cart security mechanism. The wheel seen above listens for a particular magnetic signal and when encountered it locks down the yellow cowl, preventing the wheel from touching the ground and making the cart very hard to move.

[Nolan Blender] acquired one of these wheels for testing purposes and he’s posted some details about the hardware inside. But the first thing he did was to put together some test equipment to help find out details about the signal that trips the mechanism. He connected a coil to an audio amplifier and walked around the market looking for strong signals. Once he found a few strong bursts with that equipment he grabbed an oscilloscope, hooked it to the coil, and made some measurements. He found an 8 kHz signal at a 50% duty cycle at 30 ms intervals (it would be hard to make a better case for why you need an oscilloscope).

With the specs in hand, [Nolan] grabbed two 555 timers, an audio amplifier, and a 200 turn antenna around a ferrite core to build his own locking mechanism. If you’re ever stopped short in the middle of the market, just look for the hacker at the end of the aisle holding the homemade electronics.

[Photo source]

[Thanks Colin]

Kindle 3 Powers This Diy LED Light

ePaper displays are easy on the eyes because there’s no flickering backlight to put strain on them. This is great until you’re trying to read in a dim environment. Of course Amazon will sell you a backlight that’s powered from the reader itself if you’re willing to pay. [Txoof] thought the price was a bit too high so he built his own version.

There are two pockets in the top of the Kindle reader for hooks to grab onto. Each has an electrical contact in it and together they provide about 4V of power. To patch into that source [Txoof] cut his own hooks from brass stock and mounted them onto a piece of basswood. He then cut and bent a hood from more of the brass stock to house the LEDs. A series of three of the white diodes draw their power from the hooks and shine onto to the display. As you can see this works just fine, but could benefit from just the right diffuser.

Fabric Speaker

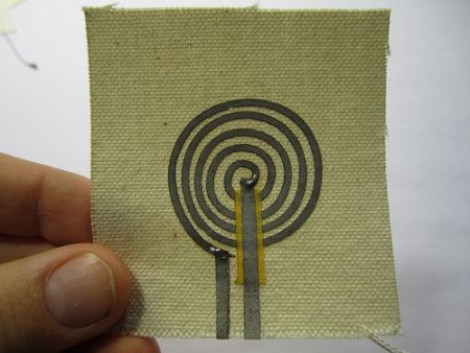
The theory behind speaker operation is pretty simple. There’s a coil that is attached to some type of diaphragm and a permanent magnet. When electrical signals pass through the coil a magnetic field is generated, and that field’s interaction with the permanent magnet causes the diaphragm to vibrate and create sound. But we’ve always assumed that the vibrating material must be stretched tight for this to work. [Hannah Perner-Wilson] proved us wrong by making this speaker out of fabric. It uses conductive tape as the coil on a heavy piece of canvas. The permanent magnet is resting on a table and for the demonstration the fabric is just laid on top.

Check out the video after the break to hear the sounds generated by this device as well as a design that uses conductive thread instead of tape. This gets us wondering if what we’re hearing is the result of the magnet vibrating against the tabletop? Let us know your thoughts, and if you’ve got any information about the paper-backed circuit (seen at 0:04 into the video) driving the speakers we’d love to hear about that too.

Continue reading “Fabric Speaker”

Layering Pinball Audio Using Parallel WAV Shields

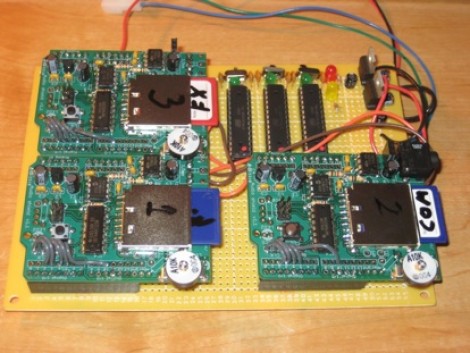
[Ed Zarick] is preparing his pinball project and wants to have authentic sound to go with the game play. The game is modeled after NBA Hangtime and in addition to music he also needs a wide range of sound effects to beef up the experience. To make this all happen at once he developed a set of Arduino WAV shields controlled by an Arduino Mega.

As you can see above, there are three ATmega328 chips which run the Arduino boot loader and each interface with one of the three green WAV shields. That set of chips listens for commands over and i2c protocol, and once they receive instructions they play can play the chosen file without affecting the other shields.

But to have the authentic sounds you first need to acquire the audio samples. [Ed] grabbed a ROM of the original video game and dumped all of the audio samples. From there it was a chore to listen to and catalog the sounds for SD card playback with the pinball version of the game. But it’s well worth the effort as the sound will end up tying the whole experience together.

Continue reading “Layering Pinball Audio Using Parallel WAV Shields”

All-band Receiver Hides In Plain Sight

This handheld radio has a little secret. You’re not going to be able to listen to Limbaugh since the original FM tuning circuit has been removed and replaced by a diode detector. Now [Miguel A. Vallejo] a discreet way to look for interesting radio signals in public.

The first step that he took was to remove the circuit board from the case and depopulate the tuning circuit while leaving the audio amplifier hardware. Next he referenced a proven design and built the diode detector circuit on a piece of protoboard. Finally he patched the new circuit into the original audio amplifier (seen in the image above) and put everything back in the case. Now he can listen in on data burst from a keypress on a computer keyboard, RF data communications, and slew of other noise sources.

This would be really handy for tracking down the electrical noise that’s screwing up your project.

[Thanks Superlopez]

Hackaday Links: February 27, 2011

Odd project materials

[Juliansr] wrote in to tell us about a site that sells bendable, moldable, stretchable, and other ‘able’ materials you might want to use in your next project.

(2 * 9V) = Flashlight

[Lasse] built a flashlight with two 9V batteries. One is a normal battery, the other has been gutted and is used as a connector and enclosure for an LED and resistor.

Ghetto flat screen mount

Don’t despair if you can’t afford a mounting bracket for that new flat screen. All you really need is a few screws and some garbage ties.

Tennis ball stand

This crafty solution to charging a phone makes sure that you’re also able to read the display. Since tennis balls lose their pressurization over time it’s a good use for the flat orbs.

Message visor

Get your message across while blocking your view of… everything with this message displaying visor. It’s like a Daft Punk helmet without the helmet.

Analog Robotic Concepts

Everyone’s getting on board with the 555 timer projects. But [Tom] didn’t just come up with one project, he shared a slew of ideas related to analog robotics. They’re center around servo motor control. You can see in the video after the break he has a pleasing way of sharing a lot of details while also making an easy to view demonstration video. He’ll put up a schematic for about one second and then move on, saving those that don’t care about the details by not droning on.

The first schematic that flashes by is the main circuit for controlling the servo motor. The rest of the concepts build from this circuit, using light, sound, flex, and other sensors as inputs. For instance, the setup above is using a light sensor. When the ball blocks the light the servo moves that vertical rod hitting it out of the way. When it swings back the process repeats. It’s striking how lifelike the reactions are, reminding us of insect movements. But this is really just the tip of the iceberg as he’s got a lot of future video ideas that we can’t wait to see.

Continue reading “Analog Robotic Concepts”