The Wonderful Scent Of Etching Pi On Pie For Pi Day

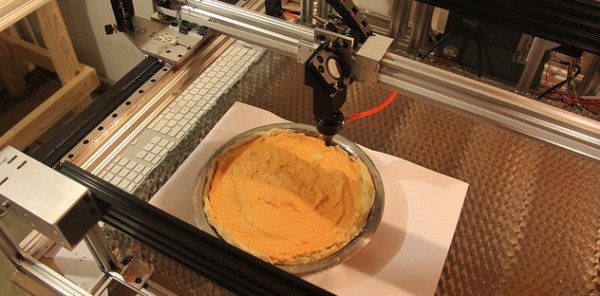
My “owl-hours” these last few months have been buried in the garage, chopping down aluminum extrusions for a homebrew laser cutter. Nevertheless, it’s time-well-spent. With the skeleton of the gantry now in place, what better way to give it a test-run other than engraving a few sweets?

(Goggles on, folks!)

Yesterday marked this year’s Pi Day, a time to commemorate our commitment to nerdom. I’m no baker; so when a couple friends put me to work on the assembly line of Pi-day pie-making, I couldn’t resist giving one a special touch.

This beloved journey towards building a laser cutter isn’t quite done, but it’s well on its way! Without fumigation, my only exceptions for cutting materials at this stage are paper, and food that smells great after burning it.

Without further ado, I’m honored to serve up a few digits of Pi-on-Pie.

To make the pattern, I generated a DXF vector file with Solidworks, and produced GCode with dxf2gcode. Admittedly, I wholeheartedly believe that this job better lends itself to GCMC, the open source GCode Metacompiler; but, sadly, time was against me. My only true regret: no raspberries in this pipeline.

From Wii-Motes to 3D sintered objects, we’ve seen some bizarre and fantastic objects enter and exit the hood of many laser cutters. If you’ve got a tale behind your build, we’d love to hear about some of your adventures. Join us on the IO and tell us your story as it happens!

(Ok, goggles off.)

Continue reading “The Wonderful Scent Of Etching Pi On Pie For Pi Day”

Aligning Invisible Lasers On-the-cheap

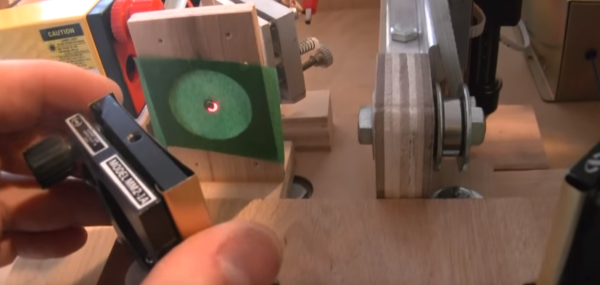
Lining up the beam from your homebrew (or retrofitted) laser cutter doesn’t come without its challenges. For instance, how do I use my remaining eye to align an invisible beam that has enough power to burn through some objects in its path? Some of us will go through the extra hassle and expense of mixing in a visible guide that traces the path of the CO2 laser. For the penny-pinchers out there, though, [Stephen] has us covered with an inexpensive technique that will cut you down by only a few strips of masking tape.

Stephan’s technique is simple, but elegant. He covers each mirror with tape, fires the laser, and leaves a burn mark, working his way from the last mirror that the laser hits to the first. With a burn mark on each mirror, and one through a guide made from a sheet of plywood, [Stephen] has a pretty good idea where the native direction of the beam is headed. He then swaps a red dot laser in to line up with the burn marks, and then aligns the mirrors using visible, and safe, light. Phew! Now that’s a lot easier than iteratively firing the beam and replacing the tape on the mirror each time we want to tweak the mirror alignment.

With all that burnt masking tape, the process can get a bit smelly. Nevertheless, we’ve filed this one away for later when we start getting that itching, burning sensation that kicks us into building our own homebrew laser cutter.

Continue reading “Aligning Invisible Lasers On-the-cheap”

Philip Friedin Takes Us On A Deep Dive Into His OSHChip

Once a month, Bay-area hackers and engineers-by-night gather in the grand office of our evil overlords (Supplyframe) and take us on an adventure in hardware. This past month, [Philip Friedin] gave us the hands-on tour of the OSHChip, a project we’ve seen floating around our pages for the last year. OSHChip might look like another open source development board, but the DIP package and all the packaged features are telltale signs that OSHChip is the offspring of a seasoned double-E. Scroll down to watch his presentation in full.

Continue reading “Philip Friedin Takes Us On A Deep Dive Into His OSHChip”

SensorTape Unrolls New Sensor Deployment Possibilities

An embedded MEMS sensor might be lots of fun to play with on your first foray into the embedded world–why not deploy a whole network of them? Alas, the problem with communicating with a series of identical sensors becomes increasingly complicated as we start needing to handle the details of signal integrity and the communication protocols to handle all that data. Fortunately, [Artem], [Hsin-Liu], and [Joseph] at MIT Media Labs have made sensor deployment as easy as unraveling a strip of tape from your toolkit. They’ve developed SensorTape, an unrollable, deployable network of interconnected IMU and proximity sensors packaged in a familiar form factor of a roll of masking tape.

Possibly the most interesting technical challenge in a string of connected sensor nodes is picking a protocol that will deliver appreciable data rates with low latency. For that task the folks at MIT Media labs picked a combination of I²C and peer-to-peer serial. I²C accomodates the majority of transmissions from master to tape-node slave, but addresses are assigned dynamically over serial via inter-microcontroller communication. The net effect is a fast transfer rate of 100 KHz via I²C with a protocol initialization sequence that accommodates chains of various lengths–up to 128 units long! The full details behind the protocol are in their paper [PDF].

With a system as reconfigurable as SensorTape, new possibilities unfold with a solid framework for deploying sensors and aggregating the data. Have a look at their video after the break to get a sense of some of the use-cases that they’ve uncovered. Beyond their discoveries, there are certainly plenty others. What happens when we spin them up in the dryer, lay them under our car or on the ceiling? These were questions we may never have dreamed up because the tools just didn’t exist! Our props are out to SensorTape for giving us a tool to explore a world of sensor arrays without having to trip over ourselves in the implementation details.

via [CreativeApplications]

Continue reading “SensorTape Unrolls New Sensor Deployment Possibilities”

Plastic Battlebots Might Bite Your Hand Off

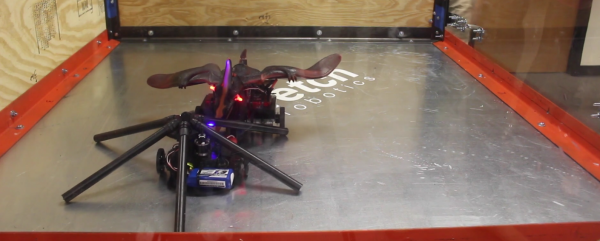
The folks at Fetch Robotics do love a good game of combat robots. Time is tight these days, however, so putting together a good ol’ 220-pounder for Robogames is a dream few of us can realize. Instead, the Fetch team hosted their own Plastic fantastic battlebots competition to blow off some steam, and the results are in!

Battlebots enter the ring built from a frame of entirely plastic parts and weighing a humble 3lbs. Just like Battlebots and Robogames, they’ll follow a 2-minute episode of hack-and-slash after which judges determine the winner. Bots were forged from everything you might see in arms reach of your local hackerspace: pvc pipe, acrylic sheets, and a few 3D-printed components. On the menu of shredded plastic we have everything from classic wedges and spinners to a giant spinning rubber pterodactyl strapped onto the body of an RC car. (Time is tight, right?)

While 3 pound plastic fighters might not seem devastating, don’t underestimate the LiPo batteries and brushless motors that are running under the hood. These competitors can easily heave each other across the ring. We’ve definitely seen mini Battlebot tournaments before, and we’re thrilled to see them on the rise in everyday places. Better start getting your materials ready. Who knows? Mini Battlebots might be coming to an alley near you too.

Continue reading “Plastic Battlebots Might Bite Your Hand Off”

Anti-Cogging Algorithm Brings Out The Best In Your Hobby Brushless Motors

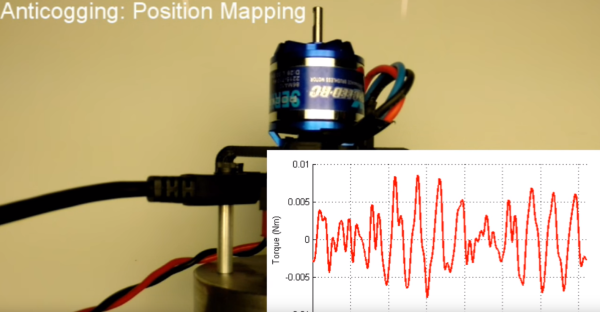
Cheap, brushless motors may be the workhorses behind our RC planes and quadcopters these days, but we’ve never seen them  in any application that requires low-speed precision. Why? Sadly, cheap brushless motors simply aren’t mechanically well-constructed enough to offer precise position control because they exhibit cogging torque, an unexpected motor characteristic that causes slight variations in the output torque that depend rotor position. Undaunted, [Matthew Piccoli] and the folks at UPenn’s ModLab have developed two approaches to compensate and minimize torque-ripple, essentially giving a cheap BLDC Motor comparable performance to it’s pricier cousins. What’s more, they’ve proven their algorithm works in hardware by building a doodling direct-drive robotic arm from brushless motors that can trace trajectories.

Cogging torque is a function of position. [Matthew’s] algorithm works by measuring the applied voltage (or current) needed to servo the rotor to each measurable encoder position in a full revolution. Cogging torque is directional, so this “motor fingerprint” needs to be taken in both directions. With these measured voltages (or currents) logged for all measurable positions, compensating for the cogging torque is just a matter of subtracting off that measured value at any given position while driving the motor. [Matthew] has graciously taken the trouble of detailing the subtleties in his paper (PDF), where he’s actually developed an additional acceleration-based method.

Hobby BLDC motors abound these days, and you might even have a few spares tucked away on the shelf. This algorithm, when applied on the motor controller electronics, can give us the chance to revisit those projects that mandate precise motor control with high torque–something we could only dream about if we could afford a few Maxon motors. If you’re new to BLDC Motor Control theory, check out a few projects of the past to get yourself up-and-running.

Continue reading “Anti-Cogging Algorithm Brings Out The Best In Your Hobby Brushless Motors”

The Triumph Of Open Design And The Birth Of A FormLabs Aftermarket

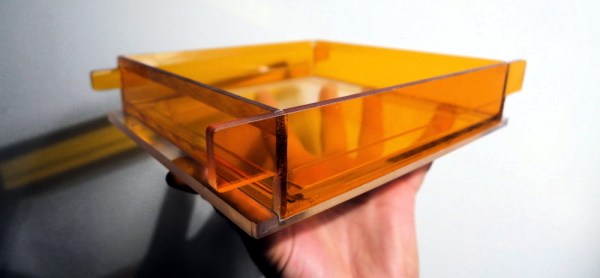
Whilst designing hardware, it’s easy to shut the doors, close the blinds, and bury ourselves deeply into an after-hours design session. Although it’s tempting to fly solo, it’s likely that we’ll encounter bugs that others have handled, or perhaps we’ll realize that we forgot to add a handy feature that someone else could’ve noticed before we sent the darned PCB files out for fab. All that said, if we probe the community around us and ask for feedback, we can produce a project that’s far more functional and feature-complete in less time than if we were to design solo. Who knows? With enough eyes giving feedback on your project, maybe others will get excited enough to want one for themselves! [Andrew Werby] and [Zak Timan] on the FormLabs forums did just that: through months of iterative design and discussion on the FormLabs forums, they’ve created the first 3rd party glass resin tank that’s altogether sturdier, longer-lasting, more scratch-resistant, and less distorting than the original resin tank. And guess what? After months of trials through a few brave customers, you too can be the proud owner such a tank as they’re now up for sale on [Zak’s] website.
Continue reading “The Triumph Of Open Design And The Birth Of A FormLabs Aftermarket”