High Altitude Glider Will Be Dropped From A Balloon!

[House4Hack] and [HABEX] have teamed up to design and build a glider system that can be taken up 30-40km via a weather balloon, dropped, and flown home via FPV.

Of course, this has been done before, but you know what, it’s such a cool experiment, and so few people have done it… who cares! The goal is to hit at least 20km altitude, hope for 30km, and if possible — 40km would break records. For reference, the one we linked made it 33km up.

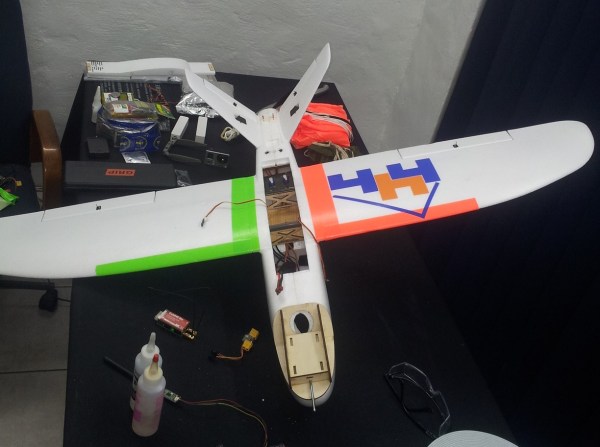
The plane is a Mini-talon V-tail, which was donated to them by their local hobby shop as a sponsorship. It features an ArduPlane Autopilot module, a 1.2GHz video transmitter, a long range 433MHz receiver for the control signal, and a telemetry data link at 433MHz connected to the ArduPlane. Two GoPro cameras make up its eyes, and it also has a custom release mechanism for letting go of the weather balloon.

Continue reading “High Altitude Glider Will Be Dropped From A Balloon!”

Electric Go-Kart Made From Off The Shelf Components

Eletctric go kart
What would you do with a catalog of parts and a nice budget? [Ben Rothschild] decided to build an electric go-kart from scratch, for a contest he’s trying to win.

He designed the entire go-kart in 3D CAD using off the shelf components to speed up assembly. The frame is made of aluminum extrusion with t-bolt brackets, and he’s using modified FIRST Robotics wheels with standard #25 chain and sprockets.

Two 1850W Turnigy SK3 brushless motors make up the drive system, equivalent to almost a 5HP engine — except with a constant torque profile, meaning it’ll have no problem going up hills at 3km/h or 30km/h, no gearing necessary! To power the beast he’s using four hard-shell LiPo batteries (4S1P), which are rated for 14.8V and 5Ah. Two el cheap-o 24V 500W speed controllers (slightly concerning) provide the control system, which he may plan to upgrade in the near future.

The test drive video is a bit short, but it looks like with a bit more work this go-kart could have a lot of potential!

Continue reading “Electric Go-Kart Made From Off The Shelf Components”

Popmaskinen — An Electromechanical One Man Band

one man band

The Stockholm Mini Maker Faire 2014 has just finished up, and [Johnny Eriksson] was awarded the Maker of the Year award for his very impressive electromechanical one man band.

As a musician/electrician/furniture carpenter, [Johnny] has quite a few skills — and he wanted to try putting them altogether for a project. He calls it the Popmaskinen (the pop machine).

Using MIDI keyboards, buttons, and knobs, the Popmaskinen translates digital outputs to physical instruments controlled by various electromechanical components. One of our favorite parts is the guitars, which use solenoids to strum, and even more solenoids to squeeze various cords on the pair of guitars.

Continue reading “Popmaskinen — An Electromechanical One Man Band”

Isoscel-Ease Drawing Robot Is Mesmerizing

Isoscel Ease Drawing Robot

Drawing is difficult for a lot of people… So, why not build a robot to do it for you? [Darcy] had an idea for a rather unique drawing robot — he calls it the Isoscel-Ease.

Instead of using a boring XY gantry, a deltabot, or using a scissor linkage (actually that one is pretty cool!), [Darcy] decided to try harnessing of the power of triangle geometry! As you can probably guess, the linkage forms an isosceles triangle, hence the name. A pair of stepper motors increases and decreases the odd side of the triangle, allowing for a full range of continuous inky movement (there’s no pen actuator) over the page.

It’s a very cool little drawing robot, and it was completely designed in SketchUp — He has lots of photos of the build process and example drawings on his site — But don’t forget to stick around after the break to see a video of it in action!

Continue reading “Isoscel-Ease Drawing Robot Is Mesmerizing”

Candle Powered Fan Keeps You Cool Using A Thermoelectric Generator

This is a great example of using a thermoelectric generator for a project. [Joohansson] made both a functional, and aesthetically beautiful fan using components from a computer.

Thermoelectric generators (TEGs for high temperatures, and cheaper TECs for lower temperatures) are also called peltier elements, which look like small square pieces of ceramic with two wires sticking out of them. If you supply power to it, one side will become hot, and the other cold. The TECs [Joohansson] is using want a temperature difference of 68C between either sides. They are typically used for cooling electronics and even some of those cheap mini-fridges will make use of one with a giant heat sink on the hot side.

In addition, they can be used as an electric generator, thanks to the seebeck effect. If you can create a temperature differential between the two sides, you can generate electricity. Using a CPU heatsink, cooler, and fan, [Joohansson] was able to power a small DC fan using only a candle. It’s a brilliant demonstration of the seebeck effect.

Continue reading “Candle Powered Fan Keeps You Cool Using A Thermoelectric Generator”

A Levered Light Switch Even Fido Can Operate

Dog Light

We love hacks that make a difference in people’s lives. Service dogs can make a huge difference in a physically disabled person’s life, and while they can do a lot of things, dogs aren’t the greatest at flipping light switches. So a team of industrial design students from Ghent, Belgium decided to try finding a solution.

Their case study was for a young woman named [Heleen Bartsoen]. She has a very smart white golden retriever named [Gyproc] who is very good at picking up commands, and is a very careful and cautious service dog. She has an IKEA lamp with a foot switch that neither she or her dog can press.

The team quickly got to work and decided to design a lever to give the dog (or Heleen!) some mechanical advantage to actuate the switch. Having access to a laser cutter, they designed the lever to be cut out of plywood for easy assembly. It pivots around a wooden dowel, and they’ve filled a compartment of the base with cement to keep it stationary when being used.

Continue reading “A Levered Light Switch Even Fido Can Operate”

Catching Drops Of Water With LEDs

rig_circuit
Ever wonder how they capture seemingly perfectly timed photographs of water droplets? Most of the time it’s done by using an optointerrupter whereby it detects the droplet falling and then triggers a light source a few milliseconds later with your camera ready and waiting.

This is typically done with something called an air gap flash, which is usually rather expensive or difficult to make, but [Michal’s] figured out another easier way suitable for some applications — using an array of LEDs to illuminate the scene.

He’s got a IR diode, a photo-resistor, a few spacers, some plastic and  a bunch of hot glue to make up his optointerrupter. When the droplet passes through the IR beam it breaks the signal from the photo-resistor which then triggers his ATmega48P. It waits 80 milliseconds (he timed it out) and then turns on the LEDs for approximately 50 microseconds. Meanwhile his camera is watching the whole event with a shutter-speed of a few seconds.

This works because LEDs have rise and fall times that are much shorter than a traditional camera flash — normal flashes light up for 1-2 milliseconds, as opposed to this 50 microsecond LED flash. Just take a look at some of the pictures!

Continue reading “Catching Drops Of Water With LEDs”