Aluminum Bitcoin Keychain

mVCyX2K

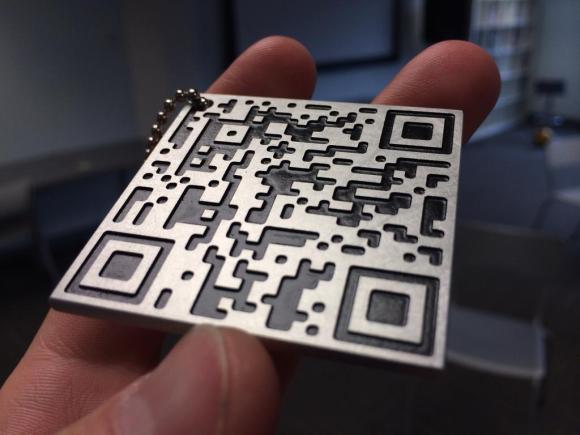
Here’s a cool way to bring a physical presence to your Bitcoins: a custom CNC milled QR code Bitcoin address!

[ch00f], one of our occasional writers here at Hack a Day, has just finished this slick aluminum Bitcoin QR code keychain. He started by creating a vanity Bitcoin address using a program called OCLVanitygen, consisting of his dad’s first initial and last name at the beginning, followed by a random string of numbers. It only took his Radeon HD6790 6 hours to solve, which amounted to approximately half a trillion guesses in order to find the address! 

He then took his shiny new Bitcoin address and created a QR code from it using an web-based generator. [ch00f] then increased the resolution of the image in Photoshop and imported it into a CNC program called CamBam. A converted CNC Taig mill got to work tracing out the code with a 0.049″ carbide end. The total milling time was just over 2 hours. A bit of black spray paint, some sanding, and a few layers of clear coat later and the keychain is done!

[via Reddit]

A PC Rig That Belongs On The Wall Of An Art Museum

When Overclock.net user [Show4Pro] decided to upgrade his “old dusty rig”, he eschewed the conventional PC form factor and instead built an incredibly sexy custom wall-mounted case.

The six sticks of RAM, quad HDD/SSDs, and dual Radeon HD7970s are enough to make all but the most hard core gamer blush, but that was only the beginning here.  Using a Dremel tool, Show4Pro cut the frame from a piece of hardboard and coated it with a mock-carbon fiber vinyl sheet.  This backdrop acts to both hide the (many) cables and provide structural support to the components.  Custom light guides cut from an acrylic sheet are back lit with LEDs and serve as a border for each of the components.

Laying all of the boards flat on the frame required the use of PCIe risers to move the video cards away from the mother board.  Long PCIe connectors are very susceptible to EMI though, and Show4Pro ran into a few stability problems that he eventually had to resolve with some high-end shielded risers.

Besides that one minor hiccough, the project went off without a hitch and it looks like his 100+ hours of work have really paid off.

Via Reddit.

Gizmo Board, A Tiny X86 Dev Board

Gizmo

With the Raspberry Pi and sever other ARM dev boards seeing their time in the lime light, it’s no surprise other chip manufacturers would want to get in on the action. AMD is releasing a very tiny x86 dev board called the Gizmo, a four-inch square board that shrinks a desktop computer down to the palm of your hand.

The Gizmo is powered by a dual-core x86 Brazos CPU running at 1 GHz with an included Radeon HD 6250 graphics engine. Also on the board is 1GB of DDR3 RAM, a SATA, Ethernet, USB, VGA, Audio, PCI and PCIe ports, and a ton of GPIO pins that include ADCs and DACs. All this in a four-inch square package that boasts about twice the performance of a Raspberry Pi.

While the price of the Gizmo – $200 for an explorer kit – will probably preclude it from being as popular as a Raspberry Pi or other ARM board, sometimes you just need an x86 platform to do the job. With the powerful graphics potential of the Gizmo, we could easily see this board being used in a few computer vision or autonomous robot builds.

STM32 Driving A PCIe Video Card

[Gpuhackr] chose his username to explain exactly how he spends his time. For instance, here he’s using an STM32 Discovery board to drive an AMD Radeon HD 2400 graphics card. The ARM microcontroller isn’t actually using the PCIe interface on the card. Instead, [Gpuhackr] has patched into the debugging interface built into the card itself. This isn’t quite as straight forward as it sounds, but if you do the wiring carefully it’s a pretty intersting way to connect an ARM to an LCD monitor.

This project would be almost impossible if it weren’t for the open source code which AMD has released. This lets him implement the card’s 3D rendering features. The demo directly programs the UVD Xtensa CPU which is on the video card. It draws a cube with color gradients on each side. The cube spins while the debug information is overlaid on the screen. In this case the ARM chip/board is really being used as a programmer to upload some custom firmware. But we think a real code-ninja could implement a communications protocol to open up a simple way to drive the card in real-time.

[Thanks uMinded]

Paddle Controller For GPU Overclocking

[Fred] likes to squeeze every cycle possible out of his graphics card. But sometimes pushing the clock speed too high causes corruption. He figured out a way to turn a knob to adjust the clock speed while your applications are still running.

The actuator seen above is a Griffin Powermate 3.0. It’s a USB peripheral which is meant to be used for anything you can imagine. [Fred] uses an AutoHotKey script that he wrote to capture the input from the spinner, process that information, then adjust GPU clock speed in the background. Since the clock on his ATi Radeon 5800 can be adjusted using the AMD GPU clock tool, it’s an easy choice for this application. Now better graphics are at the tips of his fingers. See for yourself in the video after the break.

Of course if you don’t want to shell out for the fancy hardware you could always build your own paddle controller.

Continue reading “Paddle Controller For GPU Overclocking”

Hacking 14 Year Old Power PC Mac Back To Life

For a while now I have been battling a dying 2.6Ghz dual core computer, but due to laziness and budget I just let it ride. At first it would occasionally crash in games, then it got to where it would crash during routine activities. After a year of this it would nail 105 degrees C in like 20 seconds and that is where the drama starts!

I threw my 2ghz “electronics” computer into my main machine’s case and used that for a few months. It’s motherboard had suffered from every electrolytic capacitor on it being puffy, but it has worked fine for nearly 5 years. I was surprised by the sound of what ended up being 2 caps blowing off of the geforce 7600 video card. In shock and excitement I removed the blown caps, slapped her back in and got another 4 months out of it before 2 more capacitors blew and took out a voltage regulator (and who knows what else with it).

Only armed with the craptop, I was stuck in a pickle! Then a co-worker came up to me and said “hey man you want this mac I only want its zip drive”. Well of course, going bonkers without my avrgcc, datasheets, and calculators, I took on the 14 year old Apple Power Macintosh 9600/300 as my bench machine, and I will now show you how I turned it from a novelty relic to a daily useful machine after the break.

Continue reading “Hacking 14 Year Old Power PC Mac Back To Life”