Hackaday Podcast Episode 264: Cheap Minimills, 65-in-1 Electronics, And Time On Moon

It was Dan’s turn behind the mic with Elliot this time as we uncovered the latest from the world of hacking, and what an eclectic mix it was. It was slightly heavy on machining, with a look at mini-mills that are better than nothing, and a DIY DRO that’s A-OK. We also kicked the nostalgia bucket over — whatever that means — and got a new twist on the old “65-in-1” concept, found hidden code in 80s music, and looked at color TV in the US and how it got that way. We’ve got ample alliteration about grep, thoughts about telling time on the Moon, and what does Canada have against the poor Flipper Zero, anyway?

Grab a copy for yourself if you want to listen offline.

Continue reading “Hackaday Podcast Episode 264: Cheap Minimills, 65-in-1 Electronics, And Time On Moon”

Open HT Surgery Gives Cheap Transceiver All-Band Capabilities

Watch out, Baofeng; there’s a new kid on the cheap handy talkie market, and judging by this hardware and firmware upgrade to the Quansheng UV-K5, the radio’s hackability is going to keep amateur radio operators busy for quite a while.

Like the ubiquitous Baofeng line of cheap transceivers, the Quansheng UV-K5 is designed to be a dual-band portable for hams to use on the 2-meter VHF and 70-centimeter UHF bands. While certainly a useful capability, these bands are usually quite range-limited, and generally require fixed repeaters to cover a decent geographic area. For long-range comms you want to be on the high-frequency (HF) bands, and you want modulations other than the FM-only offered by most of the cheap HT radios.

Luckily, there’s a fix for both problems, as [Paul (OM0ET)] outlines in the video below. It’s a two-step process that starts with installing a hardware kit to replace the radio’s stock receiver chip with the much more capable Si4732. The kit includes the chip mounted on a small PCB, a new RF choke, and a bunch of nearly invisible capacitors. The mods are straightforward but would certainly benefit from the help of a microscope, and perhaps a little hot air rework. Once the hardware is installed and the new firmware flashed, you have an HT that can receive signals down to the 20-meter band, with AM and SSB modulations, and a completely redesigned display with all kinds of goodies.

It’s important to note that this is a receive-only modification — you won’t be transmitting on the HF bands with this thing. However, it appears that the firmware allows you to switch back and forth between HF receive and VHF/UHF transceive, so the radio’s stock functionality is still there if you need it. But at $30 for the radio and $12 for the kit, who cares? Having a portable HF receiver could be pretty handy in some situations. This looks like yet another fun hack for this radio; we’ve seen a few recently, including a firmware-only band expansion and even a Trojan that adds a waterfall display and a game of Pong. Continue reading “Open HT Surgery Gives Cheap Transceiver All-Band Capabilities”

Cheap DIY Microscope Lamp Makes Tiny Macro Shots Look Great

For optical microscopes, light is everything. If you don’t have a good amount of light passing through or bouncing off your sample, you’ve got nothing for your eyeballs or a camera to pick up. To aid in this regard, [Halogenek] whipped up a nifty microscope lamp with some LEDs.

The build uses a neat arch-shaped PCB with a hole in the middle for the microscope’s optics to pass through. Surrounding this are the LEDs, which provide a circle of light focused on the sample, akin to the ring lights so favored by today’s online influencers. The LEDs are powered via USB C, so the lamp can be run off of any garden-variety phone charger you might have lying around.

[Halogenek] reports that the lamp has proven useful for extreme macro shots of PCBs. It’s an easy build to replicate or redesign your own way if you’re doing similar work.

Microscopes are super useful, and there are all kinds of hacks you can do to make them perform better in your quest for science. Meanwhile, if you’ve been jazzing up your own lab hardware, let us know—we’d love to hear about it!

Phenolic board from an RC car - a well-known sight for a hacker

Pairing A New Remote To A Cheap RC Car

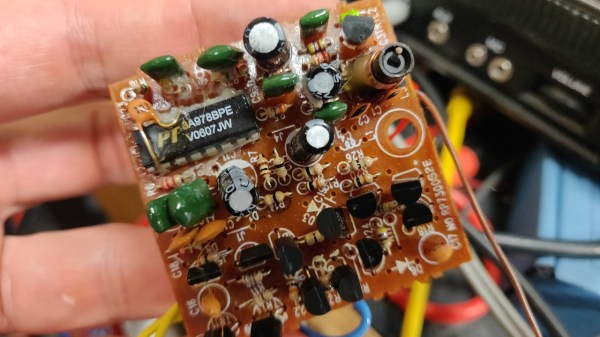
The cheap little RC cars are abundant anywhere you are, and if you’ve ever disassembled one, you are familiar with how the PCB looks. A single-sided phenolic paper PCB with a mystery chip driving a bunch of through-hole transistors, a sprinkle of through-hole capacitors, and a few supporting components for the wire antenna. It might not feel reusable, but [Chris Jones] begs to differ, with a Twitter thread showing us how he’s paired a scrap board from one RC car with a remote control from another, all to help a little family project.

These mystery ICs turn out to be RC-car-on-a-chip modules, and Chris lucked out in that his IC has a detailed datasheet available, complete with code pulse examples for different commands. The datasheet for the chip in the remote control is nowhere to be found, though, so we have to dig deeper. How about scoping the RF output? Turns out the supported codes between the two ICs are basically identical! The scrap board wouldn’t move any motors though, so it was time to narrow down the issue.

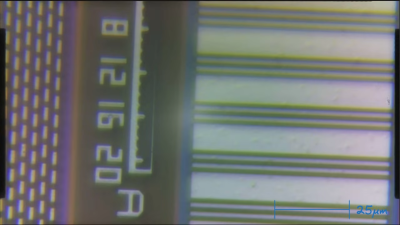
The RC car board has a 128KHz oscillator, and scoping that has shown the issue – it was producing 217KHz for some reason. It turned out that the oscillator’s load resistor was 100 kiloohms instead of recommended 200k, and switching that put it back on course. We would assume that, wherever the original remote control for that car is, it is similarly mis-tuned, or otherwise the RC car could never have worked.

Through sheer luck and tactical application of an oscilloscope, the RC car moves again, paired to a remote it was never meant to be, and the family project moves forward. Got a RC car, but no remote? Perhaps a HackRF can help.

Cheap Microscope Can Take Amazing Images With Some Simple Upgrades

[Birdbrain] is trying to make their own microfluidic devices. To aid in this quest, they need a quality microscope to see what they’re doing. Instead of buying one outright, they purchased a cheap microscope and upgraded it to do the job instead.

Usability and performance is greatly improved over the stock unit, which was really only fit for learning purposes.

The cheap education-grade microscope cost around $50 USD, had few features, and wasn’t much chop out of the box. The worst part was the sample stage — which was poorly adjustable in the up-and-down axis and could only track about two centimeters up and down. There was no X or Y axis panning either, and it lacked a proper condensor iris, too. Oh, and the included camera module had a resolution of just 240p.

To fix these problems, the microscope was first outfitted with a fully redesigned X-Y-Z stage built out of old components from a salvaged DVD drive and an additional NEMA stepper motor. Camera-wise, it was hooked up with a 2K Raspberry Pi Camera Module 3 running at 10 to 15 frames per second, which broadcasts video over a local network for easy viewing on an external monitor. It also gained an epi-illumination setup for doing reflected light microscopy.

If you’re eager to build a quality microscope with all the controls you personally dream of, this could be a relevant project for you to study. We’ve featured some other builds along these lines before, too. Video after the break.

Continue reading “Cheap Microscope Can Take Amazing Images With Some Simple Upgrades”

Wireless Telescope Guidance You Can Build On The Cheap

Telescopes are fun to point around the sky, but they’re even better when you have some idea of what you’re actually looking at. Experienced sky-gazers love nothing more than whipping out some quality glassware and pointing it to the heavens to try and view some photons from some fancy celestial point of interest. To aid your own endeavors in this realm, you might consider following [aeropic’s] example in building a capable wireless telescope DSC.

Yes, [aeropic] built a capable digital setting circle (DSC) which can be used to quickly point a telescope at objects in the sky, with the aid of the right astronomical software. An ESP32 board runs the show, using AS5600 positional encoders on each axis of the telescope to understand the device’s orientation. The encoders are attached via 3D-printed components to track the motion of the telescope accurately. It can then be paired over Bluetooth with a smartphone running an app like Skysafari. Once calibrated on some known stars, the app can then read the encoder outputs from the telescope, and help guide the user to point the device at other stars in the night sky.

The rig won’t actually move the telescope for you, it just guides you towards what you want to look at. Even still, it makes finding points of interest much faster and could help you get a lot more out of your next sky viewing party. Have fun out there! Video after the break.

Continue reading “Wireless Telescope Guidance You Can Build On The Cheap”

There’s Hope For That Cheap Lathe Yet!

There may be few cases where the maxim that “you get what you pay for” rings true, than a lathe. The less you spend on a lathe, the closer you get to a lathe-shaped object and the further from, well, a lathe. [Camden Bowen] has bought a cheap lathe, and he’s not content with a lathe-shaped object, so he takes us in the video below through a set of upgrades for it. In the process he makes a much nicer lathe for an entirely reasonable sum.

First up are the bearings, in this case a set of ball races which aren’t really appropriate for taking lateral force. After a lot of effort and a tiny bit of damage he manages to remove the old bearings and get the new ones in place, though their slightly different dimensions means he has to replace a spacer with a temporary 3D printed item which he’ll turn in metal later. We learn quite a bit about cheap lathe tools and tool alignment along the way, and he ends up buying a better tool post to solve some of its problems. We were always not very good at grinding HSS edges, too.

At the end of it all he has a much better lathe, upping cost from $774 to $1062 which is still pretty good for what he has. Worth a look, if you too have a lathe-shaped object.

Continue reading “There’s Hope For That Cheap Lathe Yet!”