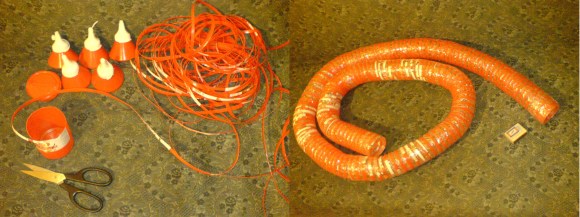
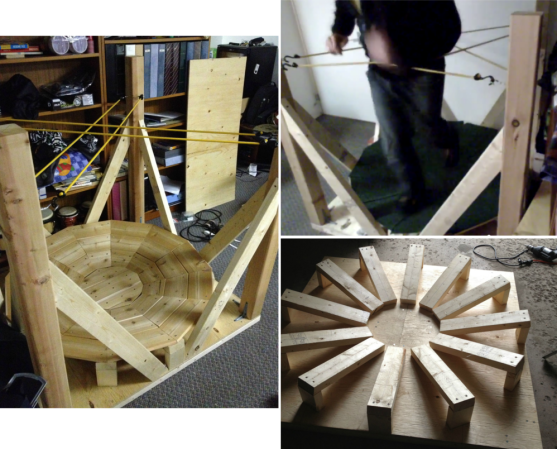
Breadboarding With A ARM Microcontroller

NXP’s LPC1114 ARM microcontroller is in a class all of it’s own. ARM microcontrollers are a dime a dozen, but this fabulous chip is the only one that’s housed in a hacker and breadboard friendly PDIP package. However, breadboard setups usually won’t have the luxuries of a true development platform such as flashing the part, single stepping through the code, and examining memory. [Steve] found an interesting solution to this problem that involves a Dremel and hacking up even more hardware.

[Steve] found a few LPC1769 dev boards that include a debugger and a way to program these chips. Simply by hacking off the programmer and debugger portion of this dev board with a Dremel tool, [Steve] had an easy to use interface for his breadboardable ARM.

After connecting the power rails to his breadboarded chip, [Steve] connected his programmer up and set up a gcc toolchain. For about $25, he has a breadboard friendly ARM microcontroller with full debugging capabilities.

This isn’t the first time we’ve seen a few people play with this DIP28 ARM chip; someone even milled this 600 mil chip down to 300 mils for even easier prototyping. Still, this is the best and cheapest way we’ve seen yet to turn this ARM into a proper prototyping platform.

Retrotechtacular: Miniseries On The Wright Brothers

retrotechtacular-wright-brothers

Admittedly we prefer our Retrotechtacular videos to be campy, but sometimes the content is just so cool we have to give up that goal. So is the case with this series on the Wright Brothers’ first manned, powered flight.

Now there is some argument on who actually flew for the first time on earth. And that issue is touched upon right away by sharing the benchmarks used to substantiate the claim:

  • The machine was heavier than air
  • Carried a man
  • Rose from the ground under its own power
  • Flew under control without losing speed
  • Landed safely at an altitude no lower than it took off

The two-part series clocks in at almost two hours. But the combination of images, video footage, and first-hand accounts makes for something incredibly interesting. The original flight happened 110 years ago this December. That doesn’t seem so long ago and it’s incredible to think that air-travel is now common in the developed world and we’re even seeing progress toward human powered flight that itself is doing the same kind of trailblazing the Wright Brothers did.

Continue reading “Retrotechtacular: Miniseries On The Wright Brothers”

CastAR Goes Live On Kickstarter

castar2
[Jeri, Rick and the Technical Illusions crew] have taken the castAR to Kickstarter. We’ve covered castAR a couple of times in the past, but the Kickstarter includes a few new features just ripe for the hacking. First, castAR is no longer confined to a retro-reflective surface. In fact, it’s no longer confined to augmented reality. An optional clip on adapter converts castAR into a “free” augmented reality or a full virtual reality system.

[Jeri] has also posted a video on her YouTube channel detailing the entire saga of castAR’s development (embedded after the jump). The video has a real “heart to heart” feel to it, and is definitely worth watching. The story starts with the early days (and late nights) [Rick] and [Jeri] spent at Valve. She goes through the split with Valve and how the two set up a lab in [Rick’s] living room. [Jeri] also outlines some of the technical aspects of the system. She explains how the optics have been reduced from several pounds of projectors to the mere ounces we see today.

Another surprise addition is the lower level tier rewards of the campaign. The castAR tracking system is offered. The campaign page says the tracking system can be mounted to anything from robots to other VR headsets. The possibilities for hacking are almost endless. We’re curious about setting up our own swarm of quadcopters similar to the UPENN Grasp Lab. The RFID tracking grid is also offered as a separate option. In the gaming system this will be used for tracking tabletop game pieces. Based upon the Kickstarter page, it sounds as if the grid will not only use RFID, but a camera based tracking system. We’re definitely curious what possibilities this will hold.

As of this writing, the castAR Kickstarter campaign is already well past the halfway mark on its way to a $400,000 USD goal.

Continue reading “CastAR Goes Live On Kickstarter”

Creating Irregular Board Outlines In KiCad

irregular-borders-in-kicad

One of the benefits of plain text file format is that you can go in and edit them by hand. This is part of the KiCad board outline hack which [Clint] wrote about in a recent post. He wanted a unique board outline, which is something that KiCad isn’t necessarily well suited for. His solution was to create the outline as an image, then import it. If you’re wondering what custom shape is called for this type of work we’d like to point you to the (kind of) bottle opening HaDuino. That PCB layout was done on Eagle, which has a bit more leeway with special shapes.

Before getting to the code editing step seen above [Clint] used the built-in feature for KiCad that will turn an image into a component. He exported that code and altered it using a text editor in order to change the layer setting for the shape to that of the board outline. This took him from a plain old image, to a module which can be selected and dropped into the board editing program. It’s a snap to do this sort of thing for the copper layers too if you’re interested in using your mad graphics editing skills to layout an art piece on copper clad.

Running Custom Code On Cheap One-time Password Tokens

One-time passwords (OTP) are often used in America but not so much in Europe. For our unfamiliar readers, OTP tokens like the one shown above generate passwords that are only valid for one login session or transaction, making them invulnerable to replay attacks. [Dmitry] disassembled one eToken (Aladin PASS) he had lying around and managed to reprogram it for his own needs.

Obviously, these kind of devices don’t come with their schematics and layout files so [Dmitry] had to do some reverse engineering. He discovered six holes in a 3×2 arrangement on the PCB so he figured that they must be used to reprogram the device. However, [Dmitry] also had to find which microcontroller was present on the board as its only marking were “HA4450” with a Microchip logo. By cross-referencing the number of pins, package and peripherals on Microchip parametric search tool he deduced it was a PIC16F913. From there, it was just a matter of time until he could display what he wanted on the LCD.

We love seeing tiny consumer hardware hacked like this. Most recently we’ve been enthralled by the Trandscend Wi-Fi SD card hacking which was also one of [Dmitry’s] hacks.

Fine Furniture Kegerator Serves A Lot Of Beer; Smokes A Lot Of Cigars

diy-kegerator

This kegerator looks like a piece of fine furniture but closer examination of the build shows that it is at least partially hacked together. As with most of the multi-keg variants on the idea this starts with a chest freezer, but it doesn’t utilize a custom collar as is often the case.

After cutting the holes in the lid of the freezer for these beer towers [Lorglath] began building a wooden frame around it using pocket hole screws. Despite his efforts to keep things plumb and square, there was some… creative… shimming done when it came time to wrap it in oak veneer boards and add the trim pieces. But knowing where to hide the flaws got him through this part of the project and onto the surface finish. Look closely at the image above, all of those scraps are cigar rings. That represents a lot of smoke!

The rings were laid down in layers, with thin resin pours between each. To achieve a smooth and clear finish a heat gun was used to level the surface and pop any bubbles that made their way into the goo. The finished version has room to store eight kegs which are connected to the octet of taps above. That’s a lot of beer to brew, and a lot to drink!

More Drive Bays, Cooling, And Power For A DIY Raid Box

We’ve actually been on the look-out for a Network Attached Storage solution for home use. We want an embedded option just for power saving, but have you seen what a commercially available embedded RAID systems costs? It might be better to find an energy friendly PSU and use it in a PC case RAID conversion like this one that [Samimy] pulled off. He started with an old computer case and modded it to house more hard drives.

The image above shows his mounting scheme. Most of us have defunct optical drives in the junk bin. Many times they end up as a way to play with CNC, but in this case [Samimy] got rid of the guts and used a couple of angle brackets to mount a hard disk inside of the enclosure. Now that he can bolt more drives to the case he needed to power them, as the PSU didn’t have enough SATA power connectors. He clipped off a daisy-chain of connectors from a broken supply and spliced it into this one. Finally he cut a hole in the top of the case to add a bit more cooling to the system.

He’s using Windows 7 to power a RAID0 and RAID1 array using four drives. To help increase performance of the system he also used USB thumb drives as cache. This is something we’re not familiar with and we’re glad he provided a link to ReadyBoost, the software which makes it possible.

Continue reading “More Drive Bays, Cooling, And Power For A DIY Raid Box”