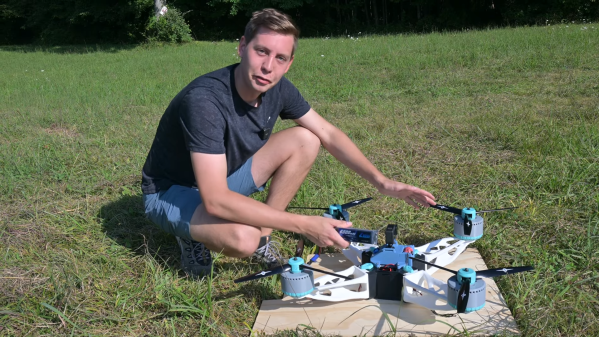
3D-Printable Foaming Nozzle Shows How They Work

[Jack]’s design for a 3D-printable foaming nozzle works by mixing air with a fluid like liquid soap or hand sanitizer. This mixture gets forced through what looks like layers of fine-mesh sieve and eventually out the end by squeezing the bottle. The nozzle has no moving parts but does have an interesting structure to make this possible.

The fine meshes are formed by multiple layers of bridged filament.

Creating a foam with liquid soap requires roughly one part soap to nine parts air. The idea is that the resulting foam makes more efficient use of the liquid soap compared to dispensing an un-lathered goop directly onto one’s hands.

The really neat part is that the fine mesh structure inside the nozzle is created by having the printer stretch multiple layers of filament across the open span on the inside of the model. This is a technique similar to that used for creating bristles on 3D-printed brushes.

While this sort of thing may require a bit of expert tweaking to get the best results, it really showcases the way the fundamentals of how filament printers work. Once one knows the process, it can be exploited to get results that would be impossible elsewhere. Here are a few more examples of that: printing only a wall’s infill to allow airflow, manipulating “vase mode” to create volumes with structural ribs, and embedding a fine fabric mesh (like tulle) as either a fan filter or wearable and flexible armor. Everything’s got edge cases, and clever people can do some pretty neat things with them (when access isn’t restricted, that is.)

3D Printed Tool Lets You Measure Component Reels Easily

Component reels are a highly-0ptimized packaging format. They deliver components to pick and place machines for effective high-speed assembly. As more of us get into working with SMD components, we’re exposed to them as well. [MG] wanted a way to easily measure tape from component reels, which is difficult because they’re often curled up. Thus, they whipped up a nifty little tool for the job.

The device consists of a 3D printed bracket which is designed to fit on a cheap electronic tape measure from Amazon. The bracket holds an 8mm wide component tape against the measuring wheel. As the component tape is fed through the device, it turns the wheel, and the measurement appears on the screen. No more must you try and flatten out a tape and measure it section by section. Instead, you just feed it in, yank it through, and you’re done!

[MG] notes that the tape measure itself runs on an STM32 microcontroller. As an extra-credit assignment, they suggest that the device could be reprogrammed to display component count instead of distance if that’s more suitable for your application. If you happen to make that mod, be sure to notify us on the tipline!

3D Printed Artificial Nose Is Totally Vegan

Prosthetics are complicated, highly personal things. They must often be crafted and customized precisely to suit the individual. Additive manufacturing is proving a useful tool in this arena, as demonstrated by a new 3D printed nose design developed at Swansea University. And a bonus? It’s vegan, too!

Often, cartilage from the ribcage is used when reconstructing a patient’s nose. However, this procedure is invasive and can lead to health complications. Instead, a nanocellulose hydrogel made from pulped softwood, combined with hyaluronic acid, may be a viable printable material for creating a scaffold for cartilage cells. The patients own cartilage cells can be used to populate the scaffold, essentially growing a new nose structure from scratch. The technique won’t just be limited to nose reconstructions, either. It could also help to recreate other cartilage-based structures, such as the ear.

As with all new medical technologies, the road ahead is long. Prime concerns involve whether the material is properly bio-compatible, particularly where the immune system is concerned. However, the basic idea is one that’s being pursued in earnest by researchers around the world, whether for cosmetic purposes or to grow entire organs. As always, if you’re secretly 3D printing functional gallbladders in your basement, don’t hesitate to drop us a line.

Dual Extrusion Support Without PVA

If you have an FDM printer that features multiple hotends or can otherwise switch between different filaments, you’ve surely thought about using the capability to lay down dedicated support material. Historically the filament of choice for this is PVA, since it can be dissolved in water once the print has finished. But if you’ve ever used it, you’ll know it’s not without its own challenges. Luckily, there may be an alternative — [ModBot] had heard that it is possible to use PLA to support PETG and vice-versa so he decided to try it. You can see how it works in the video below.

Of course, you can simply use PLA to support PLA and PETG to support PETG. Depending on the supports and slicer settings, though, it can be hard to remove the support after printing cleanly. Slicers have made major improvements in this area, but it still isn’t ideal. Some use HIPS for support, but that requires a solvent to dissolve and is also a bit exotic compared to PLA and PETG.

To illustrate, [ModBot] printed some test articles with the alternate support and did more reference prints using the same material with different parameters. The typical gap slicers use is 0.2 mm, but when using the different materials you can set the gap to zero. For the reference parts he set the gap to zero and 0.1 mm, both closer than you would normally print.

The PLA-only prints were essentially impossible to separate. While the PETG prints separated with tools, the resulting surfaces were ugly, with support residue and scarring. But the prints with two materials and zero gap pulled apart readily with no tools and left a beautiful surface underneath.

If you have the ability to do dual extrusion, this could be a great trick to have in your toolbox. Granted, PVA will still be of interest if you have support buried deep inside some structure where it is physically difficult to get to. Water can go where tweezers can’t. But for supporting large accessible areas, this looks like a game-changer.

Sometimes automatic supports can use a little help. There are plenty of supports and best practices for supports if you want to fine-tune your process.

Continue reading “Dual Extrusion Support Without PVA”

Dyson Hair Dryer Becomes Jet Engine

While Dyson makes some good products, they aren’t known for being economical. Case in point: [Integza] spent $500 on a hair dryer. While he does have a fine head of hair, we suspected he wasn’t after it for its intended purpose, and we were right. It turns out he wanted to make it into a jet engine! Why? Oh, come on. The fact that you read Hackaday means you don’t need that question answered. Watch the video below to see how it all turned out.

What got [Integza]’s attention was the power of the very small motor. So he immediately, of course, opened it up. The build quality is very impressive, although for $500, shouldn’t it be? While we are sure the Dyson dryer is more robust than our $9 Revlon special, it seems doubtful that it would handle the high temperatures of a jet exhaust. In fact, he’s had plastic meltdown while trying to build a jet before. So this time, he had a different plan.

That plan involved designing a replacement shell for the dryer and having it 3D printed in metal, which may have cost almost as much or more than the dryer. It came out great, though — and some fuel lines and a spark plug later, he was ready to fire it up.

Did it work? You bet. Test equipment was melted accidentally, and eventually, the engine looked like it flamed out. But it generated some very hot exhaust. We’d like to say that no tomatoes were harmed during the production of the video, but we can’t because of our well-developed sense of ethics. Poor tomatoes! We might have used a Mr. Bill doll, but that probably infringes on someone’s copyright.

If you don’t want so much melting, maybe try water cooling. If you could make this reliable, the modification to your car becomes obvious.

Continue reading “Dyson Hair Dryer Becomes Jet Engine”

Tree Supports Are Pretty, So Why Not Make Them Part Of The Print?

Here’s an idea that [Nephlonor] shared a couple years ago, but is worth keeping in mind because one never knows when it might come in handy. He 3D printed a marble run track and kept the generated tree supports. As you can see in the image above, the track resembles a roller-coaster and the tree supports function as an automatically-generated scaffolding for the whole thing. Clever!

As mentioned, these results are from a couple of years ago; so this idea should work even better nowadays. Tree supports have come a long way since then, and are available in more slicers than just Cura.

Tree supports without an interface layer is easy mode for “generate me some weird-looking scaffolding”

If you’re going to do this, we suggest reducing or eliminating the support interface and distance, which is the spacing between the supports and the rest of the model. The interface makes supports easier to remove, but if one is intending to leave it attached, it makes more sense to have a solid connection.

And while we’re on the topic of misusing supports, we’d like to leave you with one more trick to keep in mind. [Angus] of Maker’s Muse tucked a great idea into one of his videos: print just the support structure, and use it as a stand for oddly-shaped objects. Just set the object itself to zero walls and zero infill, and the printer will generate (and print) only the support structure. Choose an attractive angle, and presto! A display stand that fits the object like a glove.

You can watch a brief video of the marble run embedded below. Again, tree supports both look better and are available in more slicers nowadays. Have you tried this? If so we’d love to hear about it, so let us know in the comments!

Continue reading “Tree Supports Are Pretty, So Why Not Make Them Part Of The Print?”

Photoplotting PCBs With A 3D Printer

Do you ever wonder why your PCB maker uses Gerber files? It doesn’t have to do with baby food. Gerber was the company that introduced photoplotting. Early machines used a xenon bulb to project shapes from an aperture to plot on a piece of film. You can then use that film for photolithography which has a lot of uses, including making printed circuit boards. [Wil Straver] decided to make his own photoplotter using a 3D printer in two dimensions and a UV LED. You can see the results in the video below.

A small 3D printed assembly holds a circuit board, the LED, and a magnet to hold it all to the 3D printer. Of course, an LED is a big large for a PCB trace, so he creates a 0.3 mm aperture by printing a mold and using it to cast epoxy to make the part that contacts the PCB film.

Continue reading “Photoplotting PCBs With A 3D Printer”