Real Radar Scope CRT Shows Flights Using ADS-B

Real-time flight data used to be something that was only available to air traffic controllers, hunched over radar scopes in darkened rooms watching the comings and goings of flights as glowing phosphor traces on their screens. But that was then; now, flight tracking is as simple as pulling up a web page. But where’s the fun in that?

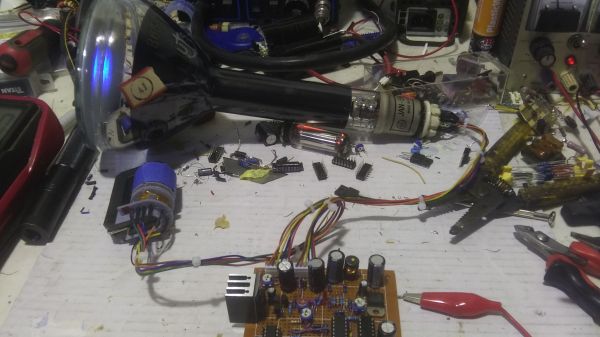
To bring some of that old-school feel to his flight tracking, [Jarrett Cigainero] has been working on this ADS-B scope that uses a real radar CRT. As you can imagine, this project is pretty complex, starting with driving the 5FP7 CRT, a 5″ round-face tube with a long-persistence P7-type phosphor. The tube needs about 7 kV for the anode, which is delivered via a homebrew power supply complete with a custom flyback transformer. There’s also a lot going on with the X-Y deflection amps and beam intensity control.

The software side has a lot going on as well. ADS-B data comes from an SDR dongle using dump1090 running on a Raspberry Pi 3B. The latitude and longitude of each plane within range — about 5 nautical miles — is translated to vector coordinates, and as the “radar” sweeps past the location, a pip lights up on the scope. And no, you’re not seeing things if you see two colors in the video below; as [TubeTime] helpfully explains, P7 is a cascade phosphor that initially emits a bright-blue light with some UV in it, which then charges up a long-persistence green phosphor.

Even though multicolored icons and satellite imagery may be more useful for flight tracking, we really like the simple retro look [Jarrett] has managed to pull off here, not to mention the hackery needed to do it.

Continue reading “Real Radar Scope CRT Shows Flights Using ADS-B”

Relive The Glory Days Of Sun Workstations

When the IBM PC first came out, it was little more than a toy. The serious people had Sun or Apollo workstations. These ran Unix, and had nice (for the day) displays and network connections. They were also expensive, especially considering what you got. But now, QEMU can let you relive the glory days of the old Sun workstations by booting SunOS 4 (AKA Solaris 1.1.2) on your PC today. [John Millikin] shows you how in step-by-step detail.

There’s little doubt your PC has enough power to pull it off. The SUN-3 introduced in 1985 might have 8MB or 16MB of RAM and a 16.67 MHz CPU. In 1985, an 3/75 (which, admittedly, had a Motorola CPU and not a SPARC CPU) with 4MB of RAM and a monochrome monitor cost almost $16,000, and that didn’t include software or the network adapter. You’d need that network adapter to boot off the network, too, unless you sprung another $6,000 for a 71 MB disk.  The SPARCstation 1 showed up around 1989 and ran from $9,000 to $20,000, depending on what you needed.

Continue reading “Relive The Glory Days Of Sun Workstations”

3D Printed Tool Lets You Measure Component Reels Easily

Component reels are a highly-0ptimized packaging format. They deliver components to pick and place machines for effective high-speed assembly. As more of us get into working with SMD components, we’re exposed to them as well. [MG] wanted a way to easily measure tape from component reels, which is difficult because they’re often curled up. Thus, they whipped up a nifty little tool for the job.

The device consists of a 3D printed bracket which is designed to fit on a cheap electronic tape measure from Amazon. The bracket holds an 8mm wide component tape against the measuring wheel. As the component tape is fed through the device, it turns the wheel, and the measurement appears on the screen. No more must you try and flatten out a tape and measure it section by section. Instead, you just feed it in, yank it through, and you’re done!

[MG] notes that the tape measure itself runs on an STM32 microcontroller. As an extra-credit assignment, they suggest that the device could be reprogrammed to display component count instead of distance if that’s more suitable for your application. If you happen to make that mod, be sure to notify us on the tipline!

Internet Of Washing Machines Solves An Annoyance

[Laurence Tratt]’s washing machine blew up, so he sprung for a brand new model with all the bells and whistles. Of course, these days, that means it has an Internet connection and an API. While we’re not quite convinced our washing machine actually needs such a thing, at least [Laurence] is making the most of it by creating an interface to the washer’s API that provides a handy countdown on the computer.

Honestly, there was one other option. The washer’s phone app — that sounds funny when you say it out loud — will notify you when the clothes are done. But it doesn’t provide a countdown, and it seems to regularly log you off, which means you don’t get the notifications anymore. You can see the minimal interface in the video below.

The exact combination of curl, jq, and pizauth probably won’t help you unless you have the same washer. On the other hand, it is a good example of how to hit some alien API and work out the details. Any API that uses OAuth2 and JSON won’t look too different. Speaking of OAuth2, that’s the purpose of the pizauth program — which, it turns out, [Laurence] is the author of.

Of course, you can refit an old washing machine to do this, too. We are more likely to steal the machine’s motor than to want to talk to it but to each their own!

Continue reading “Internet Of Washing Machines Solves An Annoyance”

Noninvasive Sensors For Brain–Machine Interfaces Based On Micropatterned Epitaxial Graphene

As fun as brain-computer interfaces (BCI) are, for the best results they tend to come with the major asterisk of requiring the cutting and lifting of a section of the skull in order to implant a Utah array or similar electrode system. A non-invasive alternative consists out of electrodes which are placed on the skin, yet at a reduced resolution. These electrodes are the subject of a recent experiment by [Shaikh Nayeem Faisal] and colleagues in ACS Applied NanoMaterials employing graphene-coated electrodes in an attempt to optimize their performance.

Impedance values of eight-channel FEG and eight-channel HPEG sensor systems placed on the occipital area of the head. (Faisal et al., 2023)

Although external electrodes can be acceptable for basic tasks, such as registering a response to a specific (visual) impulse or for EEG recordings, they can be impractical in general use. Much of this is due to the disadvantages of the ‘wet’ and ‘dry’ varieties, which as the name suggests involve an electrically conductive gel with the former.

This gel ensures solid contact and a resistance of no more than 5 – 30 kΩ at 50 Hz, whereas dry sensors perform rather poorly at >200 kΩ at 50 Hz with worse signal-to-noise characteristics, even before adding in issues such as using the sensor on a hairy scalp, as tends to be the case for most human subjects.

In this study, they created electrode arrays in a number of configurations, each of which used graphene as the interface material. The goal was to get a signal even through human hair — such as on the back of the head near the visual cortex — that would be on-par with wet electrodes. The researchers got very promising results with hex-patterned epitaxial graphene (HEPG) sensors, and even in this early prototype stage, the technique could offer an alternative where wet electrodes are not an option.

While the subject is complex, brain-computer interfaces don’t have to be the sole domain of research laboratories. We recently covered an open hardware Raspberry Pi add-on that can let you experiment with detecting and filtering biosignals from the comfort of your own home.

Sufficiently Advanced Tech: Has Bugs

Arthur C. Clarke said that “Any sufficiently advanced technology is indistinguishable from magic”. He was a sci-fi writer, though, and not a security guy. Maybe it should read “Any sufficiently advanced tech has security flaws”. Because this is the story of breaking into a car through its headlight.

In a marvelous writeup, half-story, half CAN-bus masterclass, [Ken Tindell] details how car thieves pried off the front headlight of a friend’s Toyota, and managed to steal it just by saying the right things into the network. Since the headlight is on the same network as the door locks, pulling out the bulb and sending the “open the door” message repeatedly, along with a lot of other commands to essentially jam some other security features, can pull it off.

Half of you are asking what this has to do with Arthur C. Clarke, and the other half are probably asking what a lightbulb is doing on a car’s data network. In principle, it’s a great idea to have all of the electronics in a car be smart electronics, reporting their status back to the central computer. It’s how we know when our lights are out, or what our tire pressure is, from the driver’s seat. But adding features adds attack surfaces. What seems like magic to the driver looks like a gold mine to the attacker, or to car thieves.

With automotive CAN, security was kind of a second thought, and I don’t mean this uncharitably. The first goal was making sure that the system worked across all auto manufacturers and parts suppliers, and that’s tricky enough. Security would have to come second. And more modern cars have their CAN networks encrypted now, adding layers of magic on top of magic.

But I’m nearly certain that, when deciding to replace the simple current-sensing test of whether a bulb was burnt out, the engineers probably didn’t have the full cost of moving the bulb onto the CAN bus in mind. They certainly had dreams of simplifying the wiring harness, and of bringing the lowly headlight into the modern age, but I’d bet they had no idea that folks were going to use the headlight port to open the doors. Sufficiently advanced tech.

Better Laser Cuts: Know Your Kerf

The recent crop of laser cutters are nothing short of miraculous. For a few hundred dollars you can get a machine that can easily engrave and — subject to materials — cut well, too. [Nate] has been taking advantage of a laser to make boxes that join together using finger joinery. The problem is, the pieces have to fit exactly to get a good box. While setting dimensions in software is fine, you need to account for how much material the laser removes — something traditional woodworkers and machinists know as kerf.

You can, of course, employ trial and error to get good results. But that’s wasteful and potentially time-consuming. [Nate] built a “tolerance fence” that is quick to cut out and allows accurate measurement of kerf. You can quickly use the tolerance fence to make measurements and increase your chances of nailing your boxes on the first cut.

You have to customize the fence based on the thickness of your material. [Nate] uses Lightburn, which probably has a kerf offset already set by default in your layers. If not, you’ll need to turn it on and set an estimate of your kerf size. Then you are ready to cut the fence pieces and see how they fit together.

If the fit is too loose, you want to raise the kerf setting and try again. If it is too tight, you lower the kerf setting. As [Nate] says, “Lower equals looser.”

The results speak for themselves, as you can see in the treasure chest image [Nate] provided. Well worth the effort to get this parameter right. We do enjoy laser cutting and engraving things. If you are cutting and don’t have air assist, you really need to hack up something.