For every pokemon you encounter on your adventure to become the world’s greatest trainer, you have about a 1 in 8000 chance of that pokemon being ‘shiny’, or a different color than normal. Put an uncommon event in any video game, and of course a few people will take that feature to the limits of practicality: [dekuNukem] created the Poke-O-Matic, a microcontroller-powered device that breeds and captures shiny pokemon.
We’ve seen [dekuNukem]’s setup for automatically catching shiny pokemon before, but the previous version was extremely limited. It only worked with a fishing rod, so unless you want a ton of shiny Magikarp the earlier setup wasn’t extremely useful.
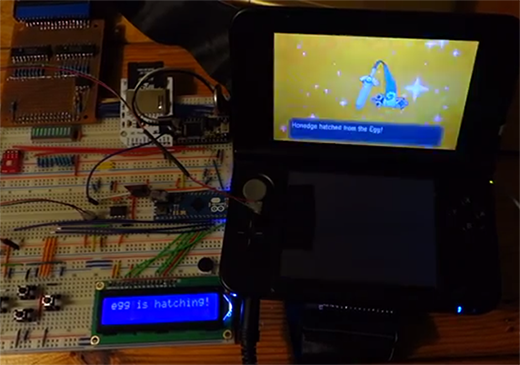
This version uses two microcontrollers – an Arduino Micro and a Teensy 3.0 – to greatly expand upon the previous build. Now, instead of just fishing, [dekuNukem]’s project can automatically hatch eggs, search patches of grass for shiny pokemon, and also automatically naming these new shiny pokemon and depositing them in the in-game pokemon storage system.
The new and improved version works a lot like the older fishing-only automated pokemon finder; a few wires soldered on to the button contacts control the game. The Teensy 3.0 handles the data logging of all the captured pokemon with an SD card and RTC.
What did [dekuNukem] end up with for all his effort? A lot of shiny pokemon. More than enough to build a great team made entirely out of shinies.
Video below, with all the code available through a link in the description.