Bally’s Bomber – A 1/3rd Replica Of A B-17G

bally bomber

One of our tipsters just sent us this fascinating story about The Bally Bomber, a single man’s huge undertaking that started back in 1999. It’s a 1/3rd scale version of the B-17G Bomber — and no, it’s not remote controlled, there will be a pilot.

Not familiar with the B-17G? What about its trade name? It’s called the Boeing B-17 Flying Fortress. This massive bomber was developed back in the 1930’s for the United States Army Air Corps as a combination between the Boeing 247 transport plane and the experimental Boeing XB-15 Bomber.

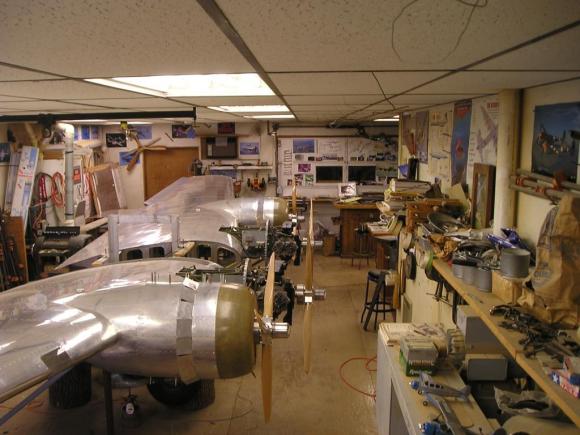
8680 of the B-17G model were built, but as of September 2011, only 13 of the entire B-17 family remain airworthy. The Bally Bomber is the only known scale replica, and looking through the progress photos it is an absolutely jaw-dropping project. It hasn’t been test flown yet, but they are getting painfully close to its maiden flight.

For more information, you can also check out their Facebook page which seems to be updated on a regular basis.

[Thanks Ryan!]

DCF77 Powered Clock Is A Work of Art

[Brett] just completed his DCF77 Master Bracket Clock, intended to be a backup to an old logic controlled clock he made. For our readers that don’t know, DCF77 is a German longwave time signal whose transmitter is located near Frankfurt (Germany). Every minute, the current date and time are sent on the 77.5kHz carrier signal.

The result, which you can see above, is made using an Ikea lantern, a skeleton clock, an ATmega328 (for Arduino compatibility), a voice recording playback IC (ISD1730), a cheap 20×4 LCD display, a DCF77 receiver module, and many LEDs. We’re pretty sure that it must have taken [Brett] quite a while to get such a nice looking clock. In case the clock loses power from the power supply, 3 AA cells provide battery backup. On the firmware side, making the platform Arduino-compatible allowed [Brett] to use its libraries so the coding was quickly done. Embedded after a break is a video of the final result.

Continue reading “DCF77 Powered Clock Is A Work of Art”

3D Printer Exhaust

[Malcolm] finally got fed up with the fumes produced by his 3D printer, so he decided to setup this rather extensive fume exhausting system.

He already has a pretty awesome setup with his Type A 3D printer inside of a filing cabinet, with a plastic tote above it to keep his filament from absorbing too much water. But as you know, the fumes released while printing ABS are actually pretty bad for you. With this in mind he 3D printed adapter rings and fitted a fan salvaged from a space heater to the outside of his filing cabinet. A dimmer switch provides variable fan speeds and some dryer vent tubing reroutes the fumes to central vac piping which then goes directly outside. When the system is not in use the piping can be plugged to prevent cold air from entering the house. It’s a fairly clean build but [Malcolm] wants to make a nicer enclosure for the fan and speed control circuit.

The major problem we see with doing something like this is removing too much heat from the build chamber which can always affect print quality. Do you vent your 3D printer?

Continue reading “3D Printer Exhaust”

SkyJack: A Drone To Hack All Drones

Quadcopters are gradually becoming more affordable and thus more popular; we expect more kids will unwrap a prefab drone this holiday season than any year prior. [Samy’s] got plans for the drone-filled future. He could soon be the proud new owner of his own personal army now that he’s built a drone that assimilates others under his control.

The build uses a Parrot AR.Drone 2.0 to fly around with an attached Raspberry Pi, which uses everybody’s favorite Alfa adapter to poke around in promiscuous mode. If the SkyJack detects an IEEE-registered MAC address assigned to Parrot, aircrack-ng leaps into action sending deauthentication requests to the target drone, then attempts to take over control while the original owner is reconnecting. Any successfully lassoed drone doesn’t just fall out of the sky, though. [Samy] uses node-ar-drone to immediately send new instructions to the slave.

You can find all his code on GitHub, but make sure you see the video below, which gives a thorough overview and a brief demonstration. There are also a few other builds that strap a Raspberry Pi onto a quadcopter worth checking out; they could provide you with the inspiration you need to take to the skies.

Continue reading “SkyJack: A Drone To Hack All Drones”

Developed On Hackaday: Let’s Build Some Hardware!

We’re pretty sure that most of you already know that a few months ago Hackaday was bought by SupplyFrame, who therefore became our new evil overlords. We do hope you’ve noticed that they’re actually quite nice, and in their divine goodness they recently gave the go-ahead on this series called Developed on Hackaday.

A new project will be made by the Hackaday staff & community and will hopefully be brought to the consumer market. For those who don’t have the time/experience to get involved in this adventure, we want to show and document what it takes to bring an idea to the marketable product stage. For the others, we would like to involve you in the design/development process as much as possible. Obviously, this project will be open source hardware/software. This time around, the hardware will mainly be developed by yours truly. You may already know me from the whistled platform (currently sold on Tindie) or from all the different projects described on my website, which makes this new adventure far from being my first rodeo.

What’s in it for the contributors? During all the steps of this project, we’ll offer many rewards as well as hand-soldered first prototypes of the device so you can start playing/testing it. Nothing is set in stone so every suggestion is welcome. Should we make a Kickstarter-like campaign to manufacture the final product, we’ll only do so once our prototype is final, our partners are chosen and all details of the production process are set and confirmed. In that case, we will just need to gather the required funds to make the device a reality. What are we going to build? Keep reading to find out.

Continue reading “Developed On Hackaday: Let’s Build Some Hardware!”

The Sub-$500 Deltaprintr

delta

We’ve seen them before, but only now has the Deltaprinter, a very simple and affordable delta printer finally hit Kickstarter.

We saw the Deltaprintr at the World Maker Faire last September where the team showed off their fancy new printer and the very nice prints it can produce. The printer itself is unique in that it eschews printed parts and is instead made of lasercut parts. Instead of belts, each arm of the delta bot is lifted with spectra line, and the entire mechanism is billed as not requiring calibration probably due to the accurate laser cut parts.

On a completely different note, we did notice the rewards for the Deltaprintr Kickstarter are limited. Unlike the gobs of 3D printers on Kickstarter, the Deltaprintr team actually wants to stay on schedule for their shipping dates. That’s an admirable dedication to getting their printer out to backers in a reasonable amount of time.

Trimming The Fat From AVR GCC

avr

[Ralph] has been working on an extraordinarily tiny bootloader for the ATtiny85, and although coding in assembly does have some merits in this regard, writing in C and using AVR Libc is so much more convenient. Through his trials of slimming down pieces of code to the bare minimum, he’s found a few ways to easily trim a few bytes off code compiled with AVR-GCC.

To test his ideas out, [Ralph] first coded up a short program that reads the ATtiny85’s internal temperature sensor. Dissassembling the code, he found the a jump to a function called __ctors_end: before the jump to main. According to the ATtiny85 datasheet, this call sets the IO registers to their initial values. These initial values are 0, so that’s 16 bytes that can be saved. This function also sets the stack pointer to its initial value, so another 16 bytes can be optimized out.

If you’re not using interrupts on an ATtiny, you can get rid of 30 bytes of code by getting rid of the interrupt vector table. In the end, [Ralph] was able to take a 274 byte program and trim it down to 190 bytes. Compared to the 8k of Flash on the ‘tiny85, it’s a small amount saved, but if you’re banging your head against the limitations of this micro’s storage, this might be a good place to start.

Now if you want to hear some stories about optimizing code you’ve got to check out the Once Upon Atari documentary. They spent months hand optimizing code to make it fit on the cartridges.