A Beautiful Pinhole Camera Takes Wonderful Photos

With digital cameras in everything and film slowly disappearing from shelves, everyone loses an awesome way to learn about photography. Pinhole cameras allow anyone to build a camera from scratch and also learn about those crazy f-stops, exposure times, and focal planes that Instagram just won’t teach you. [Matt] put up a great tutorial for building your own pinhole camera, and the project looks easy enough for even those who are still playing around with their cell phone cameras.

For film, [Matt] used 120 film, a medium-format medium that is sill available for purchase and processing in some areas. Because [Matt]’s pinhole is relatively large and made out of very thin material, the camera could take very large pictures – much larger than standard 35mm fare. If you’re using a smaller camera projecting a smaller image onto the film, 35mm would be the way to go as it greatly decreases the difficulty of finding film and a processing center.

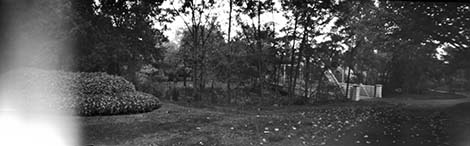
[Matt]’s camera is constructed out of laser-cut plywood. Because he’s producing extremely wide images with his camera (6 x 17cm), [Matt] needed to curve the film around the focal plane of the camera to keep the entire image in focus.

The mechanics of the camera are simple – just a pair of knobs to wind the film and a small metal shutter. [Matt] added a shutter release cable to open and close the aperture without moving the camera and had a wonderful camera perfect for capturing either sirs and madams or Civil War battlefields.

Hackaday Retro Edition Roundup

It’s time for another update chronicling the adventures and misadventures of getting really old computers to load our retro edition!

First up is [Andrew Hull] and his brilliant use of a Raspberry Pi to get an old Psion 5mx PDA on the Internet. The Raspi served as a wireless bridge, taking in Internet from a WiFi dongle and sending it back out via a serial port. Here’s a great guide for enabling PPPD on the Raspi, and giving just about anything with a serial port an Internet connection.

It may push the limits of being a retro submission, but [Glen]’s use of a modem to get on the Internet calls to us like a siren song.

Did you know Corel made computers? Well, [Victor] has one, and it’s actually a pretty interesting machine. ARM processor, an actual hard drive, and dual Ethernet ports. It was built in the late 90s and the hard drive has since died, but [Victor] booted it into Red Hat over his network and loaded up our retro site.

Finally, we come to [Greg]’s submission. He could have sent in a Mac SE/30 submission, but figured that was old hat (do you see one on there, [Greg]. No. And it’s the best computer Apple will ever make). Instead, he had an old Powerbook Duo 2300c with a Duo 230 screen lying around.

Powerbook Duos are pretty weird; they only had two ports – a single DIN-8 serial port and a dock connector. [Greg] had a Powerbook Duo dock that surprisingly had an Ethernet port. Third-party peripherals to the rescue, it seems. After plugging his Duo to his network and launching iCab, [Greg] was able to browse both the retro and main Hackaday editions. Picture Not bad for the smallest laptop Apple made before the Air.

Oh, [Greg] was also cool enough to write a tutorial for getting just about every Macintosh on the Internet. We’ve put that up on the retrocomputing guide portion of our retro site, and we’re always looking for new submissions.

You can check out the pics from all these submissions in a Web 2.0 WordPress gallery after the break, or head on over to the retro site and view them the way the gods of HTML intended.

Continue reading “Hackaday Retro Edition Roundup”

Creating A MIDI Synth From A Commodore SID

The Commodore SID was the audio chip in the venerable Commodore 64 and in the 30 years since release has attained classic status and become one of the best ways to get your chiptune on. Designed by famous synthesizer designer [Bob Yannes], it was only a matter of time before we saw a real, homebrew MIDI synth based on the Commodore SID.

Because real SID chips are rare as hen’s teeth nowadays, [Jeff Ledger] built his SID synth around an emulated system running on a Pocket Mini Computer. This very cool microcontroller platform runs on the Parallax Propeller. An emulated SID runs in one of the Propeller’s 8 cores, with the remaining cores kept open for reading MIDI notes and displaying info on a display.

The hardware portion of this build is amazingly simple; just an optoisolater, a few resistors, and a diode connect a MIDI keyboard to the Pocket Mini Computer. The buttons and dials on [Jeff]’s MIDI keyboard control the waveforms, filters, and envelope controls. A very neat setup if we do say so ourselves, and just perfect if you’re needing more chiptunes in your life.

You can check out [Jeff]’s video after the break.

Continue reading “Creating A MIDI Synth From A Commodore SID”

Making A Game Boy Color Louder

When [Anton] picked up an old translucent purple Game Boy Color, he noticed a nearly complete lack of sound coming from the speaker. This simply would not do, so [Anton] replaced the speaker and soldered in a 2 Watt amp, making his Game Boy very loud indeed.

After cracking open his Game Boy, [Anton] noticed the speaker was rusted. He replaced it by soldering in a speaker from a Motorola cell phone, fixing the most immediate problem. After plugging in a few batteries, he still noticed a nearly complete lack of sound.

Turning to his electronics junk drawer, [Anton] pulled out a TI TPA2000D1 Class D amplifier. This tiny amplifier is able to provide 2 Watts to a speaker and is very power efficient given it’s Class D pedigree.

After making a PCB and wiring up his amp to the Game Boy’s circuit board, [Anton] spent a little time tracking down the source of some high-frequency hissing. As it turns out, the power regulators and converters on a 15-year old Game Boy aren’t of the highest quality, but after adding a few capacitors [Anton] got everything under control.

Now [Anton]’s Game Boy has very loud, crystal-clear sound. Considering the lengths chiptune artists take modifying old ‘brick’ style game boys for use with Little Sound DJ or nanoloop, [Anton]’s build could become a worthwhile modification for musicians looking for a little more oomph to their performance.

Hackaday Retro Roundup, This Time With A PowerPC And A PET

Thought we forgot about this, didn’t you? Well, the Hackaday Retro Edition is still going strong, and this time we have a few more retro successes that were able to load our retro site with ancient hardware.

First up is a submission by [rusbus]. He had a Power Macintosh 6100/60 lying around – the first Macintosh with a PowerPC processor instead of the Motorola 68k – and loaded up our retro site. There are some weird quirks about the 6100, notably the AAUI Ethernet tranceiver connected to a 10BASE-T network.

Although some browsers are available for the 6100, notably iCab (it’s not great, but it also works on 68k machines), [rusbus] had to settle for Internet Explorer 3.01. He eventually got it working and has a picture to prove it.

On the subject of finding a proper web browser, [azog] loaded up the retro site with a Commodore PET. There aren’t any web browsers for a PET, you say? Well, [azog] had to make one.

The network adapter is a Retroswitch Flyer Internet Modem, and after finding some network-aware projects on the Retroswitch site such as an IRC and Telnet client, [azog] put together an extremely crude web browser. In BASIC. Old BASIC. We’re impressed.

With [azog]’s browser, the PET opens up a channel to a URL, reads the text coming in, and processes it. There’s only 1kb of video RAM and 32kb of system RAM, so small luxuries like scrolling are nearly impossible. An amazing piece of work, really.

Finally, [Bob] from Portugal sent in a neat Flickr gallery of a Schneider euro XT he found in his basement. It’s based on the IBM PC/XT running an Intel 8088 processor, but is enclosed in a ‘the keyboard is the computer’ form factor reminiscent of a C64 or TRS-80. He hasn’t gotten it on the Internet yet, but it’s still a cool piece of kit.

Basking In The Vintage Glory Of InfoAge

Last weekend’s Maker Faire wasn’t only about the latest and greatest. Some of the groups there brought up the latest and greatest from earlier eras. InfoAge is a historical science and technology learning center based out of the former Camp Evans in Wall, New Jersey, and they really know how to put on a show using old technology.

I made it to two booths at Maker Faire claimed by members or associates of InfoAge. First up is the booth from MARCH, the Mid-Atlantic Retro Computing Hobbyists. They’ve got a PDP-8, a PDP-11/20, a few VAXxen, IBM mainframes, entire kilobytes of core memory, and enough C64s, TRS-80s, Commodore PETs, teletypes, and punch cards to get to the moon several times over.

The feature of MARCH’s booth was a nearly 100% accurate Apple I reproduction. Yes, the same computer built by hand by [the Steves] who later went on to found Apple Computers. In the video (above, and after the break), a MARCH member demonstrates booting BASIC from a cassette interface with the help of an iPod and typing in a simple program.

Next up are the guys from the radio technology museum at InfoAge. They decided to celebrate the 100th anniversary of [Edwin Armstrong]’s invention of the regenerative radio receiver.

The regenerative radio receiver is an extremely simple device; it can be built out of baling wire and some variants use only one tube. In the video, [Al] shows off his recreation of a regenerative receiver with fancy olde tymie components that include a variable capacitor and a B cell battery (it’s a recreation using a bunch of 9 Volts, but yes, B batteries do exist).

It goes without saying that InfoAge is really cool, and certainly worth the visit if you’re ever in the area. Bonus: it’s only 20 miles away from where [Penzias] and [Wilson] earned their Nobel Prize for discovering the Big Bang.

Continue reading “Basking In The Vintage Glory Of InfoAge”

Giving Graphing Calculators A New Life

[youtube=http://www.youtube.com/watch?v=Um0IeGGdIRY&w=470]

[Christopher] at Cemetech, ever frequent HaD feature for his hacked up graphing calculators, made it to the NYC Maker Faire.

He already posted on his blog he was making the trip up to Maker Faire, but we were lucky enough to catch up with him. Two things: the name of his blog isn’t ‘cement tech’, but ‘chem tech.’ Apparently he hates it when it’s mispronounced.

Secondly, he’s been turning in the TI-83s for a Casio Prizm graphing calculator. In the video above he tells us he’s gotten a few homebrew games running on the Prizm, a Lua interpreter, and is currently working on digging around the operating system.