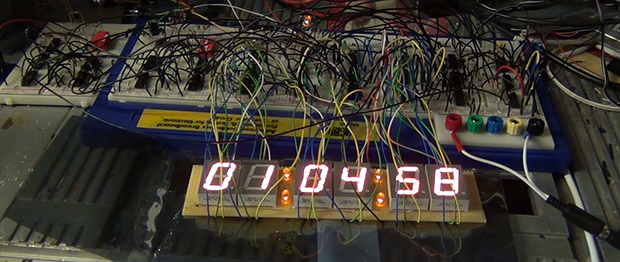
Quieting A Pendulum Clock Every Night

[Vinnie] has a wonderful old clock from his grandmother; it’s an exquisite antique with a real mechanical movement and a charming set of bells that ring every hour. Unfortunately, those chimes are a bit of a disturbance to neighbors at 2 o’clock in the morning. Previously, [Vinnie] had been stopping the clock every evening, and hoped he would remember to start the pendulum in motion 12 hours later. This was a chore, so he decided to automate the process.

The build is simple and clever; a small stepper motor is mounted in the clock just underneath the pendulum. Every 12 hours, the stepper motor moves a lever and slowly stops the pendulum over the course of a dozen or so seconds, silencing the clock movement. Twelve hours later, the motor turns again setting the pendulum in motion.

The parts count for this build is very low – basically just an ATmega88, a Darlington array to drive the stepper, and a 32.768kHz crystal. We can think of a few friends and relatives with loud clocks in their house, so we might have to build a few of these to give away.

Take a look at the demo video after the break to see how [Vinnie] stops his grandmother’s clock every night.

Continue reading “Quieting A Pendulum Clock Every Night”

Make Your Own Atomic Clock

We see plenty of clock projects come through, but usually it is their visual or mechanical design that stands out. The DCF-77 LED PIC clock is fun because it is synchronized with the Atomic clock in Braunschweig Germany. The clock picks up the radio signal at 77.5 KHz known as DCF77, and that’s where it got its name.

The circuit looks surprisingly simple and usually costs less than $30 to build, depending on how you piece it together. You can download the schematics and code from the site, but you may have to do a little research about how to catch the signal from your location. The person who wrote this was located in Europe.

[found via HackedGadgets]

Analog Clock Display Uses A Nipkow Disk

Although [Serokoy] is not thrilled with the outcome of his Nipkow disk clock (translated), but we really enjoy it. It uses the Persistence of Vision concept to create a light display from a rotating disk.

We’ve come across a lot of rotating disk clocks. Several were based off of the platters of a hard drive, using a slit, or series of slits to make up the display. This Nipkow disk uses a similar technique but in a more general way. The series of holes arranged in a spiral pattern allows a grid of concentric rings to be used as pixels when the disk is spinning. The bottom portion of the disk is used as the display area. Each pixel is illuminated at just the right time by LEDs below in order to freeze that pixel in the viewer’s eye. The demo is a bit rough, and [Serokoy] mentions that the precision of the hole layout makes all the difference. He drilled these by hand in a CD which was spray painted matte black. Even though he used a computer to lay out and print a template, it took four tries to get a suitable disk.

[Thanks Svofski]

Robotic Doodle Clock

This clock has a robotic twist to it. It will show you the time by drawing it in dry-erase marker. There’s a bit of play in the arm joints and some loose motor precision which results in a wavy font that prompted [Ekaggrat] to name his project the Doodle Clock.

The shape and building material used here really make the timepiece look great. We think if the arm holding the acrylic writing surface had been at right angles this would not look nearly as pleasing. The video after the break shows the bot in action, at first flexing its wrist to switch back and forth between marker and eraser. From there it starts to draw the time, tracing the segments of each digit multiple times to achieve a readable number. The entire thing is driven by an Arduino compatible board mounted on the base of the clock.

This reminds us of that felt-tipped Turing Machine. A variation on that would also make a really nice clock display.

Continue reading “Robotic Doodle Clock”

Workout Timer Has Its Own Fight Bell

This workout timer turned out great. We think [Douglas] managed to end up with a professional look and a full range of features even though he was doing a lot of learning along the way.

He wanted a clock that was capable of counting up or down to time different segments of his workout. In order to be really useful it needed to have a remote control and a way to signal when time had run out. He grabbed an Arduino and started prototyping with an LED marquee at first, but after adding a second Arduino to deal with the display scanning issues he finally switched over to these LED segment displays.

The timer includes an IR receiver so that it can be controlled with a handheld remote. The large red bell to the side has a heck of a ding and is used to signal the start and end of timing. Perhaps the driver for that bell could be incorporated into the home automation project from Wednesday. Once the hardware decisions were finalized [Douglas] set out to build an enclosure that he could be proud of (mission accomplished!). Don’t miss the video after the break where he walks through all various aspects of the user interface. Continue reading “Workout Timer Has Its Own Fight Bell”

Interesting Substrate Used To Position LEDs Of This Word Clock

[Ivan] decided to build a Word Clock as holiday gift for his parents. He pulled it off, but as you can see above, it meant a lot of point-to-point soldering. One small piece of proto-board is used to host the power supply and a few integrated circuits, with the rest of the device mounted on an interesting choice of material.

The substrate that holds the LED array for the display is a plastic mesh. You’ll find the stuff in any craft store, it’s meant for use in yarn work. It comes rated in several different sizes designated by holes-per-linear-inch. This is fantastic because it makes precision spacing a snap. The face plate itself looks great, especially when you consider that all of the letters were cut out from a piece of black foam board by hand. This bezel was then put in a picture frame, with a bit of tissue paper as a diffuser.

They tell us that the code was written in assembly for an ATtiny2313 microcontroller. It uses a DS1305 RTC chip to keep time and you might be interested to see how the communication protocol was implemented in assembly. The project is based on [Doug’s] Word Clock which we covered in this links post.

Rolling Digit Clock Is A Wonderful Piece Of Engineering

A long time ago and on a scrounging trip he barely remembers, [Victor] bought a quartet of digits from an old Dutch Railways clock. These antique displays used a strip of plastic coated cloth that rolls around itself with the help of a motor to display the digits 0 through 9. It’s been many years, but [Victor] finally got around to building a clock out of these single digit displays and we’re loving the results.

Because these displays were manufactured in a time when mechanical devices were king, [Victor] had to slightly modify each digit so they could display numbers with the help of a continuous rotation servo. The four servos are controlled by an Arduino – each digit changing one at a time to reduce current consumption – and a magnet and reed switch was added to each digit so the numbers could be repeatedly displayed.

Before [Victor] replaced the plastic servo gears with metal cogs, the clock was quite noisy. He’s since put each digit underneath a bell jar (actually a vase turned upside down), and we’ve got to say that [Victor] has a nice clock on his hands. Check out the videos of the clock changing digits to display the time after the break.

Continue reading “Rolling Digit Clock Is A Wonderful Piece Of Engineering”