Monitoring And Controlling Your Garage Door From Afar With An IP Camera

remote-control-garage-door

Last year, [Mark Simonelli’s] wife asked him if he could design something that would allow her to remotely check if their garage door had been left open. [Mark] jumped at the chance to tinker with electronics and designed a system around an old TrendNet IP camera. When remotely connected to the camera using IP Cam Viewer Pro for his Android phone, [Mark] could watch the video stream and also trigger the garage door opener via a small relay circuit he built.

His remote opener worked well, but his camera unfortunately lacked any sort of IR vision/low light capabilities. Since his camera wasn’t very useful in the dark, he decided that he needed to add some way to trigger a light when remotely monitoring his garage. He figured the best way to do this would be to control a power strip-connected light using a circuit similar to the one he built to open the garage door itself.

He stopped by the hardware store and picked up a cheap power strip, disassembling it and removing the power toggle once he got home. He fitted it with a small 5v relay, which he connected to the camera’s terminal block. While he admits that it might not be the absolute safest solution, he can easily control both the light and the garage door with a simple swipe of his phone’s screen.

Continue reading to see his remote controlled power strip in action, and be sure to swing by his site to see more details about his camera-controlled garage door opener.

Continue reading “Monitoring And Controlling Your Garage Door From Afar With An IP Camera”

BB313 Breadboard Platform Makes ATtiny Prototyping Painless

Johngineer's BB313

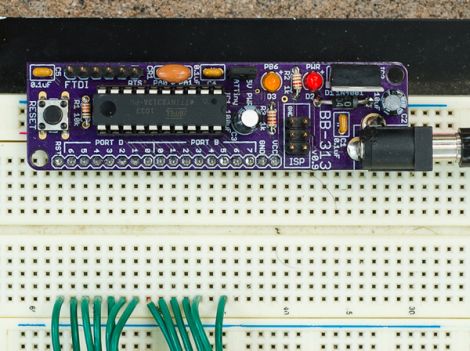
[John De Cristofaro aka Johngineer] uses various ATmega microcontrollers in his electronics projects, but he finds himself reaching for an ATtiny2313 or ATtiny4313 more often than not. He got tired of having to wire up pin headers, capacitors, and the like each time he started a project, so he spent some time designing an easy to use breadboard platform around the chips.

Inspired by LadyAda’s Boarduino, his BB313 board features FTDI pin headers, an ISP programming header, a reset button, along with breakout pins that plug directly into any breadboard. Aside from sharing a similar layout, [John] says that the similarities end there. His board is designed for designers who program in C or C++, so Arduino code won’t run without some substantial modification.

The board looks like a pretty handy benchtop tool, and we’re pretty sure it would be a big time saver for anyone who uses these chips with any frequency. [John] says that the board cost about $6.50 to make when he put it together, but that prices might vary slightly depending on where you have your PCBs made.

Be sure to swing by his site if the design looks like it might be helpful. He has made the schematics, a bill of materials, and all the rest available for the taking.

[via Adafruit blog]

Minestation – An External Weather Display For Your Minecraft World

minestation

If you’re a big Minecraft fan, the folks at [radikaldesign] have something that might be of interest to you. (Translation) Inspired by some of their Minecraft-loving friends, they have developed Minestation – a weather station for your Minecraft game.

The concept is simple. Here in the real world we have the ability to look out the window and see what it is like outside, but many of us turn to digital weather stations, the Weather Channel, or the local news to get the real scoop. They decided that the world of Minecraft should be no different, so they constructed an Arduino shield that allows players to see weather conditions as they play.

The shield contains a Nokia 6100 LCD screen which displays all sorts of useful information. It features a clock and calendar that reflect in-game time, making it easy to know when night is going to fall. It also continually displays the player’s coordinates as well as what the weather looks like in that region. Having this information at hand when you’ve been slogging away in the mines (losing track of time and weather) seems like it could be pretty useful at times.

You can buy one of the devices at Minestation.me, but the design is completely open, so you can easily construct one of your own without too much hassle.

Continue reading to see a video of the Minestation in action.

[Via HackedGadgets]

Continue reading “Minestation – An External Weather Display For Your Minecraft World”

A Zoom Lens For Your Webcam

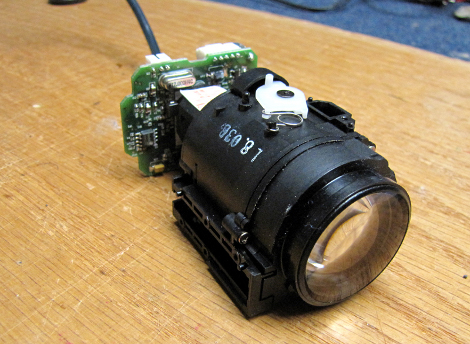
We need to find the kind of friends that [Dino] has. They seem to drop off all of their older, yet totally awesome, electronics with him once they’re through with the devices. One example of this is the Sony Handycam that came into his possession. He decided to crack it open and repurpose the 20x optical zoom lens for use with a webcam.

We always like [Dino’s] style. You can tell that he has no idea if he’s going to be able to pull off his goal, but at the same time he has an intuitive sense that he’ll make it happen. In the video after the break he starts off investigating what components are in the camera. At first the lens is passing no light at all, but he just strips down parts until he can see through it.

There are a couple of servo motors which control zoom and focus. He removes those before attaching the CCD from a Logitech webcam. At the end of his video he shows a demo of the functionality, which is pretty finicky when focusing by hand. But we think this hack would make a fantastic camera for soldering projects, it just needs a custom controller so the motors can be once again used to adjust focus.

Continue reading “A Zoom Lens For Your Webcam”

Auto Power Circuit For An Arcade Machine

Some of the pinball machines which [Jeri Ellsworth] has restored have ended up in the break room at her work. We’re sure her coworkers are thankful for this, but sometimes they forget to turn off the power to the machines, and letting them run constantly means more frequent servicing will be necessary. She set out to fix the situation by building a circuit that will automatically power the machines.

We think the solution adds some much needed functionality. Instead of hunting for the power switch, you can now power the machine up by hitting the left flipper, and it will automatically shut off after about five minutes of not having that flipper button pressed. For this she grabbed a 555 timer chip and built a circuit to control the relay switching the mains power.

She added a magnet and reed switch to the left flipper switch assembly to control her add-on circuit. It connects to the base of a PNP transistor which controls a resistor network and capacitor. This part of the circuit (seen to the left of the 555 in the schematic) allows the timer to be re-triggered. That is, every time you press the flipper the 555 will reset the timer. Don’t miss the demo she filmed after the break.

Continue reading “Auto Power Circuit For An Arcade Machine”

Klackerlaken Gets The Common Man Excited About Electronics

The Klackerlaken is a combination of LED throwie and bristlebot. The bauble is easy to build and really has no other purpose than to delight the masses. The diminutive devices were first seen in the wild at the 2011 CCC (Chaos Communications Camp) as a hands-on workshop. Check out the clip after the break and you’ll see why this really sucks in the spectators.

We’ve seen a ton of Bristlebots before (this tiny steerable version is one of our favorites) and were intrigued to see bottle caps used as the feet instead of the traditional toothbrush head. In fact, that video clip shows off several different iterations including two caps acting as an enclosure for the button cell and vibrating motor. Googly eyes on the top really complete the look on that one.

Decorating the robots with LEDs, fake eyes, tails, and feathers helps to temper the technical aspects that kids are learning as they put together one of their own. We’re glad that [Martin] shared the link at the top which covers the creations seen at a workshop held by Dorkbot Berlin. This would be a great activity for your Hackerspace’s next open house! Perhaps its possible to have follow-up classes that improve on the design, using rechargeable cells instead of disposable buttons, or maybe supercaps would work.

Continue reading “Klackerlaken Gets The Common Man Excited About Electronics”

A One-bit Processor

Put on that abstract thinking cap, get out the pen and paper, and spend some time figuring out how this one-bit processor works. [Strawdog] came up with the concept one day during his commute to work (don’t worry, he takes the train… much safer than [Dave Jones’] frightening drive-time podcasts). He sketched it out on paper to make sure he knew where he was going with the project, then collaborated with Legion Labs to implement it in processing as an easier way to visualize its functionality. Since it’s one-bit there’s only room for one instruction. That instruction is a copy, then branch-if instruction. It copies the current bit to one address, and if that bit was one, it branches to a second address.

Going a bit fast for you? We think the description is fairly good, but if you can’t quite put it together from the article’s description, you may want to build this 2-bit paper processor and learn how it works first. It should teach you the basic concepts you need to understand the 1-bit version. As you can see in the image above, there’s also a single-step feature in the processing example that lets you analyze the effects of each instruction during program execution.