Analog Clock Display Uses A Nipkow Disk

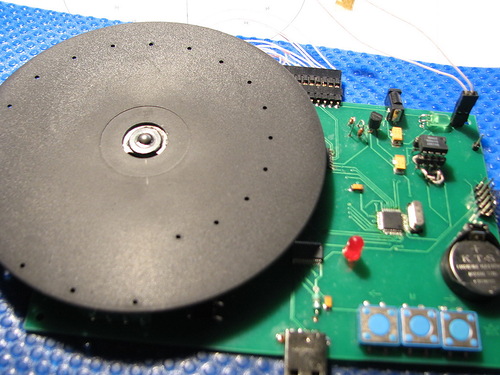
Although [Serokoy] is not thrilled with the outcome of his Nipkow disk clock (translated), but we really enjoy it. It uses the Persistence of Vision concept to create a light display from a rotating disk.

We’ve come across a lot of rotating disk clocks. Several were based off of the platters of a hard drive, using a slit, or series of slits to make up the display. This Nipkow disk uses a similar technique but in a more general way. The series of holes arranged in a spiral pattern allows a grid of concentric rings to be used as pixels when the disk is spinning. The bottom portion of the disk is used as the display area. Each pixel is illuminated at just the right time by LEDs below in order to freeze that pixel in the viewer’s eye. The demo is a bit rough, and [Serokoy] mentions that the precision of the hole layout makes all the difference. He drilled these by hand in a CD which was spray painted matte black. Even though he used a computer to lay out and print a template, it took four tries to get a suitable disk.

[Thanks Svofski]

Color Changing Coaster Has A Built-in Drink Detector

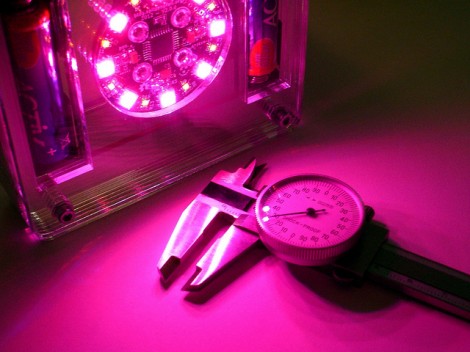
[Robert] put together his own illuminated coasters that know when they hold a drink. They look fantastic, thanks to professionally produced PCBs and a layered, laser-cut acrylic case. They’re much like the pagers given to restaurant-goes who are waiting for tables, but this version is much fancier (and doesn’t include the vibrating/paging feature).

The RGB-LED board is a previous project which was developed using eight surface mount RGB LED modules around a circular board. It uses an ATmega168 paired with an MBI5168 constant-current LED sink driver. The coaster enclosure gave him room for a few more items, like the pair of AA batteries which work in conjunction with a boost converter to power the device. It also houses an IR reflectance sensor which is used to detect the presence of a drink on the coaster. This is important since an on-occupied coaster looks like it would be blindingly bright if there wasn’t a glass to diffuse the intensity of the LEDs.

He mentions that incandescent light bulbs mess with the IR reflectance sensor. But there must be some way to account for ambient conditions with the code, right?

Kid-friendly RFID Media Center Playlist Control

rfid-dreambox-control

While young children have the tiny hands and fingers that most hackers/tinkerers wish they possessed from time to time, their fine motor skills aren’t always up to par when it comes to operating complicated electronics. People are always looking for ways to make their home entertainment systems accessible to their kids, and [Humpadilly] is no exception. Much like some of the other hacks we’ve seen this week, he has devised a way for his little ones (1 and 2 years old) to control his Dreambox Media Player using RFID, which seems to be the go-to technology for this sort of thing.

His RFID remote consists of three major components aside from the media player itself. An Arduino runs the show, and is connected to both an Ethernet shield and a breakout board fitted with an ID-20 RFID reader module. The Ethernet shield allows the Arduino to talk to his Dreambox over a telnet connection, while the RFID reader does what you would expect.

The device is in its infancy at the moment, and while [Humpadilly] hasn’t published a ton of details about the actual RFID devices he is using to control the system, he says that more details and improvements are forthcoming. In the meantime, you can check out his code here.

Twiddling An LED Using The BeagleBone’s Embedded Linux

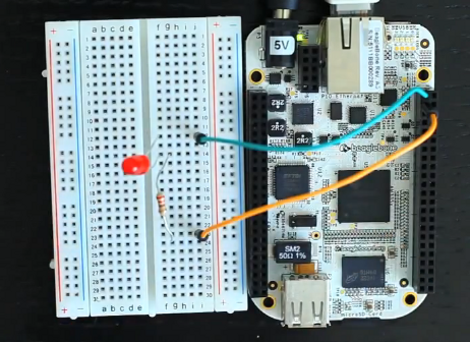
If you comfortable working with 8-bit microcontrollers, the thought of moving to a hardware platform running embedded Linux may be a bit daunting. After all, there’s a lot going on between you and the chips on a board like the BeagleBone seen above. But [Matt Richardson] shows how easy it can be to get at the pins on this device. He put together a primer on hardware control from the embedded shell.

You will remember that the BeagleBone is the newest generation of the BeagleBoard. The ARM processor and other goodies make it a powerful tool, and those already familiar with Linux will be able to get up and running in no time. Just connect the board to your network and SSH into it to get started. [Matt] outlines this setup process in the clip after the break. He then hits the reference manual to find the pinout of the female headers on either side of the board. Each available I/O pin is mapped to the /sys directory and can easily be controlled by echoing your commands to the appropriate files. But [Matt] went a step further than that, writing his own Python library that implements Arduino-style syntax like the digitalWrite() function.

This example should give you enough of a shove to start porting your own libraries over for use with the device. Don’t forget to document your projects and tip us off about them. Continue reading “Twiddling An LED Using The BeagleBone’s Embedded Linux”

RFID Playlists Plus A QR Code Concept

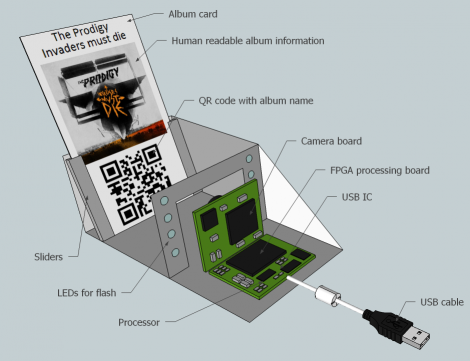
Here’s another audio playback hack that uses physical tokens to choose what you’re listening to. It uses Touchatag RFID hardware to control iTunes. The concept is very similar to the standalone Arduino jukebox we saw on Wednesday except this one interfaces with your computer and the tags select entire albums instead of just one song. A shell script processes the incoming tag ID from the reader, populates a playlist with all the tracks from the associated album, then executes an AppleScript to launch that playlist. Check out the short demo after the break.

But what really caught our eye is the QR-code reader concept which [Janis] hopes to implement at some point in the future. The computer side of things doesn’t need to be changed, but we love the challenge of putting together an FPGA-based camera to recognize and decode the QR image. Looks like a perfect use for that $10 camera module and it’s FPGA driver!

Continue reading “RFID Playlists Plus A QR Code Concept”

Gamelatron, A Fully Robotic Indonesian Gamelan Orchestra.

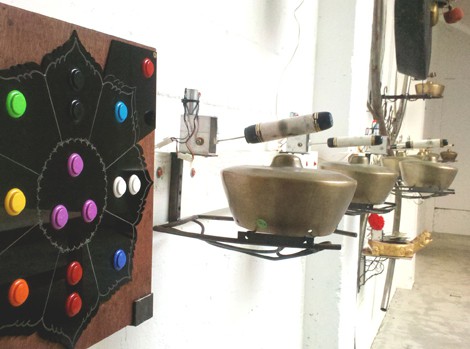
Last summer we got to have a little chat with [Aaron Taylor] about his automated Gamelan orchestra, Gamelatron. The robotic orchestra features a large collection of Indonesian gongs,  metallophones, xylophones and cymbals actuated using simple pull solenoids attached to mallets.  Gamelatron’s custom controller activates the various 24V solenoids using MIDI,  the whole thing is essentially a gigantic MIDI instrument that can be played by whatever sequencing device you so please.

[Aaron] has a variety of ways to pump MIDI into the controller including the “Padma Bhuwana”, a wooden box with 16 arcade buttons wired to an Arduino. The Arduino can either activate sequences on a computer running Ableton live or the MIDI sequence can be pumped directly out of the Arduino for a computer free interactive installation. [Aaron] also plugs his Akai MPD32 to the computer for live shows or he can just let the laptop do all the work for non-interactive installations.

The really interesting thing about having 170 or so simply actuated instruments is the ability to spread them out and fill every facet of a space. A great example of this was the Temple of Transition at Burning man 2011 where the gongs and what not else would span multiple floors. Here is a recent Wired magazine video published where [Aaron] gives a quick overview of the setup, or if you are too impatient for the ads check out a few videos of Gamelatron in at burning man and PEX summer festival after the jump. We also included [Aaron]’s kickstarter video which has a few more details on the setup (as well as irrelevant stuff about the kickstarter project that has since expired). With all the crazy midi instrument hacks we get around here it is not stretch of the imagination to see this has lots of interactive potential.

Continue reading “Gamelatron, A Fully Robotic Indonesian Gamelan Orchestra.”

Solar Charging A Buddha Machine

While having ambient music playing in the background can lead to a more relaxed state of mind, we can’t imagine the annoyance of having to replace the batteries constantly. Thankfully, [Phil] added solar charging to his Buddha Machine so he won’t have to worry about batteries anymore.

If you’re not familiar, the Buddha Machine is a small plastic box that loops nine tracks of ambient music inspired the Buddhist temples of south-east Asia. There’s not much to these little boxes; they’re just a plastic box with a speaker, on/off knob and an EEPROM loaded up with samples of music.

A year or so ago, the people behind the Buddha Machine posted a prototype of a solar-powered meditative noise box that was unfortunately never made. Thankfully, [Phil Stearns] stepped in posted a guide on how to convert a AA-powered Buddha Machine to solar power.

The modification is incredibly simple: after replacing the disposable AA batteries with NiMH rechargeable, two wires are swapped connecting the battery compartment with the main PCB and the box is sealed up again. Now, whenever one of [Phil]’s solar panels is connected to the power jack the batteries begin charging. [Phil] says he can get two days worth of runtime with a full 8-hour charge, so he shouldn’t need any batteries for his Buddha Machine anytime soon.