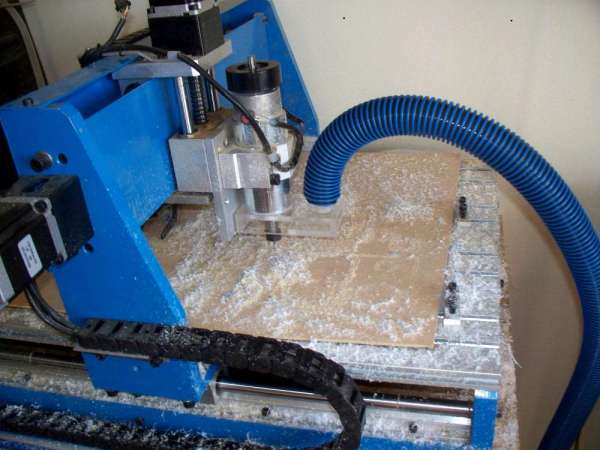
LinuxCNC Based Plasma Cutter Router

If a wood CNC router just isn’t enough for you, you’re going to need something a little bit more powerful. Relatively speaking, the next most affordable step up is a CNC plasma cutter. Mhmm… Plasma…

maker-works

[Maker Works] of Ann Arbor decided it was time to add some serious metal working capabilities to their already impressive mech shop. The design is based on of  [JoesCNC], however they’ve opted for some seriously beefy servo motors, instead of steppers.

The frame is made out of 8020 aluminum extrusions, which certainly adds to the cost, but results in a very professionally built machine. X and Y axis’ make use of NEMA 34 Servo motors, driven by Granite Devices VSD-E servo drivers. The Z-axis uses a NEMA 23 with a Gecko 320X driver. To further increase the power of these guys, 10:1 reduction gearboxes are used on both the X and Y.

All in all the project cost approximately $8,000, though after lessons learned, they think they could redo it for around $6,000.

When they first started testing it, they were dismayed with how dirty the room got from the fine dust created by the plasma cutter — so they’ve upgraded to a water tray bed (2″ deep), which helps immensely. In fact, the part doesn’t even need to be fully submerged in water for it to cut down pretty much all of the dust. The water also helps prevent damage to the aluminum bed underneath.

Continue reading “LinuxCNC Based Plasma Cutter Router”

Building A Wood CNC Router From Scratch

home made cnc router

[David Taylor] needed a CNC router to do some more complex projects — so he did what any maker would do if they’re strapped for cash — make it from scratch!

The impressive part of this build is that it was built entirely in his workshop, using tools he already had. A chop saw, wood lathe, drill and a drill press, and finally a table saw — nothing fancy, but now with the CNC router he has a world of possibilities for projects! The mechanical parts he had to buy cost around $600, which isn’t too bad considering the size of the router. He lucked out though and managed to get the Y-axis and Z-axis track and carriages as free samples — hooray for company handouts!

The router is using an old computer loaded with LinuxCNC which is a great (and free!) software for use with CNC machines. It’s driving a cheap Chinese TB6560 motor controller which does the trick, though [David] wishes he went for something a bit better.

Some examples of the projects he’s already made using this baby include an awesome guitar amp, a wooden Mini-ATX computer case, and even a rather sleek wooden stereo with amp!

Did we mention it can even cut non-ferrous materials?

[via Reddit]

One-Off Kapton Solder Masks

soldermask

With the proliferation of desktop routers, and a number of easy methods to create PCBs at home, there’s no reason anyone should ever have to buy a pre-made breakout board ever again. The traditional techniques only give you a copper layer, however, and if you want a somewhat more durable PCB, you’ll have figure out some way to create a solder mask on your homebrew PCBs. [Chris] figured Kapton tape would make a reasonable soldermask, and documented the process of creating one with a laser cutter over on the Projects site.

The solder mask itself is cut from a piece of Kapton tape, something that should be found in any reasonably well-stocked tinkerer’s toolbox. The software for [Chris]’ laser cutter, a Universal Laser Systems model, already has a setting for mylar film that came in handy for the Kapton tape,

Of course, getting the correct shapes and dimensions for the laser to cut required a bit of fooling around in Eagle and Corel Draw. The area the laser should cut was taken from the tCream and tStop layers in Eagle with a 1 mil pullback from the edges of the pads. This was exported to an .EPS file, opened in Corel Draw, and turned into a line art drawing for the laser cutter.

The result is a fast and easy solder mask that should be very durable. While it’s probably not as durable as the UV curing paints used in real PCBs, Kapton will be more than sufficient for a few prototypes before spinning a real board.

CNC Plasma Cutter Build Presented In Excruciating Detail

If you have been wondering what it takes to build a CNC Plasma Cutter then get ready to look no further. [Desert Fabworks] has documented the trials and tribulations of their CNC Plasma Cutter build. Saying it is extremely detailed would be an understatement. They cover everything from choosing components to machine setup.

The group already had a CNC Plasma Cutter that they have outgrown. To justify the new purchase the replacement machine would have to have a few non-negotiable features: 4×8 ft cutting area, torch height control, water table, cutting up to 1/2″ steel and be easy to operate and maintain. For the frame and gantry, they settled on a Precision Plasma kit as they felt it was the best value that met their requirements. The electronics package was separate from the frame kit and was provided by CandCNC. Among other things, this package included the power supply, stepper motors, stepper drivers and the torch height controller. For the plasma cutter itself [Desert Fabworks] chose a Hypertherm Powermax65 which can cut up to an inch thick of mild steel and has swappable torches so the main unit can be used for both the CNC table and hand cuts.

Continue reading “CNC Plasma Cutter Build Presented In Excruciating Detail”

Adding Spindle Direction And Coolant Control To Your CNC Machine

CNC3020 spindle direction control and coolant system

[Peter] is back at it, again modding his CNC3020 router. This time he’s adding a coolant system and spindle direction control. If you have ever tried cutting plexiglass using a mill, router or even a band saw, then you know it is common for those plastic chips to melt together and form a crusty trail of goobers directly behind the cutting tool. Turning down the spindle speed helps a little but the intent of the coolant system is to eliminate the globular mess all together.

It appears the coolant flow is open loop, meaning the initial coolant reservoir is not replenished automatically. The coolant starts in a container and is moved via a pump through a silicone hose. At the end of the hose there is a nozzle mounted to the Z axis which points the coolant stream at the tool bit. The nozzle is plastic and made from a re-purposed and modified flux application container. [Peter] took advantage of the machine’s bed being made of slotted extruded aluminum. The bed catches the coolant which then travels down the channels to the front of the machine where it is collected in a custom made bin. The parts of this plexi bin were actually cut out using this machine! Gravity then drains the contents of this bin into another container residing at a lower altitude.

Continue reading “Adding Spindle Direction And Coolant Control To Your CNC Machine”

Laser Cut Miter Joints

polyhedraEvery project deserves its own laser cut enclosure, of course, but the most common method of joinery – an overabundance of mortises and tenons, and if you’re lucky, a bit of kerf bending – is a little unsightly. Until tastes in industrial design change to accommodate this simple but primitive method of joining two laser cut panels together at an angle takes hold, the search will continue for a better way to cut acrylic and plywood on a laser cutter. The folks at Just Add Sharks might have a solution to this problem, though: miter joints with a laser cutter.

Instead of the slots and tabs of the usual method of constructing laser cut enclosures, miter joints produce a nearly seamless method of joining two perpendicular panels. The key, of course, is cutting a 45° bevel at the joint and gluing or fastening the pieces together. Just Add Sharks is doing this with a laser cut jig that holds a plywood or acrylic piece at a 45° angle to the laser beam. Yes, it’s only one cut per pass, but after adjusting the depth of cut to 1.4 times the thickness of the material, miter joints are easy.

Using a laser for miter joints isn’t limited to 45°, either. There are a few examples of an octahedron and icosahedron. Of course fastening these mitered panels together will be a challenge, but that’s what clamps and glue are for.

Better Lasing With Pulses

laser

The folks at the Lansing, Michigan hackerspace built themselves a 40 Watt laser cutter. It’s an awesome machine capable of cutting plywood and acrylic, and is even powered by a RAMPS board, something normally found in 3D printers. They wanted a little more power out of their 40 Watt tube, though, and found pulsing the laser was the best way to do that.

Unlike the fancy Epilog and Full Spectrum Laser machines, the Buildlog.net 2.x laser cutter found in the Lansing Hackerspace didn’t use Pulse-Per-Inch (PPI) control until very recently. When a laser tube is turned on, the output power of the laser is much higher – nearly double the set value – for a few milliseconds. By pulsing the laser in 2-3 ms bursts, it’s possible to have a higher effective output from a laser, and has the nice added benefit of keeping the laser cooler. The only problem, then, is figuring out how to pulse the laser as a function of the distance traveled.

To do this, the laser cutter must accurately know the position of the laser head at all times. This could be done with encoders, which would require a new solution for each controller board. Since laser cutters are usually driven by stepper motors controlled with step and direction signals, a much better solution would be to count these signals coming from the CNC computer before it goes to the RAMPS driver, and turn the laser on and off as it moves around the bed.

A few tests were done using various PPI settings, each one inch long, shown in the pic above. At 200 PPI, the laser creates a continuous line, and at higher PPI settings, the lines are smoother, but get progressively wider. The difference between PPI settings and having the laser constantly on is subtle, but it’s there; it’s not quite the difference between an axe and a scalpel, but it is a bit like the difference between a scalpel and a steak knife.

It’s an impressive build for sure, and something that brings what is essentially a homebrew laser cutter a lot closer to the quality of cutters costing thousands of dollars. Awesome work.