Laser Cut Miter Joints

polyhedraEvery project deserves its own laser cut enclosure, of course, but the most common method of joinery – an overabundance of mortises and tenons, and if you’re lucky, a bit of kerf bending – is a little unsightly. Until tastes in industrial design change to accommodate this simple but primitive method of joining two laser cut panels together at an angle takes hold, the search will continue for a better way to cut acrylic and plywood on a laser cutter. The folks at Just Add Sharks might have a solution to this problem, though: miter joints with a laser cutter.

Instead of the slots and tabs of the usual method of constructing laser cut enclosures, miter joints produce a nearly seamless method of joining two perpendicular panels. The key, of course, is cutting a 45° bevel at the joint and gluing or fastening the pieces together. Just Add Sharks is doing this with a laser cut jig that holds a plywood or acrylic piece at a 45° angle to the laser beam. Yes, it’s only one cut per pass, but after adjusting the depth of cut to 1.4 times the thickness of the material, miter joints are easy.

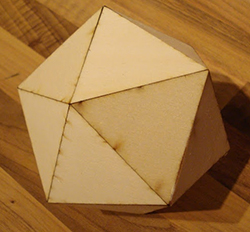
Using a laser for miter joints isn’t limited to 45°, either. There are a few examples of an octahedron and icosahedron. Of course fastening these mitered panels together will be a challenge, but that’s what clamps and glue are for.

Hackaday Links: June 15, 2014

hackaday-links-chain

Love the classic brick Game Boy, but hate the low-contrast LCD, terrible battery life, and the inability to play Pokemon Emerald? This one’s just for you. It’s the ultimate DMG Game Boy – a Game Boy Advance SP stuffed (is it stuffed if it’s taking up more room?) into the classic Game Boy enclosure. Forum thread.

Zooming in to a microchip. It starts off with a DSLR and ends up on a scanning electron microscope. This is an older chip, and the CPU you’re using right now probably has much smaller features.

Every movie and every TV show set in space invariably has space helmets with LEDs pointing towards the face. Think how annoying that would be for an astronaut. Here’s how you add LEDs to a space helmet for a nice theatrical effect. Just don’t use it on a real EVA.

Everyone’s favorite crowdfunded space probe can apparently be detected with an 8-foot dish. That’s the same size as an old C-band dish, a.k.a West Virginia wildflowers. We know some of you have one of these out there, so go make a ~2GHz feed horn, grab a USB TV dongle, write it up, and send it in.

Alright, MAME cabinets. Say you want to go old-school and have a CRT. Some arcade games use a vertically oriented display, while other, slightly more modern games use a horizontally mounted display. How do you fix this? Get a big bearing, of course. This one allows a 19″ CRT to be rotated 90 degrees – all you need, really, if you’re switching between Pacman and Mortal Kombat.

Hey mechanical keyboard enthusiasts! Here’s some Hackaday Cherry MX keycaps. Informal interest check in the comments below. Suggestions welcome.

The Relay-Based Mouse Emulator

mouse

[Nixie]’s job involves using some test software that requires moving a mouse around, clicking a few buttons, checking if everything is okay, and repeating the process over and over again. This is obviously a solution for some keyboard macros, but in a fit of sadistic spite, the test software requires someone to move a mouse around the screen. What is [Nixie] to do? Make a mouse emulator and automate the whole thing, of course.

The Memulator, as [Nixie] calls the device, is the latest in a series of devices to increase productivity when testing. The first version was the mouse tumor, an odd-looking device that simply switched off the LED for an optical mouse, keeping the cursor in one spot while [Nixie] hammered a button repeatedly. The second version is more advanced, capable of moving the cursor around the screen, all without doing an iota of USB programming: [Nixie] is simply using a resistive touch pad, some relays and a few pots to turn buttons into cursor movements. It’s such a simple solution it almost feels wrong.

There’s some interesting tech here, nonetheless. For some reason, [Nixie] has a few cases of old, can-shaped soviet-era relays in this build. While using such cool, awesome old components in such a useful and productive build seems odd, if you’re trying to fix ancient software that’s so obviously broken, you might as well go whole hog and build something that will make someone in twenty years scratch their head.

Vertical video of the Memulator below.

Continue reading “The Relay-Based Mouse Emulator”

A Motion Activated AC Switching Circuit Using Mostly Discrete Components

AC motion switch

If you’ve ever dealt with a brightly lit Christmas tree, you might understand the frustration of having to crawl underneath the tree to turn the lights on and off. [brmarcum] feel’s your pain. He’s developed his own motion activated AC switching circuit to turn the lights on and off automatically. A motion sensor ensures that the lights are only on when there are people around to actually see the lights. The circuit also has an adjustable timer so [brmarcum] can change the length of time that the lights stay on.

The project is split into several different pieces. This makes the building and debugging of the circuit easier. The mains power is first run through a transformer to lower the voltage by a factor of 10. What remains is then filtered and regulated to 9VDC. [brmarcum] is using a Parallax PIR sensor which requires 4.5V. Therefore, the 9V signal is then lowered once more using a voltage divider circuit.

When the PIR sensor is triggered, it activates the timer circuit. The timer circuit is driven by a 555 timer. The circuit itself was originally borrowed from a classic Forrest Mims book, though it was slightly modified to accommodate the PIR sensor. The original push-button trigger was removed and replaced with the signal from the PIR sensor. The only problem is that the circuit was expecting a low signal as the trigger and the PIR sensor outputs a high signal. [brmarcum] resolved this problem with an NPN BJT to invert the signal. Once the timer is triggered, it flips on a relay that allows the mains electricity to flow through to the lights.

[brmarcum] soldered the entire circuit onto a piece of protoboard. The final product was then mounted securely inside of an insulated plastic case. This allows him to mount the circuit safely underneath the Christmas tree skirt. The PIR sensor is kept external to the enclosure and wired up into the tree itself. This allows the sensor to still detect motion in the room while the rest of the circuit is hidden away.

[via Reddit]

PiGates Validates Your Concert Tickets

gatespi

[Seph] works for a company that handles ticketing for concerts and special events. One of his primary tasks is to check for counterfeit tickets at the gates of an event. Depending on the venue, this can be mag-stripes, bar codes, or one of several breeds of RFID. Until recently, netbooks coupled with USB readers performed the task. The netbooks weren’t a great solution though – they were expensive, relatively fragile, and took up more space than necessary.

[Seph] had a better idea. He created a ticket validation system using a Raspberry Pi. The Pi sits in a translucent case with a PiGlow RGB LED board. A USB reader (in this case a bar code reader) plugs into one of the Pi’s USB ports. These readers can operate in several modes, including keyboard emulation, which [Seph] chose because it wouldn’t require any driver work.

Using PiGates is so simple even a drummer could handle it. Normally the Pi glows blue. When a ticket is scanned, [Seph’s] python script reads the code and verifies it against an online database.If the ticket is valid, the Pi will glow green. A counterfeit ticket is indicated by flashing red LEDs.

Click past the break for more on PiGates.

Continue reading “PiGates Validates Your Concert Tickets”

RasPi FM Transmitter

Easily Turn Your Raspberry Pi Into An FM Transmitter

Have you ever wanted to be your own radio DJ? [Kevin] has made it easier than ever with his Raspberry Pi FM Transmitter program. The program is written in C. [Kevin] has made source code is available along with a compiled binary.

PIFM allows you to load up any audio file and specify a frequency to transmit. The program will then use PWM to modulate the audio sample through the Pi’s GPIO4 pin. [Kevin] claims that the RasPi alone will only transmit around a 10 cm distance. He says that making a simple antenna out of a jumper wire can increase the distance to around 100 meters. All you have to do is hook up the wire to the GPIO4 pin to drastically increase the range.

The legality of such a transmitter will vary from place to place, so be sure to check out your local regulations before you go transmitting audio on regulated frequencies. If this kind of thing is interesting to you, you may want to investigate ham radio. It’s not all Morse code and old fogies. Some people claim it’s a hacker’s paradise.

[via Reddit]

RFID Tag Cell Phone

Simple Hack Puts An RFID Tag Inside Your Mobile Phone

RFID security systems have become quite common these days. Many corporations now use RFID cards, or badges, in place of physical keys. It’s not hard to understand why. They easily fit inside of a standard wallet, they require no power source, and the keys can be revoked with a few keystrokes. No need to change the locks, no need to collect keys from everyone.

[Shawn] recently set up one of these systems for his own office, but he found that the RFID cards were just a bit too bulky for his liking. He thought it would be really neat if he could just use his cell phone to open the doors, since he always carries it anyways. He tried searching for a cell phone case that contained an RFID tag but wasn’t able to come up with anything at the time. His solution was to do it himself.

[Shawn] first needed to get the RFID tag out of the plastic card without damaging the chip or antenna coil. He knew that acetone can be used to melt away certain types of plastic and rubber, and figured he might as well try it out with the RFID card. He placed the card in a beaker and covered it with acetone. He then sealed the beaker in a plastic bag to help prevent the acetone from evaporating.

After around 45 minutes of soaking, [Shawn] was able to peel the plastic layers off of the electronics. He was left with a tiny RFID chip and a large, flat copper coil. He removed the cover from the back of his iPhone 4S and taped the chip and coil to the inside of the phone. There was enough room for him to seal the whole thing back up underneath the original cover.

Even though the phone has multiple radios, they don’t seem to cause any noticeable interference. [Shawn] can now just hold his phone up to the RFID readers and open the door, instead of having to carry an extra card around. Looking at his phone, you would never even know he modified it.

[Thanks Thief Dark]