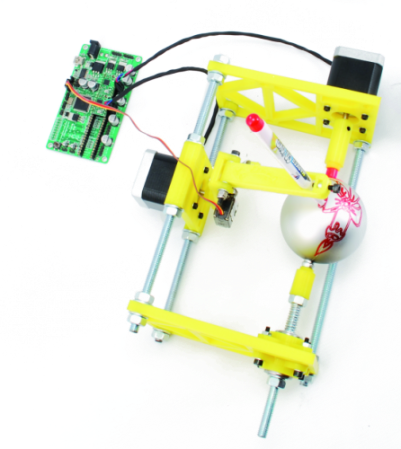
Software Advice For Anyone Thinking About A CNC Router

Excellent results can come from a small CNC router, but don’t forget the software!

CNC tools, whatever their flavor, can greatly enhance your “making” or DIY ability. My current tool of choice is a CNC router. Being familiar with a manual milling machine, the concept seemed similar, and the price of these is quite reasonable when compared to some other tools. As described in this post, my machine is a Zen Toolworks model, but there are certainly other options to visit like this Probotix V90 model noted recently in this post.

Although any number of CNC router models look great in videos and pictures, rest assured that even the best machines require some patience to get one running satisfactorily. Setting up the machine can be a challenge, as well as figuring out what your machine is capable of, but one thing that might slip peoples’ minds is the software involved. Read on to find out all you need to know the basics of what goes on behind the scenes to “magically” produce interesting parts. Continue reading “Software Advice For Anyone Thinking About A CNC Router”

Aluminum Bitcoin Keychain

mVCyX2K

Here’s a cool way to bring a physical presence to your Bitcoins: a custom CNC milled QR code Bitcoin address!

[ch00f], one of our occasional writers here at Hack a Day, has just finished this slick aluminum Bitcoin QR code keychain. He started by creating a vanity Bitcoin address using a program called OCLVanitygen, consisting of his dad’s first initial and last name at the beginning, followed by a random string of numbers. It only took his Radeon HD6790 6 hours to solve, which amounted to approximately half a trillion guesses in order to find the address! 

He then took his shiny new Bitcoin address and created a QR code from it using an web-based generator. [ch00f] then increased the resolution of the image in Photoshop and imported it into a CNC program called CamBam. A converted CNC Taig mill got to work tracing out the code with a 0.049″ carbide end. The total milling time was just over 2 hours. A bit of black spray paint, some sanding, and a few layers of clear coat later and the keychain is done!

[via Reddit]

Hanging Plotter With A Color Twist

hangbot

[Jack Boland], a mechanical engineer at the University of Wisconsin, built a cool hanging plotter project called HangBot. It’s a fairly standard setup, where he converts an image to G-Code files, and it is plotted using two stepper motors for control. We’ve seen vertical plotters before, but they tend to only have a single pen. [Jack] expanded this one to bring color into the mix by splitting an image into separate CMYK layers, and plotting each onto separate transparency film. When overlaid, they create something close to a full color image. His idea is to use this setup as a replacement for typical window signage.

Since it’s drawing a continuous line, he appears to be employing a grid instead of a traditional dot pattern. That, combined with the inaccuracy of a marker tip means resolution will be limited. Still, you can tell that he’s made a great start in this (albeit blurry) photo. Check out the video of it’s operation after the break.

Continue reading “Hanging Plotter With A Color Twist”

Four Cable Drawing Machine Pulls Our Strings

sandplotter

[David] has created a four cable drawing machine for the Telus Spark Science Centre in Canada. Hackaday has featured [David’s] unconventional drawing contraptions before, specifically his center pivot pen plotter. The drawing machine is a new take on a drawbot, and could be considered to be close cousins with [Dan’s] SkyCam. The premise is simple: A stepper motor with a reel of string is placed at each corner of a square. The strings for all four motors come together at a center weight. When all four strings are taut, the weight is lifted off the drawing surface. When a bit of slack is added into the strings, gravity pulls the weight down to touch the sand.

It’s at this point that a simple premise becomes a complex implementation. Moving the weight in one direction is a matter of reeling out string on one motor, and reeling in string on the other. But what about the two “un driven” strings? They have to be slack enough to allow movement in the driven direction, but not so slack that the weight can dig in and tumble on the sand, causing a tangle. To handle some of these questions, [David] called on [Kevin] to write some software. [Kevin] created a custom kinematics module for LinuxCNC to control the drawing machine. The drawing machine runs on Gerber Code, similar to a CNC. Simply feed the machine Cartesian coordinates, and [Kevin’s] module converts to steps.

Continue reading “Four Cable Drawing Machine Pulls Our Strings”

Fail Of The Week: Hackaday Writer’s First CNC Adventure

This Fail of the Week post focuses on a project from [Limkpin] aka [Mathieu Stephan], one of the Hackaday contributors. He wanted a CNC mill of his very own and decided to go with a kit that you assemble yourself. If it had been clear sailing we wouldn’t be talking about it here. Unfortunately he was met with a multitude of fails during his adventure. We’ll cover the highlights below.

Continue reading “Fail Of The Week: Hackaday Writer’s First CNC Adventure”

LearnCNC Game

Do you want to learn how a CNC machine works, but don’t have access to one (yet)? One of our tipsters just informed us of this great project that was created by a team of students from the University of British Columbia, and it’s an interactive 3D learning system that teaches everything about CNC machining.

We downloaded the “game” and it’s pretty cool — you get to walk around a virtual workshop and can click on various things to learn about their functions. Alternatively, you can go just go through their lessons (that appear when you click on things) on the website. It’s a great summary to get your feet wet in the world of CNC machining.

Beyond how the machines themselves work, the website also goes into great detail about the various applications you can use CNC machining for and physics behind tooling design.

Even if you’ve had a brief introduction to CNC machining before, this site provides a great summary of most everything — it’ll be very handy if you’re hoping to use a school’s machine shop for personal projects…

[Thanks Chris!]

The Making Of The WaterColorBot

water color bot

Remember the WaterColorBot? Ever wonder what goes into manufacturing a kit like it? Well the folks over at Evil Mad Scientist just spilled the beans.

It’s a great insight on how these kits are typically made in a manufacturing environment, especially if you happen to be the founders of a rather successful Kickstarter project like the WaterColorBot by [SuperAwesomeSylvia]. The article goes into great detail on minimizing material waste during CNC routing, mass producing laser engravings using a jig, hardware assembly, and finicky assembly of some of the more complex components. Not to mention boxing, storing, and packaging the finished products!

We’re happy to hear the WaterColorBot is officially shipping now, and available for purchase — Seems like they were only off by a month or so for their kickstarter delivery goals. Remember our recent post about one of these WaterColorBots out in the wild? One was used to create art using inputs from driving a real car!