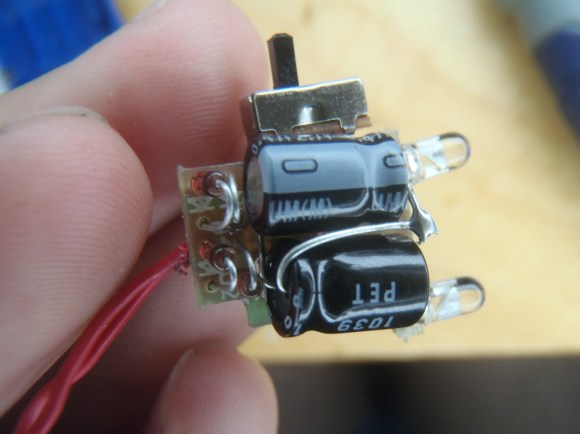
Using An Undocumented Display With An FPGA

When [Mike] ran across a display on Deal Extreme with 8 seven-segment displays, 8 red/green LEDs, and 8 buttons, he knew it would find a good home in a future project. There was only one problem, though: except for an Arduino library, there was absolutely no documentation available for this display. Wanting to use this display with an FPGA board, [Mike] decided against bit-banging a protocol and ported the C++ code into a hardware implementation.

This Deal Extreme display, the TM1638, features enough seven-segment displays, LEDs and buttons to build something really cool, and surprisingly isn’t terribly hard to interface with a microcontroller. The TM1638 library communicates with the outside world via only three pins and a simple serial connection.

After figuring out what commands are sent to make the display turn LEDs on or off, [Mike] wrote a hardware implementation for his Digilent Nexys2 and Digilent Basys2. Now the display operates on an FPGA just like it does with an Arduino, and is a great tool for debugging HDL code for [Mike]’s FPGA.

Helmet Of Many LEDs Built For Burning Man

This motorcycle helmet was heavily altered to accept all of the hardware that goes into driving that huge array of LEDs. [Brian Cardellini] built it to wear at burning man. He claims to have been in over his head with the project, but we certainly don’t get that feeling when we see the thing in action. It’s light on build details, but there are plenty of demo shots in the video after the break. The animation and fading action really gets started about a minute and a half into it.

One of the early frames of the video is a shot of the parts order webpage. Since it’s an HD clip we were able to glean a few bits and pieces from that. It includes a MAX7219 LED Display Driver and fifteen 25-packs of Blue LEDs. Now that chip is a great choice, and one of the later shots shows two of them on breakout board driven by an Arduino. The look is very clean since he carved out most of the helmet’s padding to make room for the electronics.

Continue reading “Helmet Of Many LEDs Built For Burning Man”

Hacking The Peggy

Evil Mad Scientist Laboratories received an email from someone who wanted to hack their Peggy kit. This LED matrix kit has been featured on Hack a Day in the past, and provides hardware to set up a 625 LED matrix.

This user built an external array of LEDs that they wanted to drive with the Peggy hardware. There are a few options for making this happen. The first one is to run wires from each of the 625 LED footprints on the board. Each has an anode and cathode, so that makes for a total of 1250 wires to run. It turns out that people have actually done this with the Peggy in the past, using very fine wire.

EMSL suggests wiring the rows and columns instead. This way, only one wire is needed for each row and column, allowing a 25×25 LED grid to use 50 wires instead of 1250. They also explain how to expand the grid to a 30×20 LED matrix. It’s a good explanation of how the kit works, and how it can be expanded.

Photo [oskay]

4″ Seven Segment Displays Make A Fine Scoreboard

[Blark] took a few parts and turned them into a simple scoreboard. The centerpiece of the build is a set of 4″ seven-segment displays. With those in hand it was just a matter of choosing a controller to feed them data, and developing a user interface.

He seems to have had some issues as he mentions having blown up two PIC chips while soldering. He transitioned to an ATtiny24 chip and everything seems to work quite well now. The user interface depends on two buttons, each increments the score for one half of the display and pushing both at once zeros the game score. The displays use shift registers to store data so they’re quite easy to control with AVR chips. Check out the demo video after the break.

The only problem here is that someone needs to be on the sidelines to increment the score. We’ve seen some more intricate designs that let you use a remote control or even a smart phone.

Continue reading “4″ Seven Segment Displays Make A Fine Scoreboard”

More LED Madness!

So last week [Caleb] posted an article about hacking a floating LED ball.  In response, here’s a couple simple LED hacks or repurposings that I’ve come up with recently.

glow-cube-LED

LED Solar Glow Cube: If you’ve ever seen path lights lighting up people’s gardens or walkways you may have wondered what components they had in them and how they could be repurposed.  As shown in this article, there’s not much too them other than a circuit board, rechargeable battery, and, of course, a solar panel. Combine this with some leftover foam with a hole in it, and you have the device pictured above.  Really simple, but the results are pretty cool as seen in the video after the break.

LED light-nunchucks

LED Nunchucks: If you thought that wheel lights were only for actual wheels, than you haven’t seen these nunchucks built with some PVC pipe and acceleration-sensitive wheel lights. This may not be much of a “hack” in that they are quite easy to build, but the results are pretty neat, being fun to sling around or even for use in long-exposure photography.  Check out the videos after the break of these nunchucks in action and of some LED light paintings that can be made with them. Continue reading “More LED Madness!”

Full-color Video On A Spinning POV Display

Watching Big Buck Bunny on a spinning POV display is pretty impressive. Sure, the circular display area cuts off some of the picture, but otherwise it looks fantastic. This POV display is based on a Gumstix board. It runs embedded Linux which makes video playback rather easy. But translating each frame to the round display is another story.

The device is the result of a course project at Telecom ParisTech. [Félix], [Sylvain], and [Jérémy] used an FPGA to do the pixel mapping. This uses an encoder wheel (rather than a traditional hall effect sensor) to ascertain the blade’s position. The sensor that monitors the disc sends quadrature encoded pulses which result in 10-bit position data. The FPGA uses that data to calculate where each LED falls in its arc, then looks up the pixel color for that position. It’s not the largest POV display we’ve seen, but it certainly has the very best RGB resolution by far.

Continue reading “Full-color Video On A Spinning POV Display”

Disco Planet, A Massive RGBW LED Array In A 6′ Globe

About half a year ago [John] over at Frank’s Kitchens came to me with an idea for a giant lighting project. He had this 6ft diameter aluminum frame globe rescued from the Philadelphia Theater Company and wanted it to be an interactive display of sorts. After a few discussions we got together and somehow managed to order 800 3 watt LEDs in red, green, blue, and white. We had a system that worked great on paper, and managed to get it built by Valentines day for a big show. It failed miserably and hardly even illuminated the LEDs. I, naturally, took this far too personally and set out for a complete redesign, looking in the direction of digitally addressable LED strips.

In addition to building a crazy turbo charged LED array I also spent a lot (a whole lot) of time coding a nice clean fully functioning RGB LED strip controller using an Arduino Pro Mini (5V 16 MHz), the MSGEQ7 audio frequency multiplexer (PDF) , and an IR remote. I plan on using this for other projects so the code can be easily reconfigured to use many different LED strips and a whole slew of IR remotes.

The schematic of the globe is here. The top half  of that schematic be catered to other projects using a variety of pre-built LED strips. The pastebin with code is here,  fastSPI_LED and IRRemote here and here. Some code jockeying was required to get IRRemote.h and FastSPI_LED to play nicely together, so check the code comments.

Continue reading “Disco Planet, A Massive RGBW LED Array In A 6′ Globe”