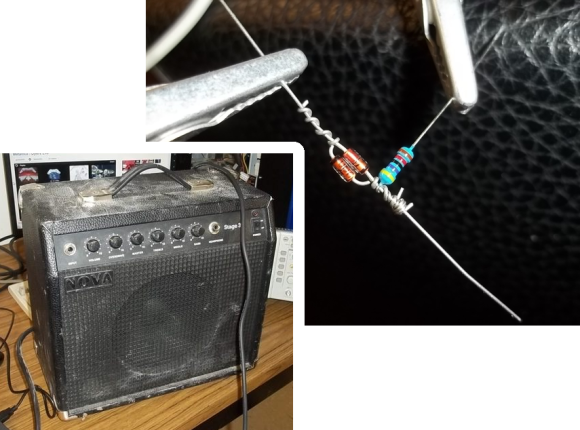
Log Guitar Uses Tube As A Bridge, Actually Is The Blues

In the never ending quest to replicate the tone of depression-era blues records, [Valve Child] managed to build the most backwoods guitar ever seen.

The body of [Valve Child]’s slide guitar was taken from the limb of a red gum tree felled during a wind storm. After taking a chainsaw, router, and sander to the guitar, [Valve] sealed it with linseed oil.

The real beauty of this build comes from the bridge and electronics: the pickup is made from six stacks of magnets encased in hot glue and wound with enamel wire. The bridge of the guitar is actually made from a 6GM8 dual triode. Not only does this provide the guitar with a wonderful brassy sound, the tube serves as a wonderful low-tech preamp when powered by a 6 volt battery.

The three strings on the guitar are tuned DAD, perfect for the likes of [Robert Johnson], or, for the younger kids, [Jack White]. Surprisingly, [Valve Child]’s guitar actually sounds really good. as heard in the video demo after the break.

Continue reading “Log Guitar Uses Tube As A Bridge, Actually Is The Blues”

Adding A Sound Synthesizer To A ‘don’t-touch-the-sides’ Maze Game

Part of the fun of the classic game of Operation is the jump you get from the loud buzzer which sounds if you touch the sides. This exhibit piece uses the same principle of lining the edges of a track with metal, but instead of an annoying buzz, each touch will issue a bit of music. That’s because the maze has been paired with a synthesizer. Instead of one sound wherever the stylus touches the sides, different parts of the maze act as one of 94 keys for the synthesizer.

There’s a lot more built into the base of the device than just a maze game. The knobs are used to alter the audio effects and the buttons work in conjunction with they stylus to sequence audio samples. There’s even a graphic LCD screen which shows the currently playing wave form. You can get a better look at the project in the video after the break.

Continue reading “Adding A Sound Synthesizer To A ‘don’t-touch-the-sides’ Maze Game”

ProtoSynth, The Prototyping Synthesizer

This project isn’t really a prototype, but a tool for prototyping. [Tymkrs] came up with a unique way to build this synthesizer prototyping tool. They actually patched into the underside of the breadboards in order to keep all of the permanent bits nice and tidy.

In the clip after the break you’ll see all of the build photos that lead up to this point. After cutting out and assembling the wooden pieces for the case they grab a soldering iron and get to work. Two octaves worth of keys were pulled out of an electric keyboard. Ribbon cable is soldered onto each key’s electrical connection, with an SIL pin header as a connector. This mates with another ribbon cable with a SIL socket on one end, and an IDC connector on the other. The real trick is getting that IDC connected to the breadboard. They cut back the adhesive tape on the underside of the board and soldered a surface mount pin header onto it. This way the inputs from the keys, as well as a few 1/4″ jacks from the back of the case are always available in a tidy way on the breadboards. The video goes on to show preliminary synthesizer work on the device.

Continue reading “ProtoSynth, The Prototyping Synthesizer”

Propeller Turned Into Chiptune Player With A Software SID

If there wasn’t reason enough to love the Parallax Propeller, now you can listen to chiptunes with your own pocket SID audio player.

This chiptune audio player uses the very unusual and very cool eight-core Parallax Propeller microcontroller. After soldering a few caps and resistors to a Propeller dev board to allow for audio out, the only thing necessary to play SID music files is a bit of code and an SD card breakout.

The key piece of code for this build would be the SIDcog object written by [Johannes Ahlebrand] this piece of code turns one of the eight cores in the Propeller into a virtual version of the classic Commodore 64 sound chip.

Since the SIDcog object only takes up one core on the eight core Propeller, it could be possible to turn this SID player into an all-inclusive chiptune audio source; the addition of an Atari POKEY or FM synthesis cog would allow for just about any conceivable chiptune sound to be carried around in a pocket.

No Hackaday post about chiptunes or SIDs would be complete without an audio demo, so you can check out the Propeller-powered SID after the break.

Continue reading “Propeller Turned Into Chiptune Player With A Software SID”

Raspberry Pi Synth Gives A Softsynth Dedicated Hardware

For all the musicians out there, here’s a great use for your Raspberry Pi. All the features you would expect from a nice analog synth are implemented in a Raspberry Pi-based polysynth – dual oscillators, LFOs, and phasers – and it looks like there will be a few more features added before the Raspi synth is released.

Even though the ‘synthesis’ part of the Raspi synth already sounds wonderful, getting MIDI on the Rasberry Pi leaves much to be desired. The creator of the Raspi synth thought about using the GPIO pins as a MIDI interface, but because the GPIO pins cannot run natively at 31250 bps (the MIDI spec), the Raspberry Pi has to waste most of its CPU cycles just listening for MIDI traffic.

Right now the Raspberry Pi synth is controlled by a USB-connected MIDI interface, and as you can hear after the break, sounds wonderful. We can’t wait to hear what this synth will be able to do in a few months’ time.

Continue reading “Raspberry Pi Synth Gives A Softsynth Dedicated Hardware”

Playing With DSP And Building A Guitar Pedal

Building guitar pedals has come a long way from hooking up a few transistors and building a simple boost circuit. [Cloudscapes] has been working on a Anti-nautilus auto glitch, auto repeat pedal, and if you’re looking for something that sounds like a spaghetti western soundtrack skipping on a record player, we couldn’t think of anything better.

[Cloudscapes] was already familiar with 8-bit AVRs, but when doing real-time audio sampling, a more powerful microcontroller was in order. He turned to the MikroElektronika MINI-32 board for development purposes. This small board fits a PIC32 microcontroller into an easily breadboardable DIP-40 form factor, perfect for playing around with some very capable hardware.

For the DAC, [Cloudscapes] had some experience with the 16-bit PT8211, but finding a good 16-bit ADC in a convenient package was a bit of a challenge. He eventually settled on the 12-bit MCP3201 ADC, more than enough for a pedal that is supposed to sound lo-fi.

After [Cloudscapes] got a few boards made, he started on his DSP adventure. Unfortunately, the initial code used unsigned 16-bit words to represent each sample, meaning every time the loop repeated it would start at 0 and produce a short pop in the speaker. After a week of debugging, [Cloudscapes] realized signed integers are a much better data format for storing audio data and got rid of the problems plaguing his project.

Now [Cloudscapes] has a wonderful DSP dev board, perfect for making new and strange guitar effects. After the break you can listen to a demo of what the Anti-nautilus pedal actually does, and we’ve got to say it sounds great.

Thanks [Chris] for sending this one in.

Continue reading “Playing With DSP And Building A Guitar Pedal”

Making Chiptunes With 32 Bytes Of RAM

Ah, chiptunes. One of the few remaining human endeavours where less RAM, less storage space, and fewer capabilities are actually considered an improvement. [dop3joe] over at the Stuttgart hackerspace Shackspace sent in a tiny chiptune playing circuit using the most bare-bones hardware we’ve ever seen.

The Noiseplug, as [dop3joe] calls it, is based on a very, very small 6 pin ATtiny9. With 1 kB of Flash memory and only 32 bytes of RAM [dop3joe] was able to create a small device inside an RCA jack that plays chiptunes whenever it is powered by a battery.

If you’d like to make your own noise plug, [dop3j0e] put all the code up in his Git. There are two relevant pieces of software for this build: a Windows app to create the chiptunes, and the ATtiny9 firmware itself. Of course to program the tiny, you’ll have to deal with the Atmel TPI, so here’s the application note (PDF).

Oh, [dop3joe] won third place at the Evoke demoscene party last weekend with the Noiseplug. Awesome.