Salvaged Meter Movements Really Pop In This DIY VU Meter Bridge

If you’re going to build a nice VU meter bridge for the recording studio, the first thing you need is a nice pair of VU meters. But lest you think it’s as easy as putting some meters into a nice box and calling it a day, think again.

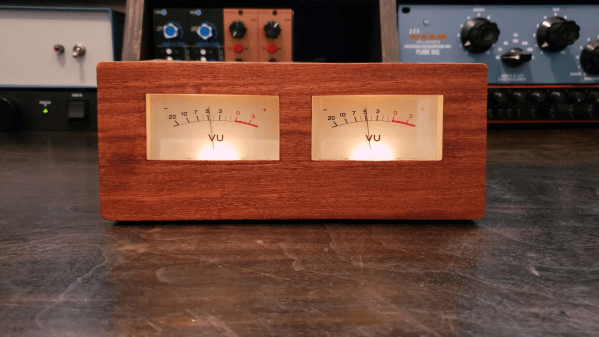
This project comes to us from [Frank Olson], whose projects usually incorporate wood as part of the mechanism, as with his famous wooden ribbon microphone. This build does indeed use wood, and to excellent effect, but only in the project’s final enclosure. Before that, [Frank] had salvaged a pair of good-looking moving coil meters from an old tape recorder. He muddled through some ideas before settling on a design. A NE5532 dual-channel audio buffer module is used as a preamp, with each channel feeding into a bridge rectifier before heading to the meter. Wisely, [Frank] chose to illuminate the meters with their existing incandescent bulbs, so a small DC-DC supply was added to provide the necessary 8 volts.

As for the enclosure, that’s where [Frank]’s experience working with veneers paid off. He chose mahogany, carefully cut all the pieces to shape with a knife, and glued it all up with CA glue — at least we assume it was CA; based on previous efforts, he uses a lot of the stuff. The tung oil finish looks fantastic, and the completed build aesthetic looks great! The video below shows it all.

If you need some backstory on the VU meter, we can help with that.

Continue reading “Salvaged Meter Movements Really Pop In This DIY VU Meter Bridge”

Low-Cost Electret Microphone Preamplifiers

Before the invention of microelectromechanical system (MEMS) microphones, almost all microphones in cell phones and other electronics were a type of condenser microphone called the electret microphone. The fact that this type of microphone is cheap and easy enough to place into consumer electronics doesn’t mean they’re all low quality, though. Electret microphones can have a number of qualities that make them desirable for use recording speech or music, so if you have a struggling artist friend like [fvfilippetti] has who needs an inexpensive way to bring one to life, take a look at this electret microphone pre-amp.

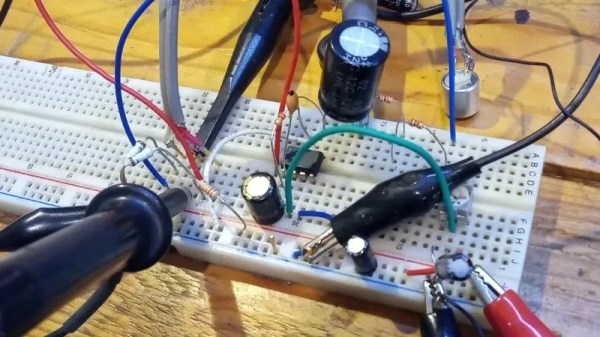
The main goal of the project is to enhance the performance of these microphones specifically in high sound pressure level (SPL) scenarios. In these situations issues of saturation and distortion often occur. The preampl design incorporates feedback loops and an AD797 opamp to reduce distortion, increase gain, and maintain low noise levels. It also includes an output voltage limiter using diodes to protect against input overload and can adjust gain. The circuit’s topology is designed to minimize distortion, particularly in these high SPL situations.

Real-world testing of the preamp confirms its ability to handle high SPL and deliver low distortion, making it a cost-effective solution for improving the performance of electret microphones like these. If you want to go even deeper into the weeds of designing and building electret microphones and their supporting circuitry, take a look at this build which discusses some other design considerations for these types of devices.

A Simple High-Fidelity DIY Mic Pre Amp

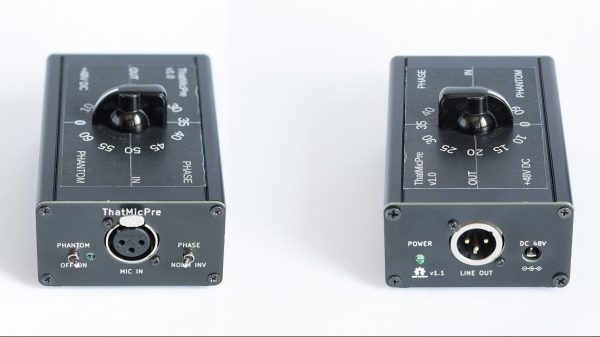
If you’re doing any serious work with microphones, you’ll typically find yourself in want of a dedicated preamp. [ojg] needed just such a thing for acoustic measurement duties, and set about working up a cheap DIY design by the name of ThatMicPre.

The design is based around the THAT1510 preamp IC, known for its good frequency response and low harmonic distortion and noise. The design is also compatible with THAT1512, SSM2019, and INA217 chips as well. [ojg] gave the design switch-controlled gain levels, providing greater accuracy than a potentiometer adjustment, and the ability to supply phantom power for mics that require it. The PCB is designed to rely on through-hole parts and common connectors for easy assembly.

The design is open source, and has already been built by others on the DIYAudio forums. Built into a simple case, it looks like a handsome and well-built piece of audio equipment. We’ve featured quite a few unique preamps over the years, and if you’ve been building your own, we’d love to see those too!

Hi-Fi Combines Best Of 60s And 90s Technology

The 90s were a dark time for audio equipment, literally and figuratively. Essentially the only redeeming quality from the decade of nondescript black plastic boxes was the low cost. Compared to the audio equipment of the 60s, largely produced in high-end enclosures with highly desirable tube amplifiers, the 90s did not offer much when it came to hi-fi stereo sound. However, those cheap black boxes from the 90s turn out to be surprisingly perfect for project enclosures for other amplifier builds, such as this 60s-era tube amp recreation.

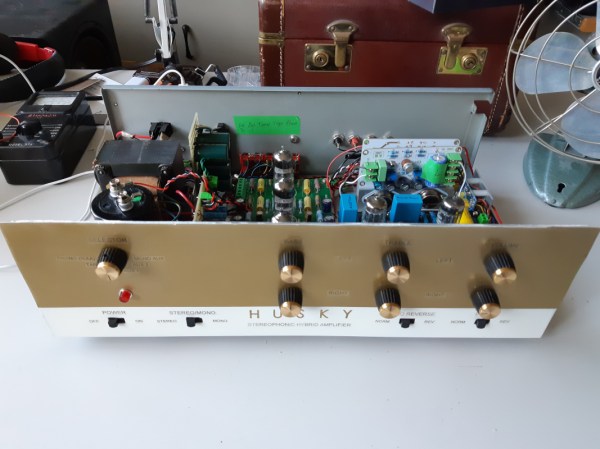
This mesh of the best of two distinct decades comes from [Alvenh] and begins by preparing the old enclosure for its new purpose. This means a lot of work fabricating a custom metal face plate for the new amplifier and significantly modifying the remaining case. After the box is complete, the amplifier build began. It uses a tube-based preamp and a solid-state power amplifier since [Alvenh]’s experience suggested that the warm tube sound was generated mostly in the preamp. This means that his design is a hybrid but still preserves the essential qualities of a full tube build.

The build also includes a radio module that has the ability to cover the 2m and 70cm bands popular in ham radio. This module also has been found to have much better audio quality than the standard AM/FM receiver typically used in projects like this. With the radio module added to the custom enclosure, as well as a phono amp and a power supply, [Alvenh] has an excellent audio amplifier in an inexpensive case which preserves the tube sound from the true hi-fi eras of decades past.

Continue reading “Hi-Fi Combines Best Of 60s And 90s Technology”

A 1950s Ampex Tape Recorder Microphone Preamplifier Restoration

So often when we read of a modification on a classic piece of tube electronics we prepare to wince, as such work often results in senseless butchery of a well-preserved survivor. With [Frank Olson]’s work on a 1958 Ampex 601 tape recorder though we were pleasantly surprised, because while he makes a modification to allow its use as a stand-alone microphone preamplifier he also performs an extremely sympathetic upgrade to modern components and retains it in substantially the form it left the Ampex factory.

The video below the break is a satisfying wallow in pre-PCB-era construction for any of the generation who cut their teeth on tube, chassis, and tag strip electronics. We can almost smell the phenolic as he carefully removes time-expired capacitors and fits modern replacements complete with period features such as sheathing over their leads. The larger multiway can electrolytics are left in the chassis, with their modern miniaturised equivalents nestling underneath them out of sight. We all know that electronic components have become a lot smaller over the decades, but it’s still a bit of a shock to see just how tiny even a high voltage electrolytic has become.

The Ampex would have been a very high quality tape recorder when new, and while this one has a problem with its mechanism it’s that quality that makes it easier for him to do this work in 2020. There’s every chance that this one could be returned to service as a tape recorder if someone was of a mind to fix it, and meanwhile it will give Frank excellent service as a high quality pre-amp. This is how resto-mods should be done!

Ampex are very much still in existence making digital storage products, but back in the 1950s they were at the forefront of analogue magnetic tape technology. We’ve written in the past about how Bing Crosby had a hand in the development of high quality tape recorders, and also about Ampex’s part in the gestation of the video recorder.

Continue reading “A 1950s Ampex Tape Recorder Microphone Preamplifier Restoration”

THAT Preamp

It is easy to cobble together projects these days. ICs make it simple and microcontrollers even easier. However, we always respect a project that really goes from concept to finished product and that’s what we liked about [Curt Yengst’s] “THAT” Thing microphone preamp.

In part 1 of his post about it, he talks about the basic ideas including the chips from THAT — a small but high-end audio chipmaker — he uses. The first chip is a low-noise audio preamp and the other is a balanced line driver.

In part 2, we get to see [Curt] go from breadboard testing to PCB fabrication all the way to the finished rack-mounted device with a good looking front panel. It worked, but like all designers, [Curt] was already thinking about the next version.

Continue reading “THAT Preamp”

Hackaday Prize Entry: A BSTRD Preamp

For this year’s Hackaday Prize, [skrodahl] is building a beautiful tube preamp. It’s a masterpiece of glass and free electrons, it already works, and it sounds great.

This circuit is a modified version of the Bastard, an amp published in the Danish magazine Ny Elektronik nearly 20 years ago. The original amp was a true bastard, with a transistor phono stage, a valve line stage, and an input selector that used relays. [skrodahl]’s version only uses the line stage, but part of the name remains as a nod to the original design.

The design of this amp uses octal 6J5 tubes, a 80 VDC, 0.1 A and 6 VDC, 1.5 A power supply. This is actually two projects in one, with the power supply comprising an another entire project.

[skrodahl]’s BSTRD is built, and it works, but the question remains: how does it sound? Unlike so, so many tube amp projects on the Interwebs, [skrodahl] actually has test and measurement gear to figure out what the frequency response and THD measurements actually are. For the frequency response, this amp is dead flat from 10 Hz to 30 kHz. THD is somewhere between 0.35-0.4%, or more than acceptable.

This is a great little project, and an awesome extension to an already popular Open Source project. It’s also a great entry for the Hackaday Prize, and we’re pleased to see it entered in this year’s contest.