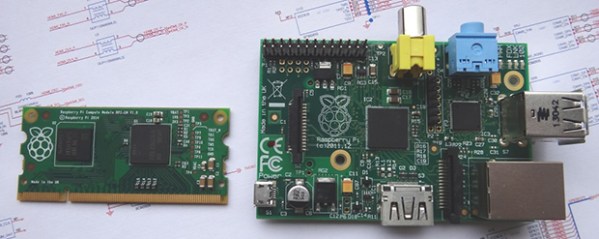
An Overkill Network Adapter For Retrocomputers

amiga

If you want to get an old Apple, Commodore 64, Amiga, or any other retrocomputer up on the Internet, this is for you. [Stian] had an Amiga 500 lying around and wanted to put it on a network. The A500 isn’t expandable, so he needed to look at some sort of adapter to put it on a network. The solution came to him in the form of a Raspberry Pi, a null modem cable, and a few bits of software.

To connect his Amiga to his network, [Stian] made a small serial converter board for his Raspi that breaks out the Tx and Rx pins on the Pi to a 9-pin serial port. With the physical connection to the Pi made, the only thing left to do was to get some software for the Amiga, namely AmiTCP and PPP. It’s not exactly a fast network connection, but this build allows [Stian] to connect to WiFi networks with ancient hardware.

One interesting aspect of [Stian]’s build is the fact it’s completely transferable to other retrocomputers – everything from old S-100 bus computers to classic macs, apples, and pretty much anything else with a serial port that supports PPP. Even with the expense of a Raspberry Pi, it’s much cheaper than absurdly expensive second-hand SCSI to Ethernet controllers and other tomfoolery.

Adding Night Vision To The Raspberry Pi Camera

After months of promises, the Raspberry Pi camera is finally heading out to hackers and makers across the world. Of course the first build with the Pi cam to grace the pages of Hackaday would be removing the IR filter, and it just so happens [Gary] and his crew at the Reading hackerspace are the first to do just that.

As [Gary] shows in his video, the process of removing the Pi cam’s IR filter is extremely fiddly.  Getting the filter out of the camera involves removing the sensor, gently cutting it open with a scalpel, and finally gluing the whole thing back together with a tiny bit of superglue. Not for the faint of heart, and certainly not for anyone without a halfway decent bench microscope.

If you’re looking for a Raspberry Pi-powered security camera, game camera, or something for an astronomy application, this is the way to make it happen. You might want to be careful when removing the IR filter; [Gary] broke one camera on their first attempt. They got it to work, though, and the picture quality looks pretty good, as seen in the videos below.

Continue reading “Adding Night Vision To The Raspberry Pi Camera”

Alert Tube Monitors All Aspects Of Your Digital Life

alert-tube

This futuristic appliance can keep you apprised of all you social network goings on and much more. [Mike Watson] calls the device the Alert Tube because of its functionality and shape. The hardware depends primarily on a Raspberry Pi board which seems tailor-made for this type of use. The information gathering side of this shows off the power of a fledgling services called If This Then That.

We’ve heard of IFTTT only because [Chris Gammel] and [Dave Jones] covered it on an episode of The Amp Hour. [Dave] dismissed it as have little to no practical use. But this project shows how it can be leveraged to make quick work of pulling your desired data from the Internet. Think of it as a collection of APIs for many sites like Twitter, Facebook, as well as local weather, etc. This project sets up IFTTT to monitor your accounts, alerting you with colors of like, sound, and even text-to-speech.

The project explanation is several pages long but you can get a quick look at it by watching the demo video.
Continue reading “Alert Tube Monitors All Aspects Of Your Digital Life”

RPi Control Your Server PSU Over The Internet

remote-server-psu-control-via-RPi

Here’s an interesting use of a Raspberry Pi to control the PSU on a server. [Martin Peres] is going to be away for a few months and still wants access to his PC. This isn’t really all that tough… it’s what SSH is made for. But he also wants lower-level access to the hardware. Specifically he needs to control and get feedback on what the PSU is doing, and even wanted to have access to the serial console without having to go through the computer’s NIC.

The image above shows one part of his solution. This is a custom Ethernet port that connects to his Rasberry Pi header breakout board. Inside the computer the jack is wired to the motherboard power LED to give feedback about the current state of the power supply. It also patches into the green wire on the PSU, which lets him turn on the power by pulling it to ground. After working out the cable routing he developed a web interface that makes it easy to interact with the setup.

As with other hacks along these lines letting an embedded computer run 24/7 is a lot less wasteful than leaving a PC on. That’s a concept we can really get behind.

Continue reading “RPi Control Your Server PSU Over The Internet”

Listening To Aircraft Transponders With A Raspberry Pi

Last year’s big hack was software-defined radio; a small USB TV tuner that could listen in on radio broadcasts anywhere between 64 and 1200 MHz. This year, it’s all about the Raspberry Pi, so it’s surprising we’re only just now seeing a mashup of these two pieces of hardware. [Corq] is using a Raspi and RTLSDR TV tuner to listen in on aircraft transponders, and getting a whole bunch of data from aircraft flying overhead.

Even though the ADS-B decoder [Corq] is using is written for OS X, he’s reading the data coming from the USB TV tuner over the network with a program called Dump1090. This program allows [Corq] to attach his SDR to a Raspbery Pi and put it somewhere the antenna will get good reception – an attic, or an outdoor weatherproof case – and stream data to his desktop over a WiFi or network connection.

With a USB TV tuner and a Raspberry Pi, [Corq] is able read the tail numbers, altitude, latitude, longitude, speed, heading, and even the type of aircraft currently flying over his house. That’s cool enough, but the fact that he can effectively do this over the Internet makes it a brilliant hardware mashup.

Submersible Camera Snaps Pics Of Ocean Going Predators

RPi-submersible-camera-rig
This camera rig uses a Raspberry Pi to send a camera down fifty meters (mirror on RPi blog) in order to spy on sharks. We got really excited at first thinking that it might be using the camera module from the Raspberry Pi Foundation but that isn’t the case. Do keep reading though, there’s a lot of cool stuff involved in this one.

The project used a collection of camera units spread over a large area to monitor shark activity. Each is mounted on an anchored buoy, using solar panels and a lead acid gel battery for power. The RPi itself remains topside in a waterproof box. It connects to the camera using a 50-foot Ethernet patch cable.

We figure the challenge of building the hardware parallels that of designing an underwater ROV. The camera needs an enclosure that can stand up to the pressure at that depth while allowing the cable to pass through it. There is also an interesting note in the project log about getting the camera exposure settings to behave.

33 Node Beowulf Cluster Built With Raspberry Pi

Not only did [Josh Kiepert] build a 33 Node Beowulf Cluster, but he made sure it looks impressive even if you don’t know what it is. That’s thanks to the power distribution PCBs he designed and etched. In addition to injecting power through each of the RPi GPIO headers they host an RGB LED which is illuminated in blue in the images above.

Quite some time ago we saw a 64-node RPi cluster. That one used LEGO pieces as a rack system to hold all of the boards. But [Josh] used stand-offs to create the columns of hardware which are suspended between top and bottom plates made out of acrylic. The only thing that’s unique about each board is the SD card and that’s why each has a label on it that identifies the node. These have been flashed with almost identical images; the host name and IP address are the only thing that changes from one to the next. They’ve been put in order physically so that you can quickly find your way through the rack. But functionally this doesn’t matter… put the card in any RPi and it will automatically identify itself on the network no matter where it’s located in the rack.

Don’t miss the demo video where [Josh] explains the entire setup.

Continue reading “33 Node Beowulf Cluster Built With Raspberry Pi”