Raspberry Pi As An AVR Programmer

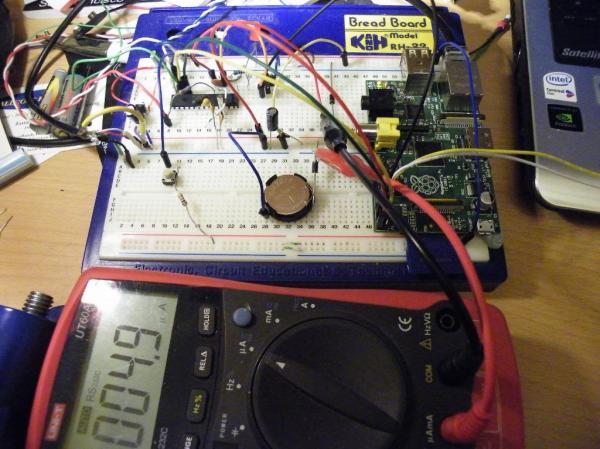
AVR programmers can be bought for just a few dollars on the Internet, but if you’re building an expansion board with an AVR for your Raspi, this is the build for you. It’s a safe way of programming an AVR via the Raspi’s GPIO pins that uses an extremely minimal circuit.

The AVR ISP interface looks a lot like an SPI interface, and the easiest way to program an AVR with a Raspi would be to bitbang all the commands from the GPIO pins. Sometimes, though, the logic of the AVR and Raspi would be at different levels, so while bitbanging may work in a pinch it’s not something anyone should use regularly.

To get the Raspi and AVR talking to each other safely, [Steve] built a small circuit from a 74244 buffer and a FET. With the added support for Linux GPIO avrdude programming, it’s a snap to program an AVR with a Raspi.

A few days ago we ran across a hugely overwrought PIC programmer for the Raspi, so we’re glad to see another round in the PIC/AVR holy war go to the AVR camp.

Thanks [Mateusz] for sending this one in.

An Adafruit Raspberry Pi Extravaganza

The folks at Adafruit are busy as a bee working on bringing some of their really cool boards to the Raspberry Pi platform. Here’s a few that came in over the last few days:

16 servos is almost too many

Servos require a PWM output but the Raspi only has hardware support for PWM on a single GPIO pin; certainly not enough to build a gigantic, city-leveling robot. [Kevin] over at Adafruit put together a tutorial for using this 16 channel servo driver with the Raspi.

12 bit DAC

With only one PWM pin and no analog out, it was only a matter of time before someone hooked up the Adafruit 12 bit DAC to the Raspberry Pi.

16×2 LCD displays

Both the servo and DAC builds use the Adafruit I2C library and a bit of Python. Of course it’s possible to treat the GPIO pins on the Raspberry Pi as digital outs, just as [Mikey] did with his Raspi LCD display tutorial.

So, what distro are you using?

Of course all these builds use Adafruit’s Occidentalis distro, a maker-friendly Linux distro we’ve posted about before. It’s too useful to languish as a single Hackaday post, so here it is again.

Expand Your Pi With A Gertboard

[Gert van Loo], the person who designed the alpha hardware for the Raspberry pi model B, has put out an expansion board for the Raspberry pi that we think many of you might be interested in seeing. Dubbed the Gertboard, this expands the Raspi  with some GPIO goodness.

We have seen TONS of tutorials for the Raspberry pi, and a few projects as well. We’re hoping that we’ll start seeing more projects where the Raspberry pi is the brain, but only part of the project, start becoming more frequent. The board is pretty cool, now lets see what you guys can build with all that power!

[thanks Zimm3rmann]

Raspberry Pi As A PIC Programmer

[Giorgio Vazzana] turned his Raspberry Pi into a PIC programmer using a rather small collection of common parts. It supports about a dozen different chips from the 16F family. But we’d guess that software is the limiting factor when it comes to supporting more chips.

Generally the problem with PIC programming is the need for a 12V supply. He chose to use an external 12V supply and a 78L05 linear regulator to derive the 5V rails from it. With the power worked out there are some level conversion issues to account for. The RPi provides 3.3V on the GPIO header pins, but 5V logic levels are needed for programming. He built transistor and voltage divider circuits to act as level converters. The programming software bit bangs the pins with a write time of less than eight seconds per 1k words of program data. So far this does not work with ICSP, but he plans to add that feature in a future version.

Raspberry Pi Wedded To A DSLR

This is a Raspberry Pi outfitted in a DSLR battery grip. [Dave H] was very interested in the idea of combining a single-board computer with a high-end camera. The size and cost of such a computer was prohibitive until the RPi came along. He managed to fit the board into the broken battery grip he had on hand, and he already has the prototype up and running.

[Dave’s] alterations to the battery grip allow access to the USB, Ethernet, and Composite video ports. Powering the RPi was a bit of a challenge. He tried using an iPhone charger with four AA batteries but that only provided 4.2V. After going back to the drawing board he discovered he could rework the parts that he removed from the grip, using a Cannon 7.2V 1800 mAh battery. So far he can automatically pull images from the Camera and transmit them over a network connection. But since the RPi is running Linux, there’s a whole world of hacks just waiting to be exploited. What comes to mind first is image manipulation software (like ImageMagick) which has a command-line interface.

[Thanks Christian]

Turning A Keyboard Into A Computer With A Raspberry Pi

Only 80s kids will get this: remember when computers had built-in keyboards, like the Apple II line, or the Commodore 64? That’s a form factor duplicated by case modders many times over the years, but [preamp]’s project is the first time its been done using a Raspi (German, Google translation).

For his build, [preamp] used what he considers the best keyboard in the world, the Cherry G80-3000. Except for the HDMI port, just about every plug was moved to the back side of the keyboard with the help of an Ethernet jack, a USB hub, and RCA jack. Audio is missing, but for an extremely portable system [preamp]’s RaspCherry Pi is at the top of its class.

We were wondering when someone would shove a Raspi into a keyboard, and we couldn’t be happier that [preamp] chose a Cherry keyboard for his build; they’re wonderful input devices second only to the 8 pound behemeoth used to write this post.

Light Painting With The Raspi

The art of taking long exposure photographs with blinking RGB LEDs has improved greatly over the years, mostly due to the extremely easy to use Arduino and hundreds of tutorials on the web. If there’s one problem with light painting with a ‘duino, it’s that large, full color images take up a ton of storage space, much more than the flash memory on an Arduino can provide. Wanting fancier and more colorful light painted images, [Phil] over at Adafruit used a Raspberry Pi to make some very awesome light painted images.

Like any Adafruit tutorial that uses LEDs, the build begins with a digital RGB LED strip wired to the GPIO pins on the Raspi. After loading up the Adafruit educational Raspi Linux distro for hardware SPI support, the only thing left to do was writing a Python script to display images in the air.

[Phil] says vertical, hand-held LED bars are old hat, so he took a hula hoop and a few bits of PVC pipe, attached the LED strip, and put it on his bike. The results are really impressive – we’re loving the flames in the title pic – and considering the Raspi is a full-fledged computer, light paintings larger than what [Phil] made are very possible.