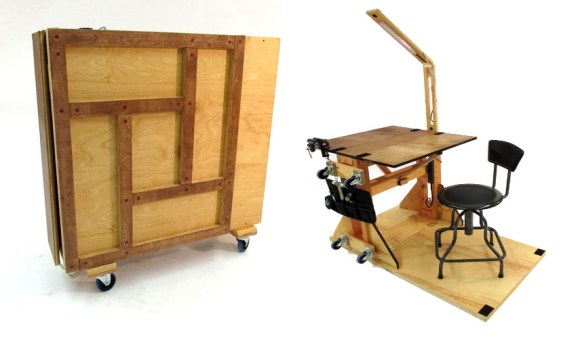
Portable SMT Lab For Hacker On The Go

smt-lab2

We admit it, we’re suckers for workbenches and toolboxes. [Jon] must feel the same way, because he built this portable surface mount electronics lab. It’s a beast of a project, which might be why it’s project #666 on Hackaday.io. [Jon] spends a lot of time working off site, and keeps finding himself without proper surface mount soldering tools. Ever tried to stack an 0603 resistor with a 40 watt pistol grip iron? Take our word for it, the results are not pretty.

[Jon] started with two cheap aluminum cases from Harbor Freight. He loaded them up with the typical lab supplies: soldering iron, oscilloscope, multimeter, dual lab supplies, and a good assortment of hand tools. He then added a few choice SMT tools: A hot air tool, a good LED light, and a stereo magnifier. Many of the tools are mounted on DIN rail along the rear of the cases.  All the low voltage equipment runs on  a common 12V bus.

We really like what [Jon] did with the tops of the cases. Each lid contains a plywood sheet. When the cases are opened, the plywood becomes a work surface. As an added bonus, the wood really strengthens the originally flimsy tool cases. The only thing we would add is a good portable anti-static mat.

The final build is really slick. Once the cases are open, four bolts act as feet. The microscope swings out, and the hot air gun hangs on the right side. Plug in power and you’ve gone from zero to SMT hero in under 1 minute.

Reflowing With A Hair Straightener

final

Around here, reflow ovens usually mean a toaster oven, and if you’re exceptionally cool, a thermistor and PID controller. There are, of course, a thousand ways to turn solder paste into a solid connection and [Saar] might have found the cheapest way yet: a hair straightener with a street value of just £15.

We don’t expect the majority of the Hackaday demographic to know much about hair straighteners, but [Saar] has done all the work and came up with a list of what makes a good one. Floating plates are a must to keep the PCB in contact with the heating element at all times, and temperature control is essential. [Saar] ended up with a Remington S3500 Ceramic Straight 230 Hair Straightener, although a trip to any big box store should yield a straightener that would work just as well.

One modification [Saar] added was a strip of Kapton tape to one of the ceramic heating elements. It’s not a replacement for a toaster oven or real reflow oven, but for small boards it works just as well.

Video below.

Continue reading “Reflowing With A Hair Straightener”

Hacking A Laser Tape Measure In 3 Easy Steps

uni-t-laser-distance

[Andrew] got a little help from his friends to hack a laser distance meter. Using laser distance meters as sensors is one of the great quests of hackers – with good reason. Accurate distance readings are invaluable for applications including robots, printers, and manufacturing. We’ve seen people try and fail to hack similar units before, while others built their own from scratch. [Andrew] started experimenting with the UNI-T 390B, a relatively cheap ($60 USD) device from China. He found the 390B has a serial port accessible through its battery compartment. Even better, the serial port is still enabled and outputs distance data. While data could be read, [Andrew] couldn’t command the 390B to start a measurement. The only option seemed to be using the Arduino to simulate button presses on the 390B’s front panel.

In an update to his original blog,  he described an Arduino sketch which would decode the distance measurements. That’s when [speleomaniac] jumped in with the discovery that the Uni-T would respond to commands in the form “*xxxxx#”. Armed with this information, [Andrew] posted a second update with a basic command breakdown. Command *00004# will take a single measurement and output the data via serial. Command *00002# will take 3 measurements, outputting them in a C style array format. There are several other commands which output debug information and what appear to be stored measurement dumps. Although he didn’t explore every nuance of the data output,  [Andrew] now has enough information to initiate a measurement and read the result. Nice work!

[Thanks James!]

Dead Computer Tower? Why Not Make A Tool Box?

F8VOED9HSVGHDGK.LARGE

[Michael Gohjs] acquired a bunch of old business computers — the Dell Optiplex GX400, to be precise — and after salvaging any of the useful components out of them he was left with the cases. Not wanting to toss them for recycling, he decided to try upcycling one into a portable tool box.

The cool thing with using a computer tower for a tool box is most of it is already setup for modular storage spaces. [Michael] removed the bracket that holds the power supply in place, and using some cardboard from a calendar stand formed a box attached to it — instant storage space. Even better? The 5.25″ drive bays have sliding rails for easy removal! Again, all [Michael] had to do was build a box in between the slot rails and he had a cleverly utilized drawer.

The rest of the case was built in a similar manner, making use of pre-existing features, and making new cubbies. If you wanted to get fancy, you could use sheet metal to do this to make an even more rugged toolbox.

While you’re at it, why don’t you make an electronics lab in the box to go with your tool box? Or one like this! Or this one…

Say Watt? A Talking Multimeter?

talkingMultimeter

After a request from one of his friends, [Mastro Gippo] managed to put together a talking multimeter to be used by blind persons working in electronics. He wanted a feature-rich meter that had serial output, and recalling this Hackaday article from a few years back led him to find a DT-4000ZC on eBay, which has serial output on a 3.5mm jack. (Though, he actually recommends this knockoff version which comes with excellent documentation).

It turns out there aren’t many talking meter options available other than this expensive one and a couple of discontinued alternatives. [Mastro Gippo] needed to start from scratch with the voice synthesizer, which proved to be as easy as recording a bunch of numbers and packing them onto an SD card to be read by an Arduino running the SimpleSDAudio library.

He found a small, battery-powered external speaker used for rocking out with music on cell phones and hooked it up to the build, stuffing all the electronics into an aluminum case. Stick around after the jump for a quick video of the finished product!

Continue reading “Say Watt? A Talking Multimeter?”

DIY CNC Dust Collection Really Sucks!

CNCdust-main2

CNC Routers are great. If you’ve ever used one you know this but you also know that they will cover the machine and everything around it with a layer of dust. It is certainly possible to use a shop vac to suck up the dust coming from the router, however, the only problem with that is the shop vac’s filter will clog with dust and lose suction, defeating the intent of your vac system.

CNCdust-assembled2[Mike Douglas] was ready to step up his CNC game and decided to make his own dust separator. This design is extremely simple and only uses a couple 5 gallon buckets, a few PVC fittings and pieces of wood. To keep the cost down and the style up, the accompanying ‘shop-vac’ is also made from 5 gallon bucket with a vacuum lid. The project is well documented so head over to his site and check out the build process.

black

Continue reading “DIY CNC Dust Collection Really Sucks!”

Homemade Ball Mill Tumbles Along Like A Champ

[Mike] enjoys doing all kinds of things with glass. He likes to melt it and fuse it into new things, so it’s perfectly understandable that he wanted to make his own glass. Doing so requires finely ground chemicals, so [Mike] put together this awesome homemade ball mill.

The design is wonderfully simple. The mill is powered by a robust 12VDC motor from a printer that he’s running from a variable power supply in order to fine tune the speed. [Mike] built a scrap wood platform and attached four casters for the drum to spin against. The drum is rotated by a round belt he had lying around from various other projects. [Mike] already had a couple of those blue containers, which formerly held abrasive grit for use in vibratory tumblers.

[Mike] had some trouble with the drum walking off the casters so he attached scrap piece of aluminum to form an end stop. All he had to buy for this project were the 5/8″ steel balls and the casters. The mill can also be used as a rock tumbler, though the bottle isn’t quite water tight as-is. He does not recommend this type of setup for milling gunpowder or other explosives, and neither do we.

Make the jump to see the mill in action and get the grand tour. If you need more tumbling power, use a dryer motor!

Continue reading “Homemade Ball Mill Tumbles Along Like A Champ”