New Research Sheds Light On 3D Printing Fumes

A few years back, there were some studies on the chemical and particle emissions coming out of the hotends of 3D printers. Although they galvanized a lot of people in the community, the science wasn’t entirely conclusive — one paper made it sound like you needed a hazmat suit for 3D printing, and the other suggested that cooking a meal in a kitchen was worse for you. That’s because they were measuring different things.

This new research paper on the emissions of 3D printers covers all the bases. They examined a variety of different materials printed in different printers. They also measured both chemical emissions and Ultrafine Particles (UFP) which can be hazardous even when the material itself is not.

We read the paper (PDF) so that you don’t have to. Here’s our takeaways:

  • 3d_printer_particles.pngThere was no significant variation across brands of 3D printers. (Duh?)
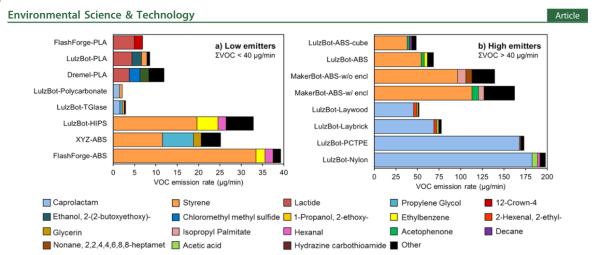
  • ABS and similar materials outgas styrene at levels you should probably be worrying about if you’re running your printer for a few hours a day in an unventilated office.
  • PLA emitted significantly less overall, and most of it was a non-hazardous chemical, lactide. PLA doesn’t look like a problem.
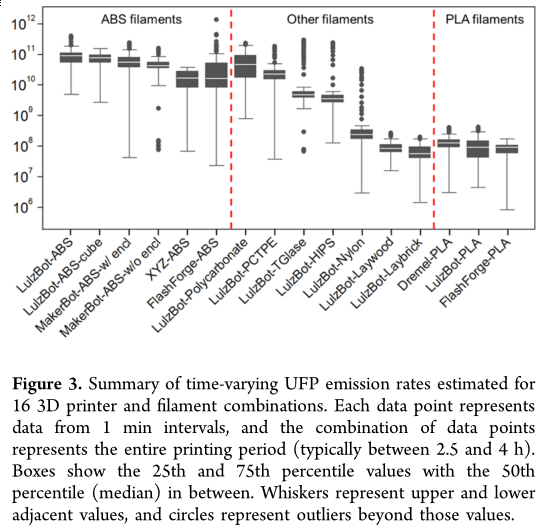
  • All of the materials resulted in increased UFP exposure. These levels are above normal household background levels, but lower than certain “microclimates” which (if you follow the references) include principals’ offices with carpet, automobiles, restaurants, and rooms with burning candles or running hair dryers. In short, the UFP exposure doesn’t look like it’s going to be a big deal unless you’re sitting right next to the printer and running it continually.

So what would we do? It now looks like it’s prudent to print ABS only in a well-ventilated room. Or enclose the printer in a box and vent whatever you can outside — which can also help prevent breezes cooling the piece down unevenly and adding to ABS’s warping problems. Or just stick to PLA. It looks essentially harmless.

Thanks [Jim Scheitel] for the tip!

Make Your Own Plastic Friction Welder

[Fran] shows us how to build a plastic friction welder. It’s a method of connecting plastic pieces. While it’s new to us, apparently this type of tool was given to kids about forty years ago to use with craft project (when plastic was all the craze).

The tip of the friction welder is a styrene rod. If it’s spun fast enough the friction will cause the material to heat to the melting point, depositing a bead of styrene into the joint. The tool seen here is a cheap DC rotary tool acquired from Harbor Freight. It really did a horrible job, but [Fran] discovered that it was the power supply that was under-rated. When she replace the wire that feeds it and used her bench supply it spit out 16,000 rpm without any trouble. The welding rods can be found at the craft store and fit the chuck of the tool quite nicely. You can see her demo in the video after the break. The seam she’s working on comes out very strong, surviving a slew of violent whacks on the workbench.

We’ve seen a few other methods of welding plastic. One used a tool much like a soldering iron, the other depends on ultrasonic waves and clamping pressure.

Continue reading “Make Your Own Plastic Friction Welder”

Add-on Panel Brings Automated Vents Flaps To A PC

[SXRguyinMA] built a replacement top bezel for his computer case. He wanted to add vents that would automatically open or close based on the cooling needs of the computer. With some careful measurements he modeled the parts in Sketchup and sent out for them to be cut from styrene with a water jet cutter. The parts came back looking great and the assembly of the shutters went swimmingly. The bezel also includes a lighted screen for temperature information, as well as the front USB ports, headphone and mic jacks, etc. Hidden underneath is an Arduino board and servo motor. The Arduino polls the temperature and drives the servo to adjust the fins accordingly. There’s even a supercap in the circuit that will close the vents when the PC powers down or when power is unexpectedly lost. See it in action after the break.

Continue reading “Add-on Panel Brings Automated Vents Flaps To A PC”

Hand Made Manipulator Arm

We’re pretty used to seeing CAD used in the design process for most things. It’s a bit of a shocker to come across a project this involve, and this well executed, that didn’t use CAD.

[Anton] spent 100 hours building this manipulator arm by hand. He made the parts by drawing them on styrene and cutting them out with scissors. He has started building version two with AutoCAD but from what we’ve seen in the video after the break, improvements on the original design will be minor. The speed and fluidity of the servos with added magnetic encoders makes for a graceful robotic dance; we’d love to be its chess partner. Continue reading “Hand Made Manipulator Arm”