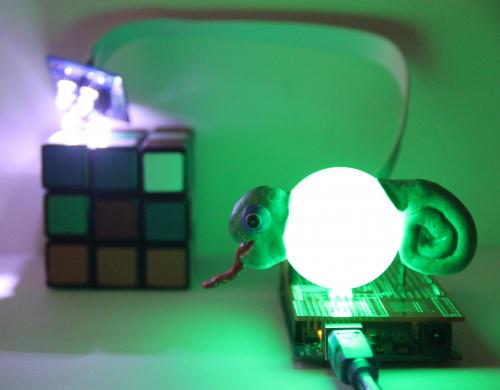
Glowing Balloon Blimps

_B093896

Looking for a neat decoration for your next soirée? How about floating fleet of glowing balloon blimps?

[Kensho Miyoshi] — an avid reader of Hack a Day — needed an art installation project in Tokyo, he came up with these clever glowing balloon blimps.

They feature a mini gondola hanging from the bottom of a regular balloon which holds a small motor with a propeller, an Arduino Pro Mini, LEDs, an ultrasonic sensor and of course, a battery. They float up to a certain height with the LEDs shining bright, and when the ultrasonic sensor trips, it all turns off and the balloon sinks gently back to the ground. The process repeats, and in a completely dark room it looks like a series of glowing bubbles forming and floating away, again and again.

To see the floaty, glowy, balloon blimps, stick around for a video after the break.

Continue reading “Glowing Balloon Blimps”

Wireless Power Transfer For Quadrotors

quadcopter

Quadrotors are great, but what kind of range can you get on them, really? What if you could charge them up just by flying over high voltage power lines, by or temporarily hovering by a charging station? That’s just what [Dr. Carrick Detweiler] wrote a paper about! (Caution: PDF)

The paper discusses the method of wireless power transfer via magnetic resonance, which, depending on the scale, can transfer power at medium distances (~1 meter). This outperforms inductive coupling which requires a much closer proximity (~1-2 centimeters) for power to transfer. It does still require a certain amount of accuracy, but as we all know, quadrotors have no problem with even the most complex aerodynamic feats!

There is an excellent demonstration video of a small scale wireless quadrotor prototype after the break.

Continue reading “Wireless Power Transfer For Quadrotors”

UFO-looking RGB LED RC Plane Lights Up The Night, Uses All The Acronyms

[Roballoba] decided to combine his love for RC planes, things that light up, and photography, and we’re glad he did. He shares his method in this Instructable for illuminating a bare styrofoam replacement fuselage for a Parkzone Stryker RC plane.  There are many more amazing pictures there as well.

He used low-tack tape to lay out the LED strips on the fuselage, solder the connections, and test them. Once he was satisfied with the arrangment, he flipped the strips face down so the foam diffuses the light. The lights are powered by a 12V Li-Po battery he soldered to a deans connector. Finally, [Roballoba] covered  and heat sealed everything with Doculam, a very cost-effective laminate that offers great protection and security.

He used some LED corn lights as afterburners, which is a nice touch of realism. There is a video after the break where [Roballoba] shows us the connections up close and then runs through some light show options.  Another video of a nighttime flight is waiting for you in the write up.

Spent too much money on eggnog and a new console this year to be able to replicate this build? $30 will snag what you need for this smartphone-controlled paper plane we featured a few weeks back. You could always BeDazzle it.

Continue reading “UFO-looking RGB LED RC Plane Lights Up The Night, Uses All The Acronyms”

I Am NXT 3-Point Bend Tester. Please Insert Girder.

Learning with visuals can be very helpful.  Learning with models made from NXT Mindstorms is just plain awesome, as [Rdsprm] demonstrates with this LEGO NXT 3-point bend tester that he built to introduce freshmen to flexural deflection and material properties. Specifically, it calculates Young’s modulus using the applied force of a spring and the beam’s deflection. [Rdsprm] provides a thorough explanation in the About section of the YouTube video linked above, but the reddit comments are definitely a value-add.

[Rdsprm] built this from the Mindstorms education base set (9797) and the education resource set (9648). Each contestant endures a 5-test battery and should produce the same result each time. The motor in the foreground sets the testing length of the beam, and the second motor pulls the spring down using a gearbox and chain.

This method of deflection testing is unconventional, as [Rdsprm] explains. Usually, the beam is loaded incrementally, with deflection measured at each loading state. Here, the beam is loaded continuously. Vertical deflection is measured with a light sensor that reads a bar code scale on the beam as it passes by. The spring position is calculated and used to determine the applied force.

[Rdsprm] analysed the fluctuation in GNU Octave and has graphs of the light sensor readings and force-deflection. No beams to bend with your Mindstorms? You could make this Ruzzle player instead.

Continue reading “I Am NXT 3-Point Bend Tester. Please Insert Girder.”

Full-size Lego Car Can Hit 30km/h!

[Steve Sammartino] is a Melbourne entrepreneur, and he had an idea: could it be possible to design and make a functional full-size Lego car?

He sent out a single tweet to try to crowd fund the project:

Anyone interested in investing $500-$1000 in a project which is awesome & a world first tweet me. Need about 20 participants…

Not one, not two, but forty Australians pledged money to start this crazy idea dubbed the #SuperAwesomeMicroProject. With the money raised, [Steve] and [Raul Oaida] purchased over 500,000 Lego pieces and began the build in Romania, where [Raul] lives.

Now before you get too excited, the car is not “fully” made out of Lego. It features real tires and some select load bearing elements. That being said, the entire engine is made completely out of Lego. It features four orbital engines utilizing a total of 256 pistons. The top speed they tested it to was about 20-30km/h — it might go faster, but they didn’t want to risk a catastrophic failure.

Since its completion (it took nearly 18 months to build), it’s been shipped back to a secret location in Melbourne, but the team has made an excellent video showcasing the project. Stick around after the break to see your childhood dreams come to life.

Continue reading “Full-size Lego Car Can Hit 30km/h!”

Particle System Busy Box Keeps Baby Occupied

Busybox

Any child born today has a bright future ahead of them—mostly consisting of watching glowing rectangles for 80 or 90 years. To give his progeny a jump-start on a lifetime of watching LEDs flicker, [Dan] created a busy box. It’s really just an Arduino, RGB LED matrix, and a programmed particle system, but if we’re fascinated by it, it will probably blow an infant’s mind.

The idea for this busy box originated with an earlier Hackaday post that used an 8×8 matrix of RGB LEDs to create a moving color cloud. [Dan] took this project as a jumping off point and created an infant’s busy box with four modes that are sure to be entertaining.

Inside the is a Rainboduino: an Arduino compatible board capable of driving an 8×8 RGB LED matrix. Also stuffed inside the busy box is a 9V battery, rocker switch for the power, and four arcade buttons that cycle through each mode. The first mode is some sort of ‘plasma cloud’ simulation, the next is a ‘painter’ light display. The final two modes spell out [Dan]’s spawn’s name, and all the numbers and letters of the alphabet.

Continue reading “Particle System Busy Box Keeps Baby Occupied”

Building Mosaic LEGO Lamps

Looking for a throw back to your childhood, or maybe you just appreciate things that light up and look amazing? Well, [Baron] has a really impressive project for you. Not only does it look stunning and incorporate all of the things we love, it’s actually a pretty novel design. These lamps are built completely out of LEGO Technic pieces, the brand of LEGO that have holes drilled through them so you can build more advanced creations.

[Baron] used these parts with the drilled holes to create a dot matrix in which he placed colored transparent LEGO dots in the holes. The method of creating patterns is very similar to the way it’s done on the “Lite-Brite”. We especially love the theme of these lamps and they would match well with your LEGO mystery box. What’s really great about this tutorial is that it lays down the foundation for LEGO-built lamps that could be more interactive, involve more control (like RGB LEDs), or even introduce some LEGO mechanics!