Most robots depend on controlled environments, because the real world is hard to get around in. The smaller the robot, the bigger this problem because little wheels (or legs) can take only little steps. One way around that is MIT’s latest one-legged hopping robot, which sports a set of four insect-like wings on its top end and can quickly pogo-hop its way across different terrain with ease.
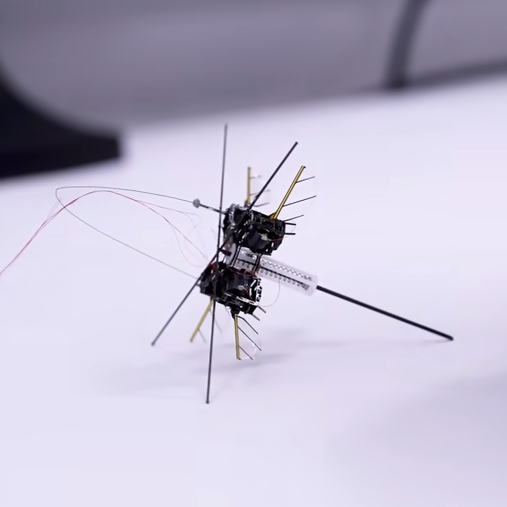
The wings aren’t for flying in the usual sense. They provide lift, but also help the tiny device steer itself so that its hops land precisely. Earlier incarnations of one-legged hopping robots (like this one) accomplished this with propellers and electric motors, but traditional motors are a non-starter on a device that weighs less than a paperclip.
Right now, this little winged hopper is not completely self-contained (power and control systems are off-board) but running it as a tethered unit allows researchers to test and evaluate different, minimalistic ways for a machine to move around efficiently. And efficiency is the whole goal of going in this direction.
Certainly tiny flying drones already exist and get about in the real world just fine. But if one wants to shed mass, ditch conventional motors, and reduce cost and power consumption, this tiny winged hopping machine is one way to do it. And it can even carry payloads! The payloads are tiny, of course, but being able to haul around ten times one’s own weight and still function reliably is an impressive feat.
You can watch it in action in the video embedded just below the page break. Once you’ve watched that, we’d like to remind you that novel locomotion isn’t just the domain of hopping robots. Tiny robots with explosive joints is just as wild as it sounds.