Musician On A Budget MIDI Bass Pedals

bass_pedal1

Organ pedal boards have been around forever — they’re an easy way to multitask while playing the piano, organ, or even the guitar. [Ville] plays the electric guitar and wanted to give bass pedals a shot — the only problem is, the commercial versions are pretty pricey. So he decided to make his own temporary solution using an old MIDI keyboard he had lying around.

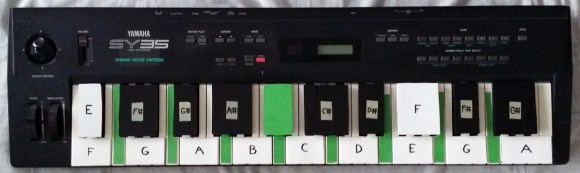
The beauty of this hack is it’s completely non-destructive — although you might find you like it so much you won’t want to take it apart! [Ville] started by marking out spacer keys using green cardboard. He then grouped together other sets of keys using tape and polystyrene sheets, which he recycled from a plastic waste bin. He then marked off each set of keys with the range of notes to program into the MIDI receiver — on a 49 key keyboard you get just a bit more than an octave of bass pedal keys! It’ll certainly do until you get your hands on a proper organ pedal unit.

From there it was just a matter of re-mapping the keys on the software end of things, and disabling the other unused keys. He offers a few different methods of doing this, including using VST plugins, and Pure Data — to which he’s provided a patch he made to simplify the process.

To see it in action, stick around after the break and hear [Ville] play One Hour Backwards on electric guitar.

Continue reading “Musician On A Budget MIDI Bass Pedals”

Decascrap: A Three Servo Decapod

IMG_2718

[Drewtoby] loves making robots. His latest project is a 10-legged bot called the Decascrap, which makes use of only 3 servos!

What we like most about this project is the leg mechanism [Drew] has cooked up. The legs are made of guitar picks hinged to what look like popsicle sticks. Each guitar pick has a hole punched in it which allows the servo rod to go through the legs. Strategically placed globs of hot glue on either side of each leg on the servo rod allows for the parallel motion during the actuation of the legs. A third servo tilts the bot back and forth as the legs are moved, allowing the bot to scuttle about.

Stick around after the break to see it tackle some rough terrain — well, actually it’s just a piece of uneven foam, but hey!

Continue reading “Decascrap: A Three Servo Decapod”

Controlling Alphanumeric LCDs With Three Wires

shift

The HD44780 LCD controller is the defacto way of adding a small text display to your next project. If you need a way to display a few variables, a few lines of text, or adding a small user interface to a project, odds are you’ll be using one of these parallel LCDs. These displays require at least six control lines, and if you’re using a small microcontroller or are down to your last pins, you might want to think about controlling an LCD with a shift register.

[Matteo] used the ubiquitous ‘595 shift register configured as a serial to parallel converter to drive his LCD. Driving the LCD this way requires only three pins on the Arduino, [Matteo]’s microcontroller of choice.

For the software, [Matteo] modified the stock Arduino LiquidCrystal library and put it up on his Git. Most of the functions are left untouched, but for this build the LCD can only be used in its four bit mode. That’s not a problem for 99% of the time, but if you need custom characters on your LCD you can always connect another shift register.

If you just can’t spare three pins for a display, you could squeeze this down to just two, or add a second microcontroller for a one-wire-like interface.

IKEA LED Table Mod Doesn’t LACK Awesome

Some people look at IKEA LACK tables as cheap furniture. Our readers look at them as a blank canvas. [Klaas] has turned a LACK Side table into an interactive LED table featuring 144 RGB LEDs. After attending a class on WS2801 pixel strings at his student IEEE chapter, [Klaas] was inspired to design something of his own. He settled on an IKEA LACK table and started sketching. He didn’t actually have a table on hand, so he had to deduce the size from the website images and dimensions. He calculated a usable size of around 45cm, which was pretty close to the mark. After running a few tests, [Klaas] determined that a 12×12 grid of squares 35mm on a side would provide that enough resolution to play simple games. The 35mm x 35mm grid would also be small enough for the LEDS to illuminate. He used a laser cutter to cut the an interlocking grid from 3mm MDF. A base plate with 144 12mm LED holes was also cut out, and the entire assembly was glued together.

For illumination, [Klaas] settled on WS2812B LEDs, as they were cheaper than their WS2801 couterparts. The WS2812B’s also snapped easily into his 12mm holes. At this point [Klaas] actually purchased his IKEA table and proceeded to cut a huge hole in it. The grid glued right in, and some aluminum L-profile cleaned up the top edge. Driving all those LEDs would need a bit of processing power, [Klaas] chose a Teensy 3, and the well-known OctoWS2811 library. He also added a USB host shield, which allowed him to use an Xbox 360 USB game pad as his controller. For software, he created a simple Tetris clone, and ported snake from the Arduino game shield. A menu and some scrolling text ties everything together. The only thing left to add is a glass top. [Klaas] hasn’t settled on clear or diffuse glass yet. We a suggest clear to avoid hiding any details of this great build.

Continue reading “IKEA LED Table Mod Doesn’t LACK Awesome”

Laser-Based PCB Printer

Being able to create PCB’s at home is a milestone in the DIYer’s arsenal. Whether you physically mill or chemically etch boards, it’s a tricky task to perfect. [Charlie & Victor] are working towards a solution to this complicated chore. They call their machine the DiyouPCB. DiyouPCB is an open source PCB etching project consisting of both hardware and software components.

The project is based on using a Blue Ray optical pickup. The pickup was used in its entirety, without any modification, to simplify the build process. In order to use the stock pickup, [Charlie & Victor] had to reverse engineer the communication protocol which also allowed them to take advantage of the auto-focus feature used while reading Blue Ray discs. The frame of the machine is reminiscent of a RepRap, which they used to do preliminary testing and laser tuning. The X and Y axes run on brass bushings and are belt driven by stepper motors which are controlled by an Arduino through a specially designed DiyouPCB Controller Shield.

Continue reading “Laser-Based PCB Printer”

Soldering In The Dark — Add Some Light To Your Iron!

iron_01

While [William] may not know what he’s doing (his words, not ours!), at least he can SEE what he’s doing now with this awesome soldering iron light modification. And judging by the build quality, we’d reckon he really does know what he’s doing!

He’s taken a piece of copper-clad PCB, and formed it to create a nice circular copper donut. This allows him to make a ring of LEDs in parallel that will slide nicely over the soldering iron and integrate into the plastic case.

To power it, he’s made a small diode bridge to rectify the AC, and a 24 ohm high-wattage resistor run in series with the heating element. The voltage drop across the resistor is 7.5V max, which equates to about 5.3V RMS minus the diode voltage drops. This means the LEDs see about 4.5V at a total of 135mA, which works out to about 17mA each — just under the approved rating. All of this fits nicely into the original casing of the soldering iron.

Finally to finish it off, he’s MacGyver’d an old pill bottle into a protective casing around the LED ring — it looks surprisingly stock on the soldering iron!

Do you have a tool hack that adds handy features? Let us know through the Tips Line!

From A Truck Trailer To A Mobile Workshop

If you’re a seasoned hacker, you might find you need a portable workshop, because every moment away from home you feel a bit naked without access to all your tools and machines. It’s a bit of an older project that we’re quite surprised we never covered, but without further ado let us introduce you to [Steven Roberts’] Polaris Project trailer!

[Steven] is quite the seasoned hacker. In 1983, he took a 17,000 mile journey across America on a technology equipped bicycle — a very impressive feat at the time — seriously you won’t regret watching his video about it.

Anyway, fast forward to 2010, and [Steven] was invited to explain his new project on Make — with detailed build instructions! The 24′ mobile workshop utility trailer features thousands of electronic parts, cabinets filled with both hand and power tools, welders, a CNC router, a 2kW generator, a solar array, AGM battery backups, a ham radio, dedicated computer, soldering equipment, microscopes and more. It is quite literally packed to the gills with an amazing variety of tools.

The picture here doesn’t do it justice, so we recommend you check it out for yourself!

Is anyone planning on making their own mobile workshop? We don’t know about you, but we are now!

[via Toolmonger]