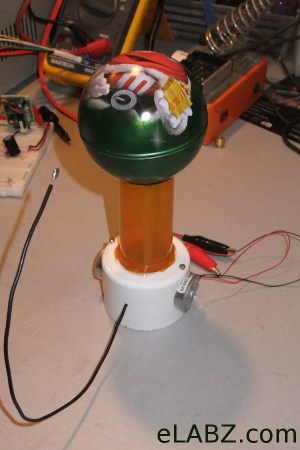
RC Plane Made Specifically For UAVs

We’ve seen our fair share of remote-controlled planes turned into UAVs and FPV platforms, but the Techpod is the first airplane we’ve seen specifically designed to be used as a camera-equipped robotic airplane.

The Techpod is the brainchild of [Wayne Garris]. He has been flying camera-equipped FPV airplanes for a while now, but recently realized the current offerings of remote control planes didn’t match his needs. [Wayne] decided to design his own plane specifically designed with a pan/tilt camera mount in the nose.

[Wayne]’s prototype was designed with some very fancy aeronautical design software packages and milled out of foam. From the videos after the break, we can see the Techpod flies beautifully, but needs the Kickstarter community to bring his model to the masses.

The specs for the Techpod put it up there with other high-performances FPV and UAV models; with its 102 inch (2590 mm) wingspan and a pair of batteries wired in parallel, the Techpod can stay aloft transmitting video for up to one hour.

Video of the plane in action after the break.

Continue reading “RC Plane Made Specifically For UAVs”

Rebuilding The Electronics In A Remote Control Car

Inspired by the many autonomous rovers such as Curiosity and the self-driving Google car, [Rohit] decided to build his own by taking an off-the-shelf remote control car and adding his own electronics. Unfortunately, he couldn’t find the datasheet for the chip used to receive radio signals and drive the motors, so he ended up building his own electronics and putting them in the car.

[Rohit]’s car – the Thunder Rumbler RC Car – is driven by applying power to two motors. This is an easy system to control, as only two channels are needed to make the car go forward, left, right, or backwards. To drive these two motors, [Rohit] found an SN754410 quadruple half-H bridge driver chip lying in his box of assorted electronic components. Thanks to a helpful instructable, this chip was easily controlled with an Arduino.

That left the problem of sending a wireless signal to the Arduino. [Rohit] accomplished this by relying on an Android phone to provide the remote control.

[Rohit] whipped up a small program running on his desktop that allows him to send ‘L’, ‘R’, ‘U’, or ‘D’ to the Android phone to dictate if the car should go left, right, forward, or reverse. The Android phone receives these commands via the Internet and sends an audio signal through the headphone port. This audio signal is connected to two analog pins of the Arduino. With a little bit of software and a bit of reading up on frequency shift keying, [Rohit] was able to make his car move in any direction.

Even though [Rohit] realized his goal of controlling a remote control car on his own terms, the build is far from done. He plans on adding some ultrasonic sensors and using the Android’s camera for object detection.

Umbrella-based Windmills

[Niklas Roy] is at it again. He’s applying wind power to his projects by using umbrellas. He was inspired by the shape of an anemometer, and umbrellas turned out to be a great choice because they’re cheap and easy to find.

Anemometers measure wind speed by capturing it with egg-shaped sails (in fact, we’ve seen them built from plastic Easter eggs before). The umbrellas have a much larger area and will capture more wind. Still it’s a big jump from measuring wind speed to generating energy. That’s why he’s not trying to generate electricity, but instead using the mechanical force directly. He took a page from one of last year’s projects and used the dual umbrella setup to power a music box, thereby reinventing the wind chime. The triple-umbrella unit seen above serves as a bubble machine, driving a series of plastic rings through a soapy solution and letting the wind do the rest. We’ve embedded his demo video after the break.

Continue reading “Umbrella-based Windmills”

programmable-rc-car

How To Control Your Cheap RC Car With A Computer

[Jon] wrote in to tell us about his programmable RC car, and the Howto guide that he’s made. According to him, this project can be constructed with $9 worth of parts plus an Arduino and a small toy car. So around $50 if you’re starting from scratch.

At it’s core, this project is about using the Arduino to allow your computer to send signals to the toy car. For this, [Jon] has included JAVA code that should be able to run on Mac, Linux, and PC operating systems. The Arduino code is also included.

Most small RC cars like those used in this project switch on at full speed or turn off, but this project allows the PC/Arduino to give the car PWM signals to control the speed. As pointed out in the video after the break, this can be a bit jerky at slow speed, but still a neat effect. A decent amount of soldering is required to get this project working, but it may be a good project especially if you have some of the parts already available! Continue reading “How To Control Your Cheap RC Car With A Computer”

Reverse Engineering A Syma 107 Toy Helicopter IR Protocol

Half the fun of buying toys for your kids is getting your hands on them when they no longer play with them. [Kerry Wong] seems to be in this boat. He bought a Syma S107G helicopter for his son. The flying toy is IR controlled and he reverse engineered the protocol it uses. This isn’t the first time we’ve seen this type of thing with the toy. In fact, we already know the protocol has been sniffed and there is even a jammer project floating around out there. But we took a good look at this because of what you can learn from [Kerry’s] process.

He starts by connecting an IR photo diode to his oscilloscope. This gave him the timing between commands and allowed him to verify that the signals are encoded in a 38 kHz carrier signal. He then switched over to an IR module designed to demodulate this frequency. From there he captures and graphs all of the possible control configuration, establishing a timing and command set for the device. He finishes it off by building a replacement controller based on an Arduino. You can see a video of that hardware after the break.

Continue reading “Reverse Engineering A Syma 107 Toy Helicopter IR Protocol”

The ShockerDrone; A Shocking Mod For The AR Drone


You’ve all seen taser like devices built from disposable cameras. We have seen them mounted to rubber gloves, finger tips, even potato gun ammo! We had not yet seen them on a quadcopter. This was quickly remedied once we had one to play with. Meet the shockerDrone, a Parrot AR Drone with built in shocker attachment.

Continue reading “The ShockerDrone; A Shocking Mod For The AR Drone”

Becoming Gallagher In Your Mind

The folks at the Louisville hackerspace LVL1 created the handiest and the dandiest kitchen tool you’ve ever seen. It’s not a slicer, it’s not a dicer, or a chopper or a hopper; it’s… a Star Wars Force Trainer that blows up watermelons.

The project is called Mind Over Melon and was created by [Chris] and [Brad] at LVL1 for the CONNECT at Bernheim festival this past weekend. The idea behind the build is allowing people to explode a watermelon with their mind using a Star Wars Force Trainer EEG toy.

The build features the Force Trainer attached to an XBee module, wirelessly connected to the ground zero of watermelon destruction. When the operator of the device concentrates very hard, a series of LEDs light up and a solenoid dumps a shot of compressed CO2 into a watermelon.

[Brad] tells us instructions to build your own mental Sledge-O-Matic will be available on the LVL1 wiki shortly, but until then enjoy this video of the Mind Over Melon being featured on WHAS11 news.