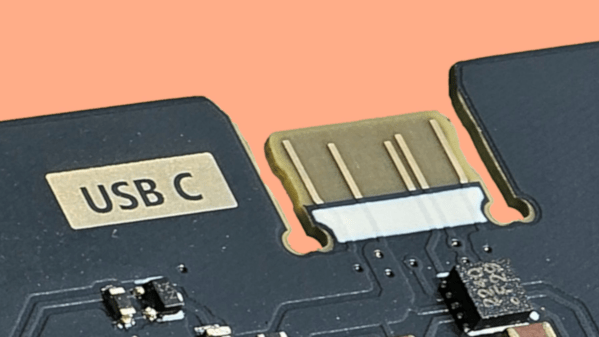
A USB3SUN adapter, connected to a SPARCstation on one end and to a keyboard on another, with the OLED screen showing status icons

An Open SPARCstation USB Keyboard&Mouse Adapter

Got a SPARCstation? You might have had to deal with the proprietary DIN port used for keyboard and mouse input. However, you need not look for outdated hardware anymore – we’ve recently found an adapter project called [usb3sun], which lets you use a regular USB keyboard and mouse instead! Designed by [delan] from [the funny computer museum], the usb3sun adapter is featureful, open-source, and even comes with four blog posts describing its inner workings and development process!

Based on a Pi Pico board, this adapter has a ton of quality of life features – an OLED screen for status display, extra USB port and headers for debugging, a buzzer to emulate bell and click functions, power LEDs, and all the ports you would expect. The OLED screen is needed just because of how many features this adapter’s firmware has, and you’re bound to get more – the [usb3sun] firmware is being actively updated to this day. It’s as if this adapter aims to do all it possibly could help you with – for instance, one of the firmware updates has added idprom reprogramming features, which, as [delan] tells us, lets you boot your workstation with a dead NVRAM battery.

You can order the adapter PCBs yourself, you can breadboard it by following detailed instructions from [delan], or you can get a fully assembled and tested [usb3sun] adapter on Tindie! This adapter will seriously help you in your SPARCstation forays, and, if you don’t happen to own a SPARCstation, you can always emulate SunOS.

The Thinkpad in question, with a Linux shell open on its screen, showing that the device mode has been successfully enabled

ThinkPad X1 Carbon Turned USB Device Through Relentless Digging

In what’s perhaps one of the most impressive laptop reverse engineering posts in recent memory, [Andrey Konovalov] brings us an incredibly detailed story of how he’s discovered and successfully enabled a USB device controller in a ThinkPad X1 Carbon equipped with a 6th gen Intel CPU.

If you ever wanted to peek at the dirty secrets of a somewhat modern-day Intel CPU-based system, this write-up spares you no detail, and spans dozens of abstraction layers — from Linux drivers and modifying NVRAM to custom USB cable building and BIOS chip flashing, digging deep into undocumented PCH registers for the dessert.

All [Andrey] wanted was to avoid tinkering with an extra Raspberry Pi. While using a PCIe connected device controller, he’s found a reference to intel_xhci_usb_sw-role-switch in Linux sysfs, and dove into a rabbit hole, where he discovered that the IP core used for the laptop’s USB ports has a ‘device’ mode that can be enabled. A dig through ACPI tables confirmed this, but also highlighted that the device is disabled in BIOS. What’s more, it turned out to be locked away behind a hidden menu. Experiments in unlocking that menu ensued, in particular when it comes to bypassing Intel Boot Guard, a mechanism that checks BIOS image signatures before boot.

Continue reading “ThinkPad X1 Carbon Turned USB Device Through Relentless Digging”

Hackaday Podcast Episode 255: Balloon On The Moon, Nanotech Goblets, And USB All The Way

This week, Dan joined Elliot for a review of the best and brightest hacks of the week in Episode 0xFF, which both of us found unreasonably exciting; it’s a little like the base-2 equivalent of watching the odometer flip over to 99,999. If you know, you know. We had quite a bumper crop of coolness this week, which strangely included two artifacts from ancient Rome: a nanotech goblet of colloidal gold and silver, and a perplexing dodecahedron that ends up having a very prosaic explanation — probably. We talked about a weird antenna that also defies easy description, saw a mouse turned into the world’s worst camera, and learned how 3D-printed signs are a whole lot easier than neon, and not half bad looking either. As always, we found time to talk about space, like the legacy of Ingenuity and whatever became of inflatable space habitats. Back on Earth, there’s DIY flux, shorts that walk you up the mountain, and more about USB-C than you could ever want to know.

And don’t forget that to celebrate Episode 256 next week, we’ll be doing a special AMA segment where we’ll get all the regular podcast crew together to answer your questions about life, the universe, and everything. If you’ve got a burning question for Elliot, Tom, Kristina, Al, or Dan, put it down in the comment section and we’ll do our best to extinguish it.


Grab a copy for yourself if you want to listen offline.

Continue reading “Hackaday Podcast Episode 255: Balloon On The Moon, Nanotech Goblets, And USB All The Way”

Eliminate That Pesky Power-Only USB Cable With This Cable Tester

Ever wondered why your Arduino wasn’t programming, only to find out that the cable doesn’t have any data conductors? Worry not, [Spencer Maroukis] has got you covered with the USB Sleuth Cable Tester!

The cable tester is a beautiful black circular PCB, with USB ports of nearly every type on the edges. It works partially through passive detection with LEDs and otherwise through active detection of things like the orientation with an STM32 powered by a coin cell battery. But it gets better: There are disconnect switches and exposed pads to test some of the conductors with a digital multimeter!

It may not be necessary for all of us, but one thing is clear: When you needed a good USB cable, you wished you had this to actually test it. The design is open-source too, which is definitely nice if you want one for yourself.

Meanwhile this isn’t the first USB cable tester we’ve seen here.

A Basic USB-C Primer

Over the last five years or so there has been a quiet take-over of the ports on laptops, phones, and other devices, as a variety of older ports as well as the familiar USB A and micro USB sockets have been replaced by the now-ubiquitous USB-C port. It’s a connector which can do so many things, so many in fact that it bears a handy explanation. The Electromagnetic Field 2022 hacker camp has been quietly uploading videos of its talks, and a recent one has [Tyler Ward] explaining the intricacies of the interface.

Many of you will be familiar with XKCD number 927 which makes a joke about proliferating connector standards, and it’s evident that USB-C is a rare case of a connector which bucks the trend of simply making another standard, and has instead created something with which it makes sense to replace what went before. We learn about the intricacies of inter-device communications and USB-PD, and the multiple high-speed connection  lanes shoehorned into it. That one small connector can plug into a laptop and provide power, USB peripherals including network, and display, is nothing short of amazing. Take a look at the video below the break, and if you’re interested in diving deeper, have a look at our colleague [Arya Voronova]’s USB-C for hackers series.

Continue reading “A Basic USB-C Primer”

Getting Started With USB-C And Common Pitfalls With Charging And Data Transfer

USB-C is one of those things that generally everyone seems to agree on that it is a ‘good thing’, but is it really? In this first part of a series on USB-C, [Andreas Spiess] takes us through the theory of USB-C and USB Power Delivery (PD), as well as data transfer with USB-C cables. Even ignoring the obvious conclusion that with USB-C USB should now actually be called the ‘Universal Parallel Bus’ on account of its two pairs of differential data lines, there’s quite a bit of theory and associated implementation details involved.

The Raspberry Pi 4B's wrong USB-C CC-pin configuration is a good teaching example.
The Raspberry Pi 4B’s wrong USB-C CC-pin configuration is a good teaching example.

Starting with the USB 2.0 ‘legacy mode’ and the very boring and predictable 5 V power delivery in this mode, [Andreas] shows why you may not get any power delivered to a device with USB-C connector. Most likely the Downstream Facing Peripheral (DFP, AKA not the host) lacks the required resistors on the CC (Configuration Channel) pins, which are both what the other USB-C end uses to determine the connector orientation, as well as what type of device is connected.

This is where early Raspberry Pi 4B users for example saw themselves caught by surprise when their boards didn’t power up except with some USB cables.

The saga continues through [Andreas]’s collection of USB-C cables, as he shows that many of them lack the TX/RX pairs, and that’s before trying to figure out which cables have the e-marker chip to allow for higher voltages and currents.

On the whole we’re still excited about what USB-C brings to the table, but the sheer complexity and number of variables make that there are a myriad of ways in which something cannot work as expected. Ergo Caveat Emptor.

Continue reading “Getting Started With USB-C And Common Pitfalls With Charging And Data Transfer”

Arduino Provides No Fuss SNES-To-USB Conversion

Even for those of us who are fans of retrocomputing, it’s fair to say that not everyone plays their old-school games on real old-school hardware. The originals are now fragile and expensive, and emulators are good enough that if the gaming experience is all you’re after there’s little point in spending all that cash.

There’s one place in which the originals sometimes have the edge though, the classic controllers are the personal interface with the game. So when [Dome] found a SNES controller in an Akibahara shop, of course he picked it up. How to make it talk to a PC? Tuck an Arduino Pro Micro inside it, of course!

What we like about this project is that instead of ripping out the original electronics it instead hooks the Arduino board onto the original serial interface. We might have made a Nintendo socket to USB box to keep the original cable, but either way, the SNES (technically Super Famicom, because it’s a Japanese market unit) original stays true to its roots. The Arduino polls the clock line at the speed of the console, reads the result, and translates it to a USB interface for the computer. There’s a full run-down of the code and how it was made, should you wish to try.

Of course, if you don’t always have a PC handy, you could also put the whole computer in the controller.