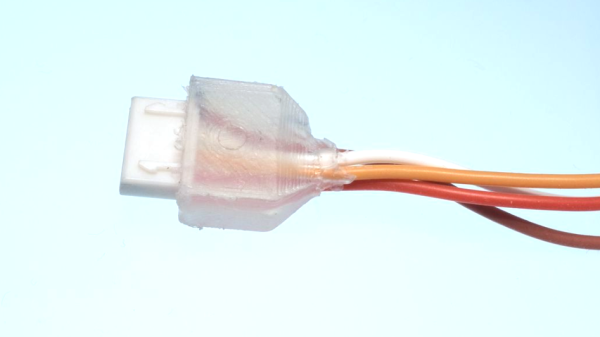
Ferrules And 3D Prints Revive Classic Microphone

Contrary to what our readers may think, we Hackaday writers aren’t exactly hacking layabouts. True, we spend a great deal of time combing through a vast corpus of material to bring you the best from all quadrants of the hacking galaxy, but we do manage to find a few minutes here and there to dip into the shop for a quick hack or two.

Our own [Jenny List] proves that with this quick and easy vintage microphone revival. The mic in question is a Shure Unidyne III, a cardioid pattern dynamic microphone that has been made in the millions since the 1950s. She’s got a couple of these old classics that have been sidelined thanks to their obsolete Amphenol MC3M connectors. The connectors look a little like the now-standard XLR balanced connector, but the pin spacing and pattern are just a touch different.

Luckily, the female sockets in the connector are just the right size to accept one of the crimp-on ferrules [Jenny] had on hand with a snug grip. These were crimped to a length of Cat 5 cable (don’t judge) to complete the wiring, but that left things looking a bit ratty. Some quick OpenSCAD work and a little PLA resulted in a two-piece shell that provides strain relief and protection for the field-expedient connections. It’s not [Roger Daltry] secure, mind you, but as you can see in the video below the break it’s not bad — nothing a few dozen yards of gaffer’s tape couldn’t fix. Come to it, looks like The Who were using the same microphones. Small world.

Continue reading “Ferrules And 3D Prints Revive Classic Microphone”

Hackaday Podcast 054: Xenomorph Cookies, 101 Uses For Hot Glue, Rolling Robots, And A Clippy Computer

Hackaday editors Elliot Williams and Mike Szczys reflect on great hacks of the past few days. Strain relief is something every electronics geek encounters and there’s a spiffy way to make your hot-glue look like a factory connector. There’s something in the air and it seems to be recreating early computers. Did you know astronauts are baking cookies they’re forbidden to eat? And did you hear about the 3D printer that’s being fed oil from the deep fryer?

Take a look at the links below if you want to follow along, and as always tell us what you think about this episode in the comments!

Take a look at the links below if you want to follow along, and as always, tell us what you think about this episode in the comments!

Direct download (60 MB or so.)

Continue reading “Hackaday Podcast 054: Xenomorph Cookies, 101 Uses For Hot Glue, Rolling Robots, And A Clippy Computer”

Cheap Strain Relief By Casting Hot Glue In A 3D Print

[Daniel Roibert] found a way to add cheap strain relief to JST-XH connectors, better known to hobby aircraft folks as the charging and balance connectors on lithium-polymer battery packs. His solution is to cast them in hot glue, with the help of 3D printed molds. His project provides molds fitted for connectors with anywhere from two to eight conductors, so just pick the appropriate one and get printing. [Daniel] says to print the mold pieces in PETG, so that they can hold up to the temperature of melted glue.

The 3D models aren’t particularly intuitive to look at, but an instructional video makes everything clear. First coat the inside surfaces of the mold with a release agent (something like silicone oil should do the trick) and then a small amount of hot glue goes in the bottom. Next the connector is laid down on top of the glue, more glue is applied, and the top of the mold is pressed in. The small hole in the top isn’t for filling with glue, it’s to let excess escape as the mold is closed. After things cool completely, just pop apart the mold (little cutouts for a screwdriver tip make this easy) and trim any excess. That’s all there is to it.

One last thing: among the downloads you may notice one additional model. That one is provided in split parts, so that one can make a mold of an arbitrary width just by stretching the middle parts as needed, then merging them together. After all, sometimes the STL file is just not quite right and if sharing CAD files is not an option for whatever reason, providing STLs that can be more easily tweaked is a welcome courtesy. You can watch a short video showing how the whole thing works, below.

Continue reading “Cheap Strain Relief By Casting Hot Glue In A 3D Print”

Damaged Power Cord Repaired With Shop-Made Mold

We’ve likely all seen a power tool with a less-than-functional strain relief at one end of the power cord or the other. Fixing the plug end is easy, but at the tool end things are a little harder and often not worth the effort compared to the price of just replacing the tool. There’s no obsolescence like built-in obsolescence.

But in the land of Festo, that high-quality but exorbitantly priced brand of premium tools, the normal cost-benefit relationship of repairs is skewed. That’s what led [Mark Presling] to custom mold a new strain relief for a broken Festool cord. The dodgy tool is an orbital sander with Festool’s interchangeable “Plug It” type power cord, which could have been replaced for the princely sum of $65. Rather than suffer that disgrace, [Mark] built a mold for a new strain relief from two pieces of aluminum. The mold fits around the cord once it has been slathered with Sugru, a moldable adhesive compound. The video below shows the mold build, which has some interesting tips for the lathe, and the molding process itself. The Sugru was a little touchy about curing, but in the end the new strain relief looks almost like an original part.

Hats off to [Presser] for not taking the easy way out, and for showing off some techniques that could really help around the shop. We suppose the mold could have been 3D-printed rather than machined; after all, we’ve seen such molds before, and that 3D-printed dies can be robust enough to punch metal parts.

Continue reading “Damaged Power Cord Repaired With Shop-Made Mold”

Arduino Uno Strain Relief

Do jumper wires pulling out of your Uno have you pulling your hair out? Is troubleshooting loose jumpers making you lose your mind?  Are your projects backing up because of all the time you’ve lost keeping jumper wires secure in your Arduino Uno? Then you need the all new Ardunio Strain Relief Enclosure!

[Jeremy Cook] has had it with loose jumpers pulling out of his Uno, so he designed a case that not only secures the Arduino; it also keeps those dastardly jumper wires from pulling out at the most inconvenient times.

Composed of 3/4 inch thick MDF and 1/8 inch thick polycarbonate, the Arduino Strain Relief enclosure is sure to be a hit for every hacker’s work bench. [Jeremy] used a CNC router to cut the enclosure and top. The plastic top is secured to the MDF base via four 4-40 screws. Interestingly – he applied super glue to the screw holes in the MDF before tapping them. We’ll have to try this trick on our next project!