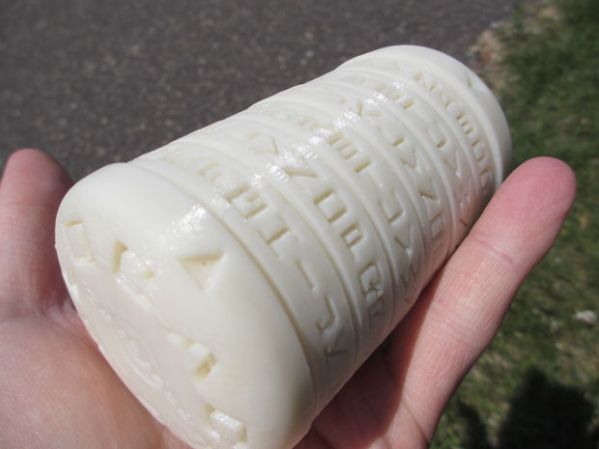
3D Printing Vacuum Tube Sockets

tubes

With the popularity of 3D printers and the current cult of vacuum tubes, it’s shocking we haven’t seen someone do this before.

[Peter] printed his own sockets for a few vacuum tubes he had lying around. After designing them on his computer, [Peter] printed them out on his local hackerspace’s 3D printer.

After printing out the plastic parts, [Peter] needed to add a few strips of metal for a conductor. He used a few pieces of an ATX power supply; a little difficult to fit, but something that works all the same.

So far, [Peter] has whipped up a few sockets for UX5 and VT76 tubes, UX6, B7G (7 pin mini), and B9D  Magnoval tubes. No Nixie sockets yet, but it’s enough diversity to build your own tube amp using the most common designs. Now if we could only make our own transformers with laser cutters and 3D printers…

[Prusa] Interviews A Whole Bunch Of RepRappers

prusa

Any time a media outlet or conference wants an expert on 3D printing there are two people to turn to. The most famous is [Bre Pettis] of MakerBot. The other is an awesome guy named [Prusa], designer of the most popular RepRap and possibly the most popular 3D printer of all time. He’s been putting his fame to use by interviewing all the big names in 3D printing and putting them all up on his YouTube account.

First up is [Kliment], RepRap core dev and creator of the Sprinter firmware and Pronterface host.

[Ruben Lubbes], RepRap community guru, tells [Prusa] about his collection of RepRap parts from famous RepRappers. It sound like a quite interesting collection that’s probably very valuable from a historical perspective. Who knows, in a few years it could be as interesting as [Gutenberg]’s first printing press or [Tim Berners-Lee]’s NEXT cube.

Next up is [Tonokip]. He developed the original Tonokip firmware, the firmware that all major RepRap firmwares are based on.

[Prusa] also interviewed [Jordan Miller] a.k.a. [jmil] of the Philly hackerspace Hive76 and the University of Pennsylvania. He made his name in the RepRap community for 3D bio printing.

Wrapping up the most interesting people, there’s also an interview with [Sound], developer of the Slic3r firmware. We’ve seen an interview of [Sound] before, and this interview continues the earlier one by talking about multiple extruders and how awesome the RepRap community is.

Lastly, and unfortunately, is a short video of [Prusa] interviewing me at the world Maker Faire last September[Prusa] is a huge fan of Hackaday, so this interview is just two guys being star struck at each other.

Actually, the 2012 World Maker Faire had the largest number of current and former Hackaday alumni in one place ever. A group interview of  [Ian] (now of Dangerous Prototypes), [Phillip Torrone] (Adafruit), [Phil Burgess] (Adafruit), current Hackaday boss man [Caleb] and myself would have been awesome. We’ll try harder next year.

You can check out the good videos after the break.

An Interview With The Creator Of Slic3r

[youtube=https://www.youtube.com/watch?v=vA6jmg_zcQo&w=580]

When in Rome, most people visit great works of art, see masterpieces of architecture, or simply try to convince random tourists that a modern recreation of naval battles in the Colosseum would be really cool and somebody should really get on that. [Andrew] had a different idea, though. He thought meeting up with Slic3r developer [Alessandro Ranellucci] would be just as educational and entertaining as visiting a basilica and thoughtfully decided to film his interview for all to see.

Whenever a file of a 3D object is sent to a 3D printer, the object must first be converted into GCode – the language of lines, circles, and computer aided design that all 3D printers speak. To convert 3D objects to GCode, every piece of 3D printer software from Pronterface, ReplicatorG, and Repetier must first ‘slice’ the file up so the object can be printed one layer at a time.

As the lead dev for Slic3r, [Alessandro], a.k.a. [Sound] goes over the current happenings of his STL to GCode converter – he’s even getting a little support from the very cool people at LulzBot – and the future of Slic3r. There’s still a lot of work to be done optimizing the current software, improving the user interface, and getting rid of all those nasty edge-case bugs.

For as much as we at Hackaday focus on the hardware half of 3D printers, it must be said the current state of the art in desktop manufacturing wouldn’t be where it is without [Alessandro] and other software devs. There’s still a lot of room for improvement – try printing a single wall thickness cylinder without a seam, for example – but without software projects like Slic3r, 3D printing wouldn’t be where it is today.

An Automat Of Wireless 3D Printers

vending

There’s a lot of really cool 3D printer stuff happening in the fashion district of NYC this month. It’s called 3DEA, and shows off  the awesomeness of Shapeways, Ultimaker, and the Up! 3D printer to all the fashionistas, trend setters, and the caliphate of coolness that is midtown Manhattan. The folks at Ultimaker wanted to bring something awesome to this exposition and came up with the Vendingwall: a wall of 3D printers connected into a vending machine able to print multiple objects at once.

Ultimaker has made a name for themselves as the top open source 3D printer manufacturer with absolutely impressive build quality and even a 20-foot-high printer able to manufacture entire rooms. The Vendingwall is their next step in the commercialization of 3D printers; all you need to do to create your own 3D printed object is walk up to the Vendingwall, order a print, and later retrieve from one of the many Ultimakers.

To control these ranks of Ultimakers, a piece of software runs on a wireless router loaded up with OpenWRT. From there, the router serves up a website powered by JQuery-mobile for all the Android and iDevices at the 3DEA open house, turning a wall of 3D printers into a vending machine reminiscent of the automats of yore.

Continue reading “An Automat Of Wireless 3D Printers”

Simplifying Fabrication Of Soft Robots

Soft robots are a peculiar wing of technology. They don’t use frames and motors for locomotion, but as the name implies they are made of soft materials. They move by pumping fluid — it could be air or liquid — in and out of bladders that push or pull against the body itself. [Matthew] points out that fabricating soft robots has traditionally been a time-consuming and difficult task. He’s trying to make it easier by 3D printing molds into which soft robots can be cast. This way the parts can be designed in CAD, converted to a mold design, and pushed to a 3D printer.

The object with which he’s been testing the technique functions like an octopus tentacle. The image at the bottom left illustrates the internal structure, with rings separated to allow the appendage to flex, and tubes running parallel to the appendage to provide the force needed to bend it. Above that image you can see one of the molds that was used, and the final product is on the right. The video after the break shows a demonstration of this bending left and right as air is pumped in using the bulb of a blood pressure cuff (or Sphygmomanometer for those paying attention).

Continue reading “Simplifying Fabrication Of Soft Robots”

[Prusa]’s Nozzle Prints Polycarbonate, PEEK, & Nylon

Oh, we’ve been sitting on this one for a while.

[Josef Prusa], brainchild behind what is probably the most popular 3D printer, has just unleashed a new hot end that is capable of printing objects in polycarbonate, PEEK, and nylon.

This new hot end is completely made out of stainless steel – there are no plastic parts made out PTFE or PEEK to keep the heat from transferring up to the extruder. Because the Prusa Nozzle can print these plastics, it’s also now possible to print parts for other hot ends such as the J Head and the Budaschnozzle.

We ran into [Prusa] at NYC Maker Faire a few months ago, and he was kind enough to go over the advancements in his new nozzle and new i3 printer. So far, it looks like the lack of a PEEK insulator isn’t doing the new hot end any harm – [Prusa] has left molten plastic in the nozzle for a few hours and nothing bad has come of it.

You can check out the interview below.

[youtube=www.youtube.com/watch?v=fzFpMZE366Q]

Again, thanks to [Prusa] for granting us an interview and providing some free advertising for Hackaday’s hosts for the NYC Maker Faire. Before you complain about the delay in getting this interview out to you, don’t worry; I slapped a few Makerbot stickers on the back of [Prusa]’s jacket. Everything’s cool.

Blending Real Objects With 3D Prints

It’s very subtle, but if you saw [Greg]’s 3D printed stone to Lego adapter while walking down the street, it might just cause you to stop mid-stride.

This modification to real objects begin with [Greg] taking dozens of pictures of the target object at many different angles. These pictures are then imported into Agisoft PhotoScan which takes all these photos and converts it into a very high-resolution, full-color point cloud.

After precisely measuring the real-world dimensions of the object to be modeled, [Greg] imported his point cloud into Blender and got started on the actual 3D modeling task. By reconstructing the original sandstone block in Blender, [Greg] was also able to model Lego parts.After subtracting the part of the model above the Lego parts, [Greg] had a bizarre-looking adapter that adapts Lego pieces to a real-life stone block.

It’s a very, very cool projet that demonstrates how good [Greg] is at making 3D models of real objects and modeling them inside a computer. After the break you can see a walkthrough of his work process, an impressive amount of expertise wrapped up in making the world just a little more strange.

Continue reading “Blending Real Objects With 3D Prints”