A cylindrical grey robot sits on a white mat. The robot is made of three grey sections connected by a series of radially-arranged copper pillars.

Controlling A Vibrobot With Only One Motor

The vibrobot – a vibrating motor and battery attached to the head of a brush – isn’t truly a robot, since its movement can’t be controlled, but it’s whetted the interest of many future roboticists. With a clever control method, though, it is in fact possible to drive them in any desired direction while using only one motor.

[Namaskar Mitro] based the design of this robot on this research paper; if the vibrating motor is mounted at an angle above the base of the robot, it causes the bot to rotate, and if the motor is mounted off-center from the center of mass, the robot moves in a circle. Crucially, reversing the direction of the motor’s rotation reverses the direction of the robot’s rotation. By rapidly switching the direction of rotation, the bot can move in a series of short, shallow arcs which approximate a straight line.

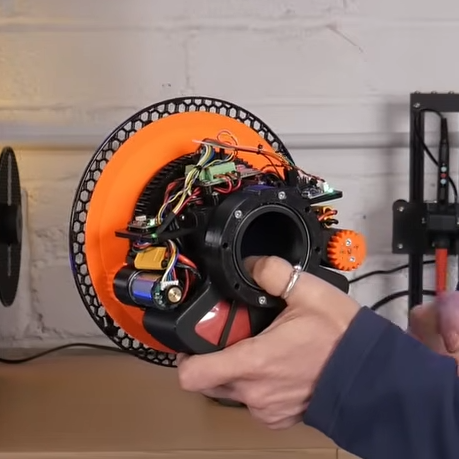
The robot which [Namaskar] built was based on an ESP-01F microcontroller, which let it be remote-controlled over Wi-Fi. It used a DRF8212 motor driver to control a vibrating pager motor, which was housed inside a 3D-printed enclosure. To move in a straight line, the ESP-01F switches the motor’s direction every 250 milliseconds, which still produces a slightly erratic movement. It can, however, approximately follow a traced path.

This adds to the previous vibrobot control methods we’ve seen: a pair of differentially-driven vibrating motors or a weight-shifting mechanism.

Thanks to [110y6] for the tip!

Robot Looks Exactly Like A Roll Of Filament, If Filament Had Eyes

[Matt Denton]’s SpoolBot is a surprisingly agile remote-controlled robot that doesn’t just repurpose filament spool leftovers. It looks exactly like a 2 kg spool of filament; that’s real filament wound around the outside of the drum. In fact, Spoolie the SpoolBot looks so much like the real thing that [Matt] designed a googly-eye add-on, because the robot is so easily misplaced.

The robot’s mass rotates around a central hub in order to move forward or back.

SpoolBot works by rotating its mass around the central hub, which causes it to roll forward or back. Steering is accomplished by tank-style turning of the independent spool ends. While conceptually simple, quite a bit of work is necessary to ensure SpoolBot rolls true, and doesn’t loop itself around inside the shell during maneuvers. Doing that means sensors, and software work.

To that end, a couple of rotary encoders complement the gearmotors and an IMU takes care of overall positional sensing while an ESP32 runs the show. The power supply uses NiMH battery packs, in part for their added weight. Since SpoolBot works by shifting its internal mass, heavier batteries are more effective.

The receiver is a standard RC PWM receiver which means any RC transmitter can be used, but [Matt] shows off a slick one-handed model that not only works well with SpoolBot but tucks neatly into the middle of the spool for storage. Just in case SpoolBot was not hard enough to spot among other filament rolls, we imagine.

The googly-eye add-on solves that, however. They clip to the central hub and so always show “forward” for the robot. They do add quite a bit of personality, as well as a visual indication of the internals’ position relative to the outside.

The GitHub repository and Printables page have all the design files, and the video (embedded just below) shows every piece of the internals.

The kind of hardware available nowadays makes self-balancing devices much more practical and accessible than they ever have been. Really, SpoolBot has quite a lot in common with other self-balancing robots and self-balancing electric vehicles (which are really just larger, ridable self-balancing robots) so there’s plenty of room for experimentation no matter one’s budget or skill level.

Continue reading “Robot Looks Exactly Like A Roll Of Filament, If Filament Had Eyes”

An Introduction To Analog Filtering

One of the major difficulties in studying electricity, especially when compared to many other physical phenomena, is that it cannot be observed directly by human senses. We can manipulate it to perform various tasks and see its effects indirectly, like the ionized channels formed during lightning strikes or the resistive heating of objects, but its underlying behavior is largely hidden from view. Even mathematical descriptions can quickly become complex and counter-intuitive, obscured behind layers of math and theory. Still, [lcamtuf] has made some strides in demystifying aspects of electricity in this introduction to analog filters.

The discussion on analog filters looks at a few straightforward examples first. Starting with an resistor-capacitor (RC) filter, [lcamtuf] explains it by breaking its behavior down into steps of how the circuit behaves over time. Starting with a DC source and no load, and then removing the resistor to show just the behavior of a capacitor, shows the basics of this circuit from various perspectives. From there it moves into how it behaves when exposed to a sine wave instead of a DC source, which is key to understanding its behavior in arbitrary analog environments such as those involved in audio applications.

There’s some math underlying all of these explanations, of course, but it’s not overwhelming like a third-year electrical engineering course might be. For anyone looking to get into signal processing or even just building a really nice set of speakers for their home theater, this is an excellent primer. We’ve seen some other demonstrations of filtering data as well, like this one which demonstrates basic filtering using a microcontroller.

3D Printed Tank Has A Cannon To Boot

Few of us will ever find ourselves piloting a full-sized military tank. Instead, you might like to make do with the RC variety. [TRDB] has whipped up one of their own design which features a small little pellet cannon to boot.

The tank is assembled from 3D printed components — with PETG filament being used for most of the body and moving parts, while the grippy parts of the treads are printed in TPU. The tank’s gearboxes consist of printed herringbone gears, and are driven by a pair of powerful 775 brushed DC motors, which are cooled by small 40 mm PC case fans. A rather unique touch are the custom linear actuators, used to adjust the tank’s ride height and angle relative to the ground. The small cannon on top is a flywheel blaster that fires small plastic pellets loaded from a simple drum magazine. Running the show is an ESP32, which responds to commands from [TRDB]’s own custom RC controller built using the same microcontroller.

As far as DIY RC tanks go, this is a very complete build. We’ve seen some other great work in this space, like this giant human-sized version that’s big enough to ride in.

Continue reading “3D Printed Tank Has A Cannon To Boot”

Lockdown Remote Control Project Is Free And Open

If you flew or drove anything remote controlled until the last few years, chances are very good that you’d be using some faceless corporation’s equipment and radio protocols. But recently, open-source options have taken over the market, at least among the enthusiast core who are into squeezing every last bit of performance out of their gear. So why not take it one step further and roll your own complete system?

Apparently, that’s what [Malcolm Messiter] was thinking when, during the COVID lockdowns, he started his own RC project that he’s calling LockDownRadioControl. The result covers the entire stack, from the protocol to the transmitter and receiver hardware, even to the software that runs it all. The 3D-printed remote sports a Teensy 4.1 and off-the-shelf radio modules on the inside, and premium FrSky hardware on the outside. He’s even got an extensive folder of sound effects that the controller can play to alert you. It’s very complete. Heck, the transmitter even has a game of Pong implemented so that you can keep yourself amused when it’s too rainy to go flying.

Of course, as we alluded to in the beginning, there is a healthy commercial infrastructure and community around other open-source RC projects, namely ExpressLRS and OpenTX, and you can buy gear that runs those software straight out of the box, but it never hurts to have alternatives. And nothing is easier to customize and start hacking on than something you built yourself, so maybe [Malcolm]’s full-stack RC solution is right for you? Either way, it’s certainly impressive for a lockdown project, and evidence of time well spent.

Thanks [Malcolm] for sending that one in!

3D Printed Forklift Is A Cute Desk Toy

Many of us grew up with dreams of piloting a forklift one day. Sadly, most warehouses take a dim view of horseplay with these machines, so few of us get to live out those fantasies. Playing with this desk-sized RC model from [ProfessorBoots] is probably a safer way to get those kicks instead. You can check it out in the video below.

The 3D-printed body of the forklift is the first thing you see. It’s great quality, and it instantly puts you in mind of the real thing. The build is true to the dynamics of a real forklift, too, with proper rear steering. Inside, there’s a custom circuit board hosting an ESP32 that serves as the brain of the operation. Its onboard wireless hardware allows remote control of the forklift via a smartphone app, PS4 controller, or many other options. It controls the drive motors and steering servo, along with another motor driving a threaded rod to move the forks up and down. The whole thing is powered by two Fenix 16340 batteries—small lithium-ion cells that can be recharged with an integral micro USB port.

The project video is very thorough about the design and build. It’s worth watching just to understand the specifics of how forklifts actually raise their forks up and down. It’s good stuff.

This forklift is just the latest RC build from [ProfessorBoots]. He’s done great work in this space before, like this charming skid steer and incredibly complex crane.

Continue reading “3D Printed Forklift Is A Cute Desk Toy”

3D Printed Tires, By The Numbers

What does it take to make decent tires for your projects? According to this 3D printed tire torture test, it’s actually pretty easy — it’s more a question of how well they work when you’re done.

For the test, [Excessive Overkill] made four different sets of shoes for his RC test vehicle. First up was a plain PLA wheel with a knobby tread, followed by an exact copy printed in ABS which he intended to coat with Flex Seal — yes, that Flex Seal. The idea here was to see how well the spray-on rubber compound would improve the performance of the wheel; ABS was used in the hopes that the Flex Seal solvents would partially dissolve the plastic and form a better bond. The next test subjects were a PLA wheel with a separately printed TPU tire, and a urethane tire molded directly to a PLA rim. That last one required a pretty complicated five-piece mold and some specialized urethane resin, but the results looked fantastic.

Non-destructive tests on the tires included an assessment of static friction by measuring the torque needed to start the tire rolling against a rough surface, plus a dynamic friction test using the same setup but measuring torque against increasing motor speed. [Overkill] threw in a destructive test, too, with the test specimens grinding against a concrete block at a constant speed to see how long the tire lasted. Finally, there was a road test, with a full set of each tire mounted to an RC car and subjected to timed laps along a course with mixed surfaces.

Results were mixed, and we won’t spoil the surprise, but suffice it to say that molding your own tires might not be worth the effort, and that Flex Seal is as disappointing as any other infomercial product. We’ve seen other printed tires before, but hats off to [Excessive Overkill] for diving into the data.

Continue reading “3D Printed Tires, By The Numbers”