[Thomas Sanladerer] Gets New Threads

If you do much practical 3D printing, you eventually need some sort of fastener. You can use a screw to bite into plastic. You can create a clearance hole to accommodate a bolt and a nut or even build in a nut trap. You can also heat-set threaded inserts. Which is the best? [Thomas] does his usual complete examination and testing of the options in a recent video you can watch below.

[Thomas] uses inserts from [CNCKitchen] and some cheap inserts for 3D printing and some for injection molding. There are differences in the configuration of the teeth that bite into the plastic. [Thomas] also experimented with thread adapters that grab a 3D-printed thread.

Continue reading “[Thomas Sanladerer] Gets New Threads”

3D Printing Stacks

There is a big difference between building one of something and building, say, 100 of the same item. It isn’t surprising, then, that 3D printing in bulk differs from printing one object at a time. Of course, filling up your build plate is not a new idea. But [Keep Making] wants to encourage you to think in three dimensions and fill up your build volume in the Z axis, as well.

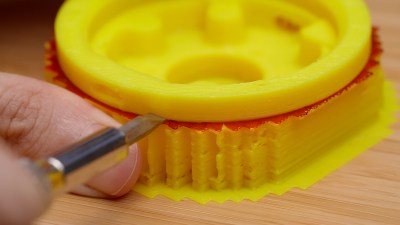
When you fill your X and Y axes, it is easy to see how the parts separate. But with stack printing, you must separate the parts from different layers. Each part has a single-layer gap, and the top surfaces are ironed for a better finish. Sometimes the prints may stick, and the video shows how to use a screw to pop off recalcitrant prints. The technique produces one side that isn’t as nice a finish as the other side, but it isn’t bad, and for many applications, you don’t care, anyway.

Before you get too excited about your own designs, you might try a simple test file and get your print settings dialed in. Obviously, if you need just two or three copies of something small, it is easier to step and repeat them across the build surface. But if you need to maximize your throughput or make multiple copies of large objects, this might be the technique for you.

Looks like an interesting technique that doesn’t require you to do anything strange like, say, waterproof your printer. No strings attached.

Continue reading “3D Printing Stacks”

Printing With Glass Fiber Filament

[ModBot] has been trying different engineering plastics for 3D printing. He recently looked at carbon fiber mixed with PET, but this time, he shows us his results with PET with glass fiber, or PET-GF. You can see how it all turned out in the video below.

The first part of the video compares the specifications, and, as you might expect, some factors are better for carbon fiber, and others are better for glass fibers. Once he gets to the printing, he covers the high temperatures needed (280-320C). He also talks about how either fiber will chew up nozzles and extruders.

Continue reading “Printing With Glass Fiber Filament”

Better 3D Printing Overhangs? Dive! Dive!

If you want better 3D-printed overhangs, you need better cooling, right? What would be better for cooling than printing submerged in water? It turns out [CPSdrone] tried it, and, at least for overhangs, it seems to work pretty well. Check it out in the video below.

Of course, there are some downsides. First, the parts of the 3D printer don’t want to work in water. The guys used deionized water to minimize water conductivity and also sealed open connections. Some components were replaced with equivalents that were less likely to corrode. However, the bearings in the stepper are still going to corrode at some point.

There’s no free lunch, though. Cooling is good for some parts of 3D printing. But for the hot parts, it could cool down too much. They encased the hot end in a large silicon block to help prevent this. They also potted the controller board, which works but makes future maintenance and upgrades painful. Initial tests looked promising.

Continue reading “Better 3D Printing Overhangs? Dive! Dive!”

Iowa Demolishes Its First 3D Printed House

It sounds like a headline from the future: the weekend before Thanksgiving, a bulldozer came for the first example of a printed home that was supposed to help the housing crisis in the city of Muscatine. Fortunately, it hadn’t been completed and sold yet.

Printing of this first house began in May 2023, and nine more were to be completed by the end of the year. Unfortunately, when tested for compressive strength, the cement mixture this first home was printed out of failed to meet the 5,000 PSI minimum required for the project. Rather than compromise on safety, the parties involved decided to knock it down and start over.

The goal now is to find out why the mixture, which met the strength requirements in laboratory testing, didn’t behave the same on-site. Currently, the plan is to start building the originally-planned second house in the spring, and begin construction on this first site after that.

The project is a collaborative effort between the Community Federation of Greater Muscatine (CFGM), Muscatine Community College, and Alquist 3D. Want to know more about the state of 3D printing when it comes to housing? Check out our handy guide.

Editors Note: The initial post initially indicated that the failed cement mixture contained hemp, but that has since found to be incorrect and the post has been edited accordingly.

Continue reading “Iowa Demolishes Its First 3D Printed House”

Art of 3D printer in the middle of printing a Hackaday Jolly Wrencher logo

G-code Goes Binary With Proposed New Format

G-code is effective, easily edited, and nearly ubiquitous when it comes to anything CNC. The format has many strengths, but space efficiency isn’t one of them. In fact, when it comes to 3D printing in particular file sizes can get awfully large. Partly to address this, Prusa have proposed a new .bgcode binary G-code format. You can read the specification of the new (and optional) format here.

The newest version of PrusaSlicer has support for .bgcode, and a utility to convert ASCII G-code to binary (and back) is in the File menu. Want to code an interface of your own? The libbgcode repository provides everything needed to flip .gcode to .bgcode (with a huge file size savings in the process) and vice versa in a way that preserves all aspects of the data. Need to hand-edit a binary G-code file? Convert it to ASCII G-code, make your changes, then flip it right back.

Prusa are not the only ones to notice that the space inefficiency of the G-code file format is not ideal in all situations. Heatshrink and MeatPack are two other solutions in this space with their own strong points. Handily, the command-line tool in libgcode can optionally apply Heatshrink compression or MeatPack encoding in the conversion process.

In a way, G-code is the assembly language of 3D printers. G-code files are normally created when slicing software processes a 3D model, but there are some interesting tricks to be done when G-code is created directly.

three resin-printed Single8 film cartridges, uncropped image

Re-Inventing The Single 8 Home Movie Format

[Jenny List] has been reverse-engineering and redesigning the Single8 home movie film cartridge for the modern age, to breathe life into abandoned cine cameras.

One of the frustrating things about working with technologies that have been with us for a while is the proliferation of standards and the way that once-popular formats can become obsolete over time.  This can leave equipment effectively unusable and unloved.

There is perhaps no greater example of this than in film photography – an industry and hobby that has been with us for over 100 years and that has left many cameras orphaned once the film format they relied on was no longer available (Disc film, anyone?).

Thankfully, Hackaday’s own [Jenny List] has been working hard to bring one particular cine film format back from the dead and has just released the fourth instalment in a video series documenting the process of resurrecting the Single8 format cartridge. Continue reading “Re-Inventing The Single 8 Home Movie Format”