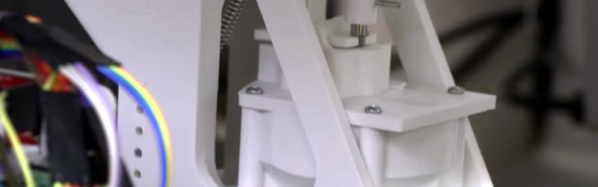
This Tampon Gun Won’t Cramp Your Style

Finally, there’s a way to get rid of those applicator-less tampons that literally no one uses while also destroying a bunch of Axe body spray. Just use the Axe as the propellant in a 3D-printed, gas-powered tampon gun.

As you’ll see in the assembly and demonstration video after the break, most of the parts in [HarambesLabs]’ modular gun design are 3D-printed. Aside from those, you just need to add a PVC tube for a barrel, a bottle that fits the threading on the body, and a pair of o-rings to make a nice, tight seal. Snap in the piezo mechanism from a lighter, fill the bottle with an Axe cloud, and screw it on to the body. If the gas/air mixture is close enough, the compacted cotton bullet should fly. The gun is single-shot, but [HarambesLabs] is working on a mod to make it fully automatic.

We love a good gun build around here, be it mostly benign or downright terrifying. This build isn’t necessarily tampon-dependent but the size, weight, and plastic covering (reducing friction) make it ideal for this particular design. Nerf darts may be another option if you can find the correct fit for the barrel.

Continue reading “This Tampon Gun Won’t Cramp Your Style”

Where There’s Smoke, There’s A Knockoff 3D Printer

These days, it’s possible to buy clones of popular 3D printers from China for satisfyingly low prices. As always, you get what you pay for, and while usable, often they require some modification to reach their full potential. [g3ggo] recently laid down €270 for a clone of the Prusa i3 by Geeetech, knowing it would require some modifications for safety and performance.

First on the bill was a wobbly Z-axis, which was dealt with by printing some new parts designed to fix this issue which have already been developed by the community. Forums are your friend here – often an enterprising user will have already developed fixes for the most common issues, and if they haven’t, you can always step up to be the hero yourself. There was a darker problem lurking inside, though.

[g3ggo] began to wonder why the MOSFETs for the hot end were running so hot. It turned out to be an issue of gate drive – the FETs were only being driven with 5V, which for the given part, wasn’t enough to reach its lowest R_DS(on) and thus was causing the overheating issue. It gets worse, though – the heatsinks on the MOSFETs were bolted on directly without insulation, and sitting fractions of a millimeter above traces on the PCB. Unfortunately, with a small scratch to the soldermask, this caused a short circuit, destroying the hot end and MOSFETs and narrowly avoiding a fire. This is why you never leave 3D printers unattended.

The fix? Replacing the MOSFETs with a part that could deal with a 5V gate drive was the first step, followed by using insulating pads & glue to stop the heatsinks contacting the PCB. Now with the cooler running MOSFETs, there’s less chance of fire, and the mainboard’s cooling fan isn’t even required anymore. Overall, for a small investment in time and parts, [g3ggo] now has a useful 3D printer and learned something along the way. Solid effort!

Ditch OpenSCAD For C++

There’s an old saying that a picture is worth a thousand words. If you’ve ever tried to build furniture or a toy with one of those instructions sheets that contains nothing but pictures, you might disagree. 3D design is much the same for a lot of people. You think you want to draw things graphically, but once you start doing complex things and making changes, parametric modeling is the way to go. Some CAD tools let you do both, but many 3D printer users wind up using OpenSCAD which is fully parametric.

If you’ve used OpenSCAD you know that it is like a simple programming language, but with some significant differences from what you normally use. It is a good bet that most Hackaday readers can program in at least one language. So why learn something new? A real programming language is likely to have features you won’t find readily in OpenSCAD that, in theory, ought to help with reuse and managing complex designs.

I considered OpenJSCAD. It is more or less OpenSCAD for JavaScript. However, JavaScript is a bit of a scripting language itself. Sure, it has objects and some other features, but I’m more comfortable with C++. I thought about using the OpenCSG library that OpenSCAD uses, but that exposes a lot of detail.

Instead, I turned to a project that uses C++ code to generate OpenSCAD output, OOML (the Object Oriented Mechanics Language)). OpenSCAD does the rendering, exporting, and other functions. Unfortunately, the project seems to have stalled a few years back and the primary web-based documentation for it seems to be absent. However, it is very usable and if you know how to find it, there is plenty of documentation available.

Why not OpenSCAD?

Continue reading “Ditch OpenSCAD For C++”

Liar’s 3D Printing: Multiple Colors With One Extruder

Good 3D printers now have multiple hot ends. You ought to be able to print in different colors or print support material. However, a lot of us don’t have multiple hot ends. Turns out, you don’t have to have multiple hot ends to print in multiple colors. To accomplish that you need a lot of patience and the willingness to tell bald-faced lies. Don’t worry, though, you’ll only be lying to some computer hardware and software, so that doesn’t count.

You may have seen people talk about putting a pause between layers to switch from one color to another. That works, but it limits your options. For example, if you want to put some colored text on a different colored background, you have to either have the text poke out, or it has to be “under” the background. It can’t be flush if you only have a single extruder and hot end. My method is a lot more trouble, but it can generate good results.

Keep in mind, with hobby-grade printers, multiple color printing has a lot of problems even if you do have multiple extruders. This isn’t a panacea. But you can get results on par with a similar printer that has multiple heads.

Bottom Line Up Front

Here are a few pictures of test prints that use this technique. A Monoprice Mini printer with the stock extruder and hot end created them using different PLA filament. On the left is a test cube, with a color spot in the middle of the layers (as well as some spots on the top surface you can’t see). To the right is a plate with my call sign in a contrasting color. It is hard to tell in the picture, of course, but there is one surface. The text is at the same height as the yellow surface.

I didn’t spend a lot of time making these prints since I was more focused on perfecting the methodology. The layer heights aren’t very fine, the infill is sparse, and the print speed was fast. However, you could invest time into making better-looking prints. You can also use the usual techniques that you use with a “real” multi-extrusion printer (such as priming towers, ooze shields, etc.).

Continue reading “Liar’s 3D Printing: Multiple Colors With One Extruder”

Open-Source Parametric CAD In Your Browser

Until recently, computer-aided design (CAD) software was really only used by engineering companies who could afford to pay thousands of dollars a year per license. The available software, while very powerful, had a very high learning curve and took a lot of training and experience to master. But, with the rise of hobbyist 3D printing, a number of much more simple CAD programs became available.

While these programs certainly helped makers get into 3D modeling, most had serious limitations. Only a few have been truly open-source, and even fewer have been both open-source and parametric. Parametric CAD allows you to create 3D models based on a series of parameters, such as defining a cube by its origin and dimensions. This is in contrast to sculpting style 3D modeling software, which is controlled much more visually. The benefit of parametric modeling is that parameters can be changed later, and the model can be updated on the fly. Features can also be defined mathematically, so that they change in relation to each other.

While still in its infancy, JS.Sketcher is seeking to fill that niche. It is 100% open-source, runs in your browser using only JavaScript, and is fully parametric (with both constraints and editable dimensions). At this time, available features are still pretty limited and simple. You can: extrude/cut, revolve, shell, and do boolean operations with solids. More advanced features aren’t available yet, but hopefully will be added in the future.

Continue reading “Open-Source Parametric CAD In Your Browser”

3D Printed Circuit Boards… Sort Of

Comedian Demetri Martin does a bit about the phrase “sort of”. He says:

“Sort of’ is such a harmless thing to say… sort of. It’s just a filler. Sort of… it doesn’t really mean anything. But after certain things, sort of means everything. Like… after “I love you”… or “You’re going to live.”

SCADboard is an OpenSCAD library that lets you create 3D printable circuit boards…sort of. The library lays out like a breadboard with two bus bars on each side and a grid of rows and columns. OpenSCAD modules provide a way to create a board, ICs, LEDs, wires and other fundamental components. You set a few initial variables (like the board thickness) then your code looks like this:

 wire(1,bln,1,e, neg); // Neg left trace to LED
 led(1,e+1, 1,e+2, yellowled); // LED
 wire(1,f, 1,i, pos); // LED Pos
 wire(1,j, 1,brp, resistor); // Resistor
 
 wire(3,c,3,h, pos); // Cap Pos
 wire(4,c,4,h, neg); // LED Resistor

Continue reading “3D Printed Circuit Boards… Sort Of”

Make Your Own Arduino Header Pins

There are two kinds of people in the world (and, no, this isn’t a binary joke). People who love the Arduino, and people who hate it. If you’ve ever tried to use a standard prototype board to mount on an Arduino, you’ll know what kind of person you are. When you notice the pins aren’t on 0.1 inch centers, you might think, “What the heck were those idiots thinking!” Or, you might say, “How clever! This way the connectors are keyed to prevent mistakes.” From your choice of statement, we can deduce your feelings on the subject.

[Rssalnero] clearly said something different. We weren’t there, but we suspect it was: “Gee. I should 3D print a jig to bend headers to fit.” Actually, he apparently tried to do it by hand (we’ve tried it, too). The results are not usually very good.

He created two simple 3D printed jigs that let you bend an 8-pin header. The first jig bends the correct offset and the second helps you straighten out the ends again. You can see the result in the picture above.

Continue reading “Make Your Own Arduino Header Pins”