Stackable Open Source 3D Printer Enclosure

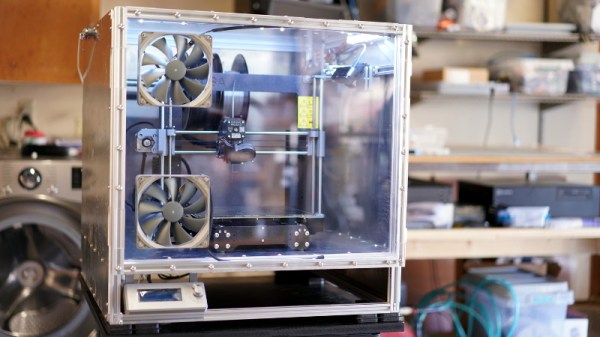
One of the unfortunate realities of desktop FDM 3D printing is that environmental factors such as ambient temperature and humidity can have a big impact on your results. Even with the exact same settings, a part that printed beautifully in the summer can warp right off the bed during the winter months. The solution is a temperature-controlled enclosure, but that can be a daunting project without some guidance. Luckily, [Jay Doscher] has spent the last few months designing a very impressive enclosure that he’s released to the community as open source.

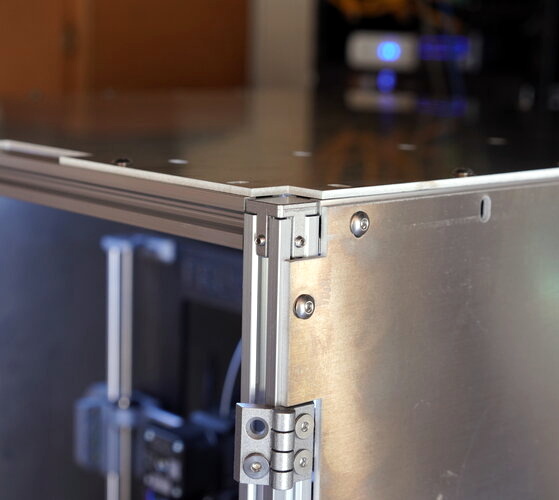
While we’ve seen no shortage of DIY printer enclosures over the years, they tend to be fairly lightweight. But that’s not the case here. Obviously not wanting to leave anything to chance, [Jay] designed this enclosure with 2020 extrusion and aluminum side panels. You could probably sit on the thing with no ill-effects, which is good, since he also designed the enclosure to be stackable should your print farm need to expand vertically.

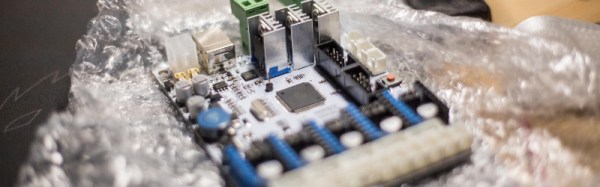
Of course, there’s more to this enclosure than just an aluminum box. It’s packed with features like an integrated Raspberry Pi for running Octoprint, internal and external environmental monitoring with the Adafruit SHT31-D, and a Logitech Brio 4K video camera to watch the action. While not currently implemented, [Jay] says he’s also working on an internal fire suppression system and a fan controller system which will circulate air inside the enclosure should things get a little too toasty.

The enclosure has been designed around the ever-popular Prusa i3 MK3/S, even going so far as to relocate the printer’s display to the outside so you don’t have to open the door to fiddle with the settings. But adapting it to whatever rig you happen to be running shouldn’t be a problem. Though admittedly, perhaps not as easy as adjusting an enclosure made out of metal shelving.

Continue reading “Stackable Open Source 3D Printer Enclosure”

Fluid Simulations In The Kitchen Sink

In an age of ultra-powerful GPUs and cheap processors, computational techniques which were once only available to those with a government-sized R&D budgets are now available to the everyday hacker. An example of industry buzzword turned desktop software is the field of “computational fluid dynamics”, which put simply allow modeling how gasses or liquids will behave when moving through a cavity under specific conditions. Extensive utilization of these fluid simulations are often cited as one of breakthrough techniques which allowed SpaceX to develop their engine technology so rapidly when compared to Apollo and Shuttle era methods.

But just because anyone with a decent computer has access to the technology used for developing rocket engines doesn’t mean they have to use it. What if you prefer to do things the old-fashioned way? Or what if, let’s me honest, you just can’t figure out how to use software like Autodesk CFD and OpenFOAM? That’s exactly where [Desi Quintans] found himself when developing GUST, his cooling duct for i3-type 3D printers.

[Desi] tried to get the big name fluid simulation projects working with his prototype designs for an improved cooling duct, but had no end of trouble. Either the learning curve was too steep, or the simulation wasn’t accurate enough to give him any useful data. But remembering that air is itself a fluid, [Desi] took his simulation from the computer to the sink in order to better visualize what his cooling duct was doing to the airflow.

[Desi] printed up a box with a hole in the bottom that would connect up to his nozzles under test. As the volume of water in the box would be a constant between tests, he reasoned that this would allow him to evaluate the different nozzles at the same pressure. Sure enough, he found that the original nozzle design he was using caused chaotic water flow, which backed up what he was seeing in his experiments when mounted onto the printer.

After several iterations he was able to tame the flow of water by using internal baffles and fins, which when tested in water created something of a laminar flow effect. When he tried this version on the printer, he saw a clear improvement in part cooling, verifying that the behavior of the air and water was close enough for his purposes.

We’ve seen other projects that successfully used fluid simulations in their design before, but the quick and dirty test procedure [Desi] came up with certainly has its charms.

Hackaday Links Column Banner

Hackaday Links: September 24, 2017

This is it. After twelve years we finally have a new Star Trek. Star Trek: Discovery (we’re using ST:DSC as the abbreviation) is airing right about when this post goes up. Next week, you’ll have to pay CBS $6USD a month to get your Star Trek fix, and today might be the last time a new episode of Star Trek is aired on broadcast TV ever. Enjoy it now, and hope the theme song doesn’t have lyrics. Also, hope The Orville is a tenth as good as a Galaxy Quest series could be.

What’s the best way to describe Delta Sigma PLLs? The Cat In The Hat (PDF, page 31). [Dr. Tune] found a Seuss reference in a TI app note. Personally, I’m a fan of hand-drawn cartoons, but we’ll take what we can get.

This weekend the Prusa I3 MK3 was announced. A good printer just got better. Now here’s the video.

The Raspberry Pi is a great media storage device, but it’s absolutely insufficient for audiophile tomfoolery. Here’s a neat Pi DAC/amp/DSP thingy. The VoltaStream turns the Raspberry Pi into a WiFi-connected pair of speakers with low-latency audio in and a TOSLINK connector.

SpaceX! There is serious consideration being given to starting an ‘Elon Musk column’ here on Hackaday. There will be SpaceX updates coming this week from the International Astronautical Congress in Adelaide. What will we find out? I don’t know bruh, but I just got back from Burning Man and I realized it was a whole lot like Mars and I was wondering Elon, like, have you ever been to Burning Man because it’s really dusty and a whole lot like Mars and there’s not much water… Please, organizers of the IAC, I implore you: give more idiots microphones. That was hilarious.

How was the World Maker Faire in New York this weekend? In one word, empty. Abnormally so. Maker Faire was not as crowded as last year, and you could actually move around. My agoraphobia didn’t kick in until the afterparties, and lines for the $5 bottles of water were short. Bay Area Faire attendance was down 16% from 2016-2017, and I would bet attendance for the NY Faire would be down a similar amount. Even a 10% decline in attendance would be noteworthy; the weather last year was cold and rainy and this year was beautiful. There are rumors, speculation, and people wondering how long Maker Faire will continue, but except for Intel pulling out of the maker market, no actual information. Millennials are killing the Maker Faire industry?

Josef Prusa: Multi Material Extruders For Amazing Color Prints

The Prusa i3 Mk 2 is the hotness in consumer-grade, quality 3D printing right now. And things just keep getting more interesting. We caught up with Josef Průša at Maker Faire Bay Area this weekend to see the multi-material extruder in its final form. It’s an upgrade to the Mk 2 which allows a single hot end to print in four different materials, be it different colors or different types of filament.

Continue reading “Josef Prusa: Multi Material Extruders For Amazing Color Prints”

Laser Cutting A 3D Printer

The concept of self-replicating 3D printers is a really powerful one. But in practice, there are issues with the availability and quality of the 3D-printed parts. [Noyan] is taking a different approach by boostrapping a 3D printer with laser-cut parts. There are zero 3D-printed parts in this project. [Noyan] is using acrylic for the frame and the connecting mechanisms that go into the machine.

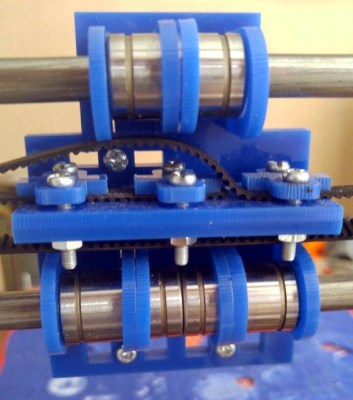
The printer design chosen for the project is the Prusa i3. We have certainly seen custom builds of this popular design before using laser-cut plywood for the frame. Still, these builds use 3D-printed parts for some of the more complicated parts like the extruder carriage and motor brackets. To the right is the X-carriage mechanism. It is complicated but requires no more than 6 mm and 3 mm acrylic stock and the type of hardware traditionally associated with printer builds.

With the proof of concept done, a few upgrades were designed and printed to take the place of the X-axis parts and the belt tensioner. But hey, who doesn’t get their hands on a 3D printer and immediately look for printable solutions for better performance?

We first saw a laser-cut RepRap almost nine years ago! That kit was going to run you an estimated $380. [Noyan] prices this one out at under $200 (if you know someone with a laser cutter), and of course you can get a consumer 3D printer at that price point now. Time has been good to this tool.

Where There’s Smoke, There’s A Knockoff 3D Printer

These days, it’s possible to buy clones of popular 3D printers from China for satisfyingly low prices. As always, you get what you pay for, and while usable, often they require some modification to reach their full potential. [g3ggo] recently laid down €270 for a clone of the Prusa i3 by Geeetech, knowing it would require some modifications for safety and performance.

First on the bill was a wobbly Z-axis, which was dealt with by printing some new parts designed to fix this issue which have already been developed by the community. Forums are your friend here – often an enterprising user will have already developed fixes for the most common issues, and if they haven’t, you can always step up to be the hero yourself. There was a darker problem lurking inside, though.

[g3ggo] began to wonder why the MOSFETs for the hot end were running so hot. It turned out to be an issue of gate drive – the FETs were only being driven with 5V, which for the given part, wasn’t enough to reach its lowest R_DS(on) and thus was causing the overheating issue. It gets worse, though – the heatsinks on the MOSFETs were bolted on directly without insulation, and sitting fractions of a millimeter above traces on the PCB. Unfortunately, with a small scratch to the soldermask, this caused a short circuit, destroying the hot end and MOSFETs and narrowly avoiding a fire. This is why you never leave 3D printers unattended.

The fix? Replacing the MOSFETs with a part that could deal with a 5V gate drive was the first step, followed by using insulating pads & glue to stop the heatsinks contacting the PCB. Now with the cooler running MOSFETs, there’s less chance of fire, and the mainboard’s cooling fan isn’t even required anymore. Overall, for a small investment in time and parts, [g3ggo] now has a useful 3D printer and learned something along the way. Solid effort!

3D Printering: Trinamic TMC2130 Stepper Motor Drivers

Adjust the phase current, crank up the microstepping, and forget about it — that’s what most people want out of a stepper motor driver IC. Although they power most of our CNC machines and 3D printers, as monolithic solutions to “make it spin”, we don’t often pay much attention to them.

In this article, I’ll be looking at the Trinamic TMC2130 stepper motor driver, one that comes with more bells and whistles than you might ever need. On the one hand, this driver can be configured through its SPI interface to suit virtually any application that employs a stepper motor. On the other hand, you can also write directly to the coil current registers and expand the scope of applicability far beyond motors.

Continue reading “3D Printering: Trinamic TMC2130 Stepper Motor Drivers”