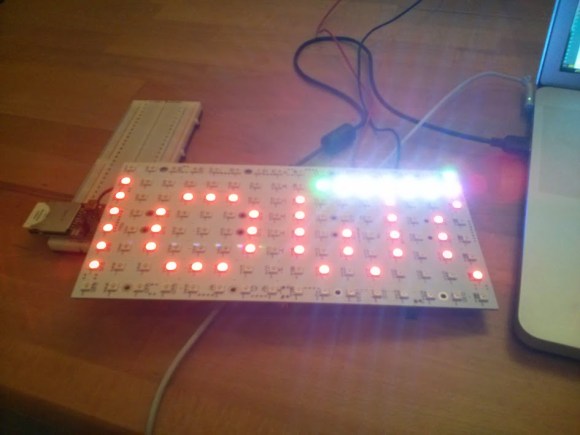
Building An Ethernet Connected RFID Reader

For the last few years, [Lt_Lemming] was the president of Brisbane’s hackerspace. Until several months ago, access to the local was done using 125KHz RFID tags and an Arduino board with a prototyping shield. As the hackerspace gained members and moved to bigger facilities, [Lt_Lemming] decided to build himself a more compact and advanced platform.

His Simple NetworkAble RFID Controller (SNARC) is a platform which can be connected to an Ethernet network and different RFID readers in order to implement smart access control functionalities. Through hole components were selected so even solder apprentices may assemble it. The PCB was designed using Fritzing, and development can even be done inside the Arduino IDE as ISP and serial headers are available on the board. Finally, an N-channel mosfet controls the door locking mechanism.

The project is open hardware and software, and all the sources can be downloaded from [Lt_Lemming]’s github repo.

Reaction Time Challenge

reactionChallenge

We’re not sure where [Bill Porter] finds all of his free time, but we’re glad he’s put it to such good use by building an exhibit piece for the local science museum: Reaction Time Challenge. It’s likely that we were all inspired to love science as kids in a museum like this, and [Bill’s] contribution is already fascinating its young audience. The challenge lets two participants test how fast they can smack a big red button after a randomly-generated countdown. The time taken for the players to react is translated into the RGB LED strips, measuring how fast they managed to hit the button.

Builds like this one need to clearly communicate how they should be used; you don’t want confused children bamming around on your cabinet. First, [Bill] guts the dim LEDs inside the big plastic buttons and replaces them with some brighter ones. To keep the connections clean, he takes the cannibalized ends of an Ethernet cable and hooks the speaker and buttons to an Ethernet jack. The jack sits snugly in a project box where it connects to an Arduino. Two RGB LED strips run from the opposite end of the box, daisy-chaining from the bottom of the cabinet to the top, then back down again. See it all come together in the video after the break.

[Bill’s] museum must be pretty lucky; he resurrected the “Freeze Frame” exhibit for them just over a year ago and has done a bunch of other projects for them over the years.

Continue reading “Reaction Time Challenge”

The Difference Between Bitcrushers And Sample Rate Reducers

bit

If you look around a few electronic music forums, you’ll see a lot of confusion over the difference between a bitcrusher – a filter that reduces the bit depth of an audio signal – and a sample rate reducer – a filter that does exactly what its name implies. With the popularization of 8-bit and retro synth music, this difference is obviously of grave import of concern to saints and kings alike. [Michael] is more than happy to walk us through the difference with real-time sample and bit rate adjustment with his audio hacker board.

The audio hacker board is an Arduino shield with a 12-bit DAC and a 12-bit ADC. With two 1/8″ jacks and a pair of pots, [Michael] was easily able to whip up a sketch that is able to adjust the sample rate and bit depth of an audio signal in real-time.

Contrary to nearly everyone’s opinion of what ‘8-bit’ music is, it’s actually the sample rate that makes music sound like a cassette deck jury rigged into a Nintendo Entertainment System. Reducing the bitrate just makes any audio source sound louder and worse.

Check out the excellent demo video of the effect of bitcrushers and sample rate reducers below.

Continue reading “The Difference Between Bitcrushers And Sample Rate Reducers”

Browsing The Web One Step At A Time

After modifying his new manual treadmill to fit under his standing desk, [Brian Peiris] found a way to let him stroll all over the internet.

After removing the treadmill’s original time/distance display, [Peiris] reverse engineered the speed sensor to send data to an Arduino and his PC.  We’ve seen a number of projects that interface treadmills with virtual worlds, but what really makes this project stand out is a simple script using the Throxy Python library which allows the treadmill to throttle his machine’s internet connection.

The end result is a browsing experience that reacts to how fast the user runs.  In the demonstration video, you can see Peiris tiptoe through images or jog through YouTube videos.  A minimum bandwidth setting keeps the connection live, so if you can’t make it all the way through that HD Netflix movie, taking a breather won’t time out the connection.

It’s certainly a great way to get in shape, or at the very least, it’ll make your ISP’s bandwidth cap feel a lot bigger.

Video after the jump.

Continue reading “Browsing The Web One Step At A Time”

Unplayable Holophonor Replica Is Unplayable

holophonor

You won’t find all that many props or homemade replica builds here at Hackaday, but [Harrison Krix’s] work is second to none, and his Futurama Holophonor replica is worth drooling over. [Harrison] sourced an old (and apparently grimy) clarinet from a local thrift store, which he strips clean of its keys and attachments. The body itself receives some subtle modifications from the lathe and epoxy to plug some holes. Custom-spun plastic pieces complete the rest of the body, including the meticulously crafted bell which houses 54 LEDs.

[Harrison] also whips up a breakout board for a mini Arduino Pro with 4 fading and 4 blinking channels, and some custom power supply options for the Holophonor’s base: a scratch-built fiberglass AAA battery holder and optional AC adapter jack. As an added bonus, he’s fitted the Holophonor’s stand with a set of Robot Devil hands that hold it in place. The only video is an illumination test, but it sure is pretty. You can see it below! It looks perfect, but alas is unplayable which actually makes it even more authentic.

The Holophonor is the latest in a slew of work from Volpin Props. You probably remember [Harrison’s] first Daft Punk helmet from a few years back, or the second one that followed shortly after.

Continue reading “Unplayable Holophonor Replica Is Unplayable”

Twitter Knitter Combines 40 Year Old Hardware With Modern Social Media

When presented with a vintage Empisal Knitmaster knitting machine, members of the TOG Dublin Hackerspace worked together to not only bring it back from the dead but to also add some custom hardware that allows for computer generated patterns.

At first the Knitmaster was in fairly bad shape requiring a few custom machined parts just to function.  It was originally designed to feed in special punch cards that mechanically directed the many moving parts of the machine (called “dibblers”) to knit patterns in yarn.  Using an Arduino, a number of servos, and a microswitch to detect when the knitting carriage is pulled across, this card-read system was replaced with a computer controlled mechanism that can direct the machine to print out images one row at a time.

Of course, you don’t get too many opportunities to name your project something as cute as “The Twitter Knitter”, so once the system was working, it was only a matter of writing some code to snatch tweets from the web and generate images out of the text.  Visitors of the Dublin Mini Maker Faire got to watch it in action as they posted tweets with a particular hashtag which the machine happily printed in yarn (as long as they weren’t too long).

Video demo after the jump.

Continue reading “Twitter Knitter Combines 40 Year Old Hardware With Modern Social Media”

Building An Entire Pinball Machine From Just The Playfield

It all started  when [Iancole] bought a Fireball Home edition playfield on some famous auction website for $135. Originally, he had the intent of lighting the lamps with an Arduino, framing it, and hanging it on the wall of his office — which often happens with old pinball parts. But then his boys asked if he “could make it play”.

[Iancole] managed to find the pinball schematics online and started designing the electronics required by the many LEDs, solenoids and switches. As the LEDs and switches are on the same matrix, he chose a simple Arduino to cycle through them, giving the player the impression that the lights are constantly on. [Iancole] originally planned on using his raspberry Pi to control the solenoids, but he later switched to another Arduino because of the precise timing required.

Therefore, his Pi was used as the heart of the machine. It is interfaced to the two Arduinos to read states and send commands while running the game program, displaying HD graphics on a 24″ screen, playing music and game event sounds. All the electronics are proudly displayed on the backbox, and many developments are planned for it. Also, the machine will be on display at the Orlando Mini Maker Faire on October 5th!