Unplayable Holophonor Replica Is Unplayable

holophonor

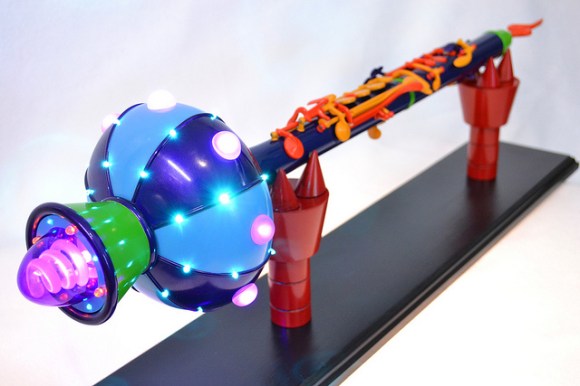
You won’t find all that many props or homemade replica builds here at Hackaday, but [Harrison Krix’s] work is second to none, and his Futurama Holophonor replica is worth drooling over. [Harrison] sourced an old (and apparently grimy) clarinet from a local thrift store, which he strips clean of its keys and attachments. The body itself receives some subtle modifications from the lathe and epoxy to plug some holes. Custom-spun plastic pieces complete the rest of the body, including the meticulously crafted bell which houses 54 LEDs.

[Harrison] also whips up a breakout board for a mini Arduino Pro with 4 fading and 4 blinking channels, and some custom power supply options for the Holophonor’s base: a scratch-built fiberglass AAA battery holder and optional AC adapter jack. As an added bonus, he’s fitted the Holophonor’s stand with a set of Robot Devil hands that hold it in place. The only video is an illumination test, but it sure is pretty. You can see it below! It looks perfect, but alas is unplayable which actually makes it even more authentic.

The Holophonor is the latest in a slew of work from Volpin Props. You probably remember [Harrison’s] first Daft Punk helmet from a few years back, or the second one that followed shortly after.

Continue reading “Unplayable Holophonor Replica Is Unplayable”

Fail Of The Week: Switched-mode PSU Camera Battery Replacement

We really wanted this week’s Fail to work. [Michael] wanted more juice for his Nikon D3100 camera. The idea he had was to replace the cells of the battery with a Buck converter and add leads for an external battery. This opens up the possibility of running from a wide range of voltage sources; an attractive prospect for devices using specialize batteries. Specifically, he wanted to swap out the stock 7.4V 1030 mAh battery and use an 18 Ah lead acid one instead.

The biggest hurdle to get over in a project like this one is the logic the camera uses to communicate with the battery. For this reason — and for the ease of hitting the right form factor — he scrapped an old battery pack to reuse the logic board and enclosure. His power supply is a free-formed circuit which fits nicely in the allotted space.

The circuit powers up, but only to about 6.4V. This isn’t enough to run the camera, which means this was just an expensive way for [Michael] to practice his soldering. After the jump you can read his recounting of the experience. You’ll also find a few of the build images, and the two hand-drawn schematics he used during development. His Dropbox has the entire collection of images.

Continue reading “Fail Of The Week: Switched-mode PSU Camera Battery Replacement”

Update: Whistled Platform Upgraded For Simple Word Recognition

Some people may remember the whistled platform I [limpkin] designed a while back, which recognizes different whistles to control your lighting. Recently, I designed a firmware that transforms the board into a word recognition device, as the 50MHz ARM Cortex M4’s processing capabilities are good enough to do so.

The simple algorithm works by correlating successive Fast Fourier Transforms (FFT) of the amplified microphone output with the FFTs of a template word previously stored in memory. Simply connect the Whistled to your power supply, say the word you’d like it to recognize and you’re good to go.

As you will see in the video embedded after the break (sorry for the accent…), I briefly explain basic principles about word/sound recognition and what you can do to improve your algorithm performances. The source files can be downloaded, as well as the code for my whistle detection algorithm which wasn’t available the first time we looked at the project.

Continue reading “Update: Whistled Platform Upgraded For Simple Word Recognition”

Crazyflie Control With Leap And Kinect

crazieFlie03

The gang at Bitcraze is at it again, this time developing Leap Motion control for their Crazyflie quadcopter, as well as releasing a Kinect-driven autopilot proof of concept. If you haven’t seen the Crazyflie before, you may not realize how compact it is: 90mm motor to motor and only 19 grams.

As far as we can tell, the Crazyflie still needs a PC to control it, so the Leap and Kinect are natural followups. Hand control with the Leap Motion is what you’d expect: just imagine your open palm controlling it like a marionette, with the height of your hand dictating thrust. The Kinect setup looks the most promising. The guys strapped a red ball to the Crazyflie that provides a trackable object against a white backdrop. The Kinect then monitors the quadcopter while a user steers via mouse clicks. Separate PID controllers correct the roll, pitch and thrust to reposition the Crazyflie from its current coordinates to a new setpoint chosen by a click or a drag. Videos of both Leap and Kinect piloting are below.

Tight on cash but still want to take to the skies? We have two rubber-band-powered devices from earlier this week: the Ornithopter and the hilariously brilliant GoPro Slingshot.

Continue reading “Crazyflie Control With Leap And Kinect”

Put In Pocket Change, Get Bitcoins

bitcoin

[gbg] put together a neat little project to get people familiarized with Bitcoins. A lot of techies know what Bitcoins are, but the impetus to download the Bitcoin client and start mining is a bit too much for some. [gbg] has a solution for this – a Bitcoin vending machine. Just dump your pocket change in the coin slot, and out comes a QR code that allows you to add Bitcoins to your wallet.

Inside this Bitcoin briefcase is a Raspberry Pi that connects to a local WiFi connection. Every five seconds, the Raspi looks at the current conversion rate of USD to Bitcoins. Once coins are deposited into the briefcase, a receipt complete with a scannable QR code is printed on a small thermal printer.

When [gbg] took this to the latest DEFCON, a lot of people were interested in the project and started shoveling change into the machine. So many people were interested that [gbg] and his compatriots are planning on turning this into a proper open-source device, complete with a bill reader and possibly an ASIC miner so the Pi can sell the coins it produces.

Check out the video below for some more info.

Continue reading “Put In Pocket Change, Get Bitcoins”

Free Yourself From Social Media With Classical Conditioning

pavlov

While [Robert] and [Dan] should be working on their dissertation, they found they actually spend a whole lot of time whiling away their days on Facebook and other social media sites. Taking inspiration from a Skinner box, they rigged up their computer to shock them every time they surfed on over to Facebook.

Their build uses the UI inspector in OS X and a Python script to activate an Arduino connected to one of those trick ‘shocking chewing gum’ pranks. The contacts for this shocker are attached to a keyboard wrist rest, providing a wonderful tingling sensation whenever the guys surf on over to Facebook.

Because shocks just aren’t extreme enough, [Robert] and [Dan] took their build one step further by invoking the wrath of Mechanical Turk users. They wrote a Python script to look at their UI inspector and submit a job to Mechanical Turk whenever they logged on to Facebook. The result is a random person being paid $1.40 to yell at [Robert] or [Dan] over the phone for wasting time on Facebook.

Video below, and be sure to like this post on Facebook.

Continue reading “Free Yourself From Social Media With Classical Conditioning”

TightLight: A 3D Projection Mapping Assistant

tightLight

Anyone can grab a projector, plug it in, and fire a movie at the wall. If, however, you want to add some depth to your work–both metaphorical and physical–you’d better start projection mapping. Intricate surfaces like these slabs of styrofoam are excellent candidates for a stunning display, but not without introducing additional complexity to your setup. [Grady] hopes to alleviate some tedium with the TightLight (Warning: “music”).

The video shows the entire mapping process of which the Arduino plays a specific role toward the end. Before tackling any projector calibration, [Grady] needs an accurate 3D model of the projection surface, and boy does it look complicated. Good thing he has a NextEngine 3D laser scanner, which you’ll see lighting the surface red as it cruises along.

Enter the TightLight: essentially 20 CdS photocells hooked up to a Duemilanove, each of which is placed at a previously-marked point on the 3D surface. A quick calibration scan scrolls light from the projector across the X then Y axis, hitting each sensor to determine its exact position. [Grady] then merges the photocell location data with the earlier 3D model using the TouchDesigner platform, and bam: everything lines up and plays nice.