Quick And Dirty RFID Door Locks Clean Up Nice

homemade RFID Door Locks

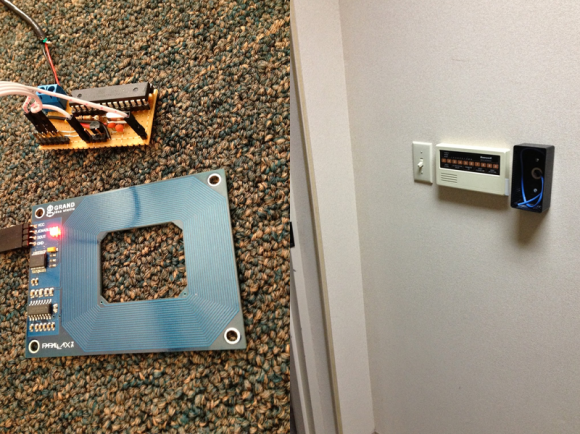
[Shawn] recently overhauled his access control by fitting the doors with some RFID readers. Though the building already had electronic switches in place, unlocking the doors required mashing an aging keypad or pestering someone in an adjacent office to press a button to unlock them for you. [Shawn] tapped into that system by running some wires up into the attic and connecting them to one of two control boxes, each with an ATMega328 inside. Everything functions as you would expect: presenting the right RFID card to the wall-mounted reader sends a signal to the microcontroller, which clicks an accompanying relay that drives the locks.

You may recall [Shawn’s] RFID phone tag hack from last month; the addition of the readers is the second act of the project. If you’re looking to recreate this build, you shouldn’t have any trouble sourcing the same Parallax readers or building out your own Arduino on a stick, either. Check out a quick walkthrough video after the jump.

Continue reading “Quick And Dirty RFID Door Locks Clean Up Nice”

QFN Breakout Is Easy On The Eyes, Wallet

What do you do when you have ATMega328s in QFN package burning a hole in your bug box, but you aren’t set up for SMD and have limited access to parts? You man up and do what [Djpanjan] did: make your own breakout board with solder, right angle header, and many tiny, beautiful wires.

[Djpanjan] says the process is a simple one that requires great concentration. Once he had it broken out, he covered the wires with hot glue to make sure they all stay in place. He programmed it using an Arduino as an ISP and he was able to run the blink sketch without issue. He blinked all the output pins to make sure there were no shorts.

[Djpanjan] says that if he can’t get a breakout for his LQFP-144, he’s going to make his own again. Good luck, [Djpanjan]. We’re all counting on you.

If you’re set up for SMD and etching, there’s always the surface mount breakout route. If not, you can always use magnet wire and protoboard.

Converting A Lame Tron Toy Into A Cool Halloween Costume Prop

sweet_souped_up_tron_identity_disc

Instructable user [cubeberg’s] daughter saw Tron:Legacy earlier this year and decided right then and there that she wanted to dress up as Quorra for Halloween. Being the awesome dad he is, he decided to make her costume himself, and hit the stores in search of an Identity Disc to complete the look.

The toy was pretty underwhelming, and lacked the lighting that a proper Tron prop should have. He figured he had the skills to make it a bit better, so he gathered some tools, a bunch of LEDs, and set off for his workshop. He gutted the disc, cutting out any extraneous bits of plastic he could find. He wired up 64 LEDs between the disc’s inner and outer ring, which he controls using an ATmega 328 paired with a Max7221 display driver.

He doesn’t show any pictures of what the toy looked like beforehand, but the final product looks great. We bet that his daughter is pretty pumped for Halloween to roll around – we know we would be.

Continue reading to see a quick video demo of his souped up Identity Disc in action.

Continue reading “Converting A Lame Tron Toy Into A Cool Halloween Costume Prop”

Building Your Own Real Time Clock

diy_rtc

Like many electronics hobbyists, [Pete] found that he had an overwhelming desire to build a clock for himself. He didn’t want to stick a discrete real time clock IC into a box and call it a day, so he opted to construct his own around a microcontroller instead.

After researching the specs on a few RTC ICs, he defined some accuracy requirements for his clock, and got to building. He started out using a 32,768 Hz watch crystal, but found that the accuracy was off by about 46 ppm after only 24 hours of use. That fell well beyond his self-imposed +/- 3 ppm tolerance goal, so he purchased an oscillator with about 500 times the resolution of his previous crystal.

After writing a handful of code to ensure that the clock remains stable, he calculated that his accuracy should be about 0.18 ppm – well within his acceptable tolerance range.

[Pete] says that this is just the first part of his clock construction, and that future revisions should include plenty of additional functionality, so keep an eye out for updates.