3D-Printed Rover Rolls Light And Looks Right

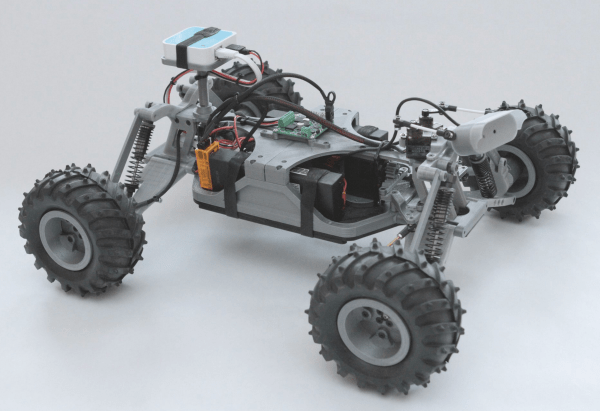
[Rick Winscott]’s RO-V Remotely Operated Vehicle instructable shows you how to make this cool-looking and capable robot. The rover, a 1/10th scale truggy, sports a chassis printed in silver and black PLA. It’s got a wireless router mounted on the back, and a webcam in a 2-servo gimbal up front. [Rick] made his own steering rack and pinion out of 3D printed parts and brass M3-threaded rods which he tapped himself.

The simplified drive system nixes the front, rear, and center differentials, thereby saving [Rick] on printing time, complexity, and weight — he was able to include a second 4000 mAH battery. A TReX Jr motor controller runs a pair of Pololu gear motors. All of this is controlled by a Beaglebone Black alongside a Spektrum DX6i 2.4Ghz transmitter and an OrangeRx 6-channel receiver. The DX6i [Rick] employs typically finds use as an airplane/quad controller, but he reconfigured it to steer the rover—the left stick controls direction and the right stick (elevator and aileron) control the webcam servos.

Enough talking technicals. We think this rover is pretty in the face. Much of this attraction owes to the set of Dagu Wild Thumper wheels (an entirely reasonable name) and the awe-inspiring 100mm shocks that jack up this whip so pleasingly. However, [Rick]’s elegant chassis and the silver-and-black color scheme doesn’t hurt one bit. The wheels are mostly for the cool factor, however—[Rick] recommends swapping out the relatively modest Pololu 20D gear motors in favor of higher-torque models if you’re planning any actual off-road extremeness. If you’re interested in making your own you can download the chassis files from Tinkercad or the BeagleBone code from Github.

If it’s other drone projects you’re after, check out the duct rover and solar wifi rover we published recently.

Ducted Fan Drone Flies

A while back, we wrote about the ducted fan, single rotor, VTOL drone that [Armin Strobel] was working on. It wasn’t quite finished then, and hadn’t got off the ground yet. He’s posted an update, and from the looks of it, he’s made tons of progress, including a first flight with successful take-off and landing.

The successful flight was no coincidence. Tuning any kind of ‘copter is a tricky business. Handling them manually during testing could be outright dangerous. So he built two different test-beds from pieces of wood, some 3D printed parts and bearings. One lets him mount the drone and tune its pitch (and roll), while the other lets him tune the yaw parameters. And just like they do in wind tunnel testing, he fixed short pieces of yarn at various points on the air frame to check for turbulence. Doing this also gave him some insight into how he could improve the 3D printed air-frame in the next iteration. He repeated the tests on the two test beds, going back and forth to make sure the tuning parameters were not interfering with each other. He also modified the landing gear to improve stability during take-off and landing and to prevent tipping. [Armin] is using the PixHawk PX4 for flight control and a BeagleBone Black for higher level functions and control.

Once the first flight showed that the drone could do stable flight, he attached a Go-Pro and recorded some nice video on subsequent flights. The next steps are to fine tune the flight control parameters to ensure stable hovering with position hold and way point following. He may also 3D print an improved air-frame. For details about the build, check out our earlier blog post on the Ducted Fan Drone. Check out the two videos below – one showing the first flight of the Drone, and the other one about the test beds being used for tuning.

Continue reading “Ducted Fan Drone Flies”

Ducted Fan Drone Uses 1 Rotor For VTOL

Multi-rotor fixed-pitch aircraft – quad, hexa, octa copters – are the current flavor of the season with hobby and amateur flight enthusiasts. The serious aero-modeling folks prefer their variable-pitch, single rotor heli’s. Defense and military folks, on the other hand, opt for a fixed wing UAV design that needs a launch mechanism to get airborne. A different approach to flight is the ducted fan, vertical take-off and landing UAV. [Armin Strobel] has been working on just such a design since 2001. However, it wasn’t until recent advances in rapid-prototyping such as 3D printing and availability of small, powerful and cheap flight controllers that allowed him to make some progress. His Ducted Fan VTOL UAV uses just such recent technologies.

Ducted fan designs can use either swivelling tilt rotors that allow the craft to transition from vertical flight to horizontal, or movable control surfaces to control thrust. The advantage is that a single propeller can be used if the model is not too big. This, in turn, allows the use of internal combustion engines which cannot be used in multi-rotor craft (well, they’ve proven difficult to use thus far).

[Armin] started this project in 2001 in a configuration where the centre of gravity is located beneath trust vectoring, giving the advantage of stability. Since there were no hobby autopilots available at the time, it was only equipped with one gyroscope and a mechanical mixer to control the vehicle around the vertical axis. Unfortunately, the craft was destroyed during the first flight, after having managed a short flight, and he stopped further work on it – until now. To start with, he built his own 3D printer – a delta design with a big build volume of 400mm3. 3D printing allowed him to build a structure which already included all the necessary mount points and supports needed to fix servos and other components. The in-fill feature allowed him to make his structure stiff and lightweight too.

Intending to build his own auto-pilot, he experimented with a BeagleBone Black connected to a micro controller to interface with the sensors and actuators. But he wasn’t too happy with initial results, and instead opted to use the PixHawk PX4 auto-pilot system. The UAV is powered by one 3-cell 3500mAh LiPo. The outside diameter of the duct is 30cm (12”), the height is 55cm (22”) and the take-off weight is about 1.2kg (2.6 pound). It has not yet been flown, since he is still waiting for the electronics to arrive, but some bench tests have been conducted with satisfactory results. In the meantime, he is looking to team up with people who share similar interests, so do get in touch with him if this is something up your alley.

If you want to look at other interesting designs, check this UAV that can autonomously transition from quadcopter flight to that of a fixed-wing aircraft or this VTOL airplane / quadcopter mashup.

Putting New Into The Old – A Phonograph Upgrade.

[smellsofbikes] recently came into possession of a 1970’s “stereo radio phonograph” cabinet consisting of a vinyl record player, AM and FM radio, and eight track tape player. The radio worked, the turntable didn’t sound too nice, and the tape player didn’t work at all. A new needle fixed the turntable, but the eight-track was in bad shape. So he replaced the tape player with a BeagleBoneBlack which plays streaming internet radio.

Hopefully, this fix is temporary, since he has carefully disconnected the tape player connections in the hope of fixing it soon. The swap out involved a fair bit of engineering, so he’s split his build log into several bite sized chunks. The first step was to set up the BBB, upgrade it and add in all the network and audio related stuff. Audio on the BBB is available only via the HDMI port, but [smellsofbikes] had a USB soundcard handy, so the next step was setting that up. He installed mpg321 – the command line mp3 player and set it up to play music streaming from somafm. Next up was getting some scripts and programs to run automatically during system bootup. The final part of the setup was adding a WiFi router as a repeater connected to the BBB via an ethernet cable. He could have used a tiny WiFi USB dongle, but he already had the router lying around, and he wanted to dedicate USB to audio functions alone, and use the Ethernet port for Internet.

He then worked on identifying the wires that go from the tape player to the amplifier, spliced them, and hooked them up to the audio sound card on the BBB. With this done, the upgrade was more or less complete – the system played streaming music and stations could be switched remotely (via SSH to BBB). [smellsofbikes] reckoned it would be nice to use the existing controls in the phonograph cabinet to control the internet streaming music, instead of controlling it via a remote computer. The cabinet had 4 indicator lamps that indicated which track was being played and a button to switch between tracks. He removed the old indicator panel and put in a fresh PCB, designed in KiCad and cut on his LPKF circuit board plotter. An aluminum knob machined out of hex bar-stock works as the new track change button. At this point, he called it a wrap. The BBB and Asus router go inside the cabinet, and the old (non-functional) tape player is put in place. Quite an interesting build, and we look forward to when he actually gets the tape player working. [Alan Martin], aka “The Most Interesting Engineer In The World” has told him that “it is a moral imperative that you repair the eight-track and get it working”. [Alan] has promised to send [smellsofbikes] a suitcase full of brand new, still in their plastic wrappers, eight-track tapes when he gets it working.