Bring Your Own Controller Kits Just Add Bluetooth

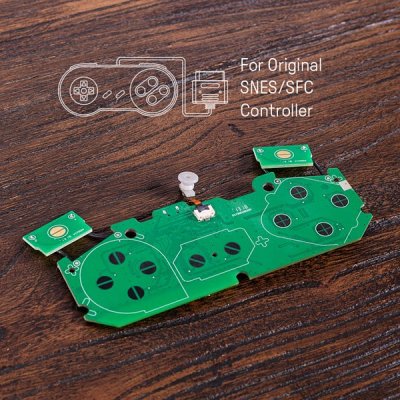
Known for their build quality and low latency, the [8bitdo] line of Bluetooth controllers are generally well liked among classic videogame devotees. They match modern conveniences like rechargeable batteries and Bluetooth connectivity with old school color schemes and the tried-and-true feel of a D-pad. All of their current offerings are modeled to invoke the same feel of console controllers of the past, however, for some there is no substitute for the original. For that type of hobbyist, the company created DIY Bluetooth mod kits in the form of drop-in replacement PCBs.

The featured mod kits are for the original NES controller, SNES controller, and 6-button Genesis Controller. They feature a 180 mAh Li-ion battery for an estimated 7.5 hours of gameplay, and a unique barrel plug type USB charging cable. The charging port fills the void left by the controller’s connection cable and also doubles a the LED status indicator. Though for the Sega Genesis mod kit, the charge port changes to a standard micro USB.
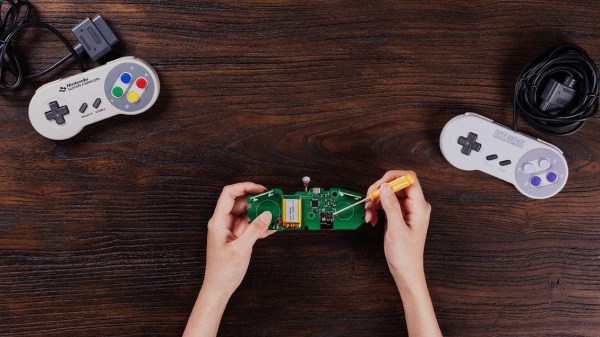
The [8bitdo] website boasts compatibility across Android, Linux, Mac, and Windows (drivers permitting) and even Nintendo Switch. With the addition of one of the company’s Retro Receivers, you are able to use the controllers on the original NES or SNES alongside their contemporary NES/SNES classic console counterparts.

Continue reading “Bring Your Own Controller Kits Just Add Bluetooth”

OSWatch, An Open Source Watch

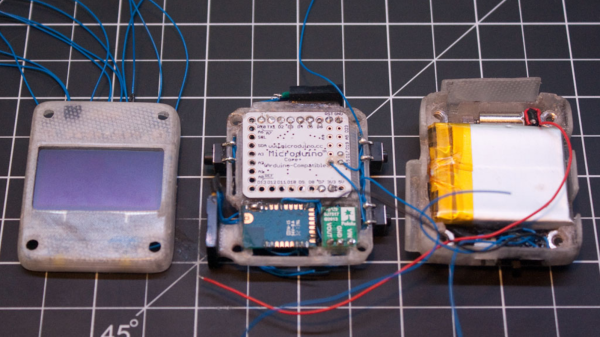
If you are a soldering ninja with a flair for working with tiny parts and modules, check out the Open Source Watch a.k.a. OSWatch built by [Jonathan Cook]. His goals when starting out the project were to make it Arduino compatible, have enough memory for future applications, last a full day on one charge, use BLE as Central or Peripheral and be small in size. With some ingenuity, 3d printing and hacker skills, he was able to accomplish all of that.

OSWatch is still a work in progress and with detailed build instructions available, it is open for others to dig in and create their own versions with modifications – you just need to bring in a lot of patience to the build. The watch is built around a Microdunio Core+ board, an OLED screen, BLE112A module, Vibration motor, a couple of LEDs and Buttons, and a bunch of other parts. Take a look at the schematics here. The watch requires a 3V3, 8MHz version of the Microdunio Core+ (to ensure lower power consumption), and if that isn’t readily available, [Jonathan]  shows how to modify a 5V, 16MHz version.

Continue reading “OSWatch, An Open Source Watch”

Junked Inspection Camera Given 15-Year Face-lift With Raspberry Pi

The nice thing with having a hacker cred is that family and friends are always on the lookout for stuff they think might be useful to you. [Craig Hollabaugh]’s son-in-law found an inspection camera and thought it would be handy for his hobby work. The MagniSight Explorer was first introduced in 2001. It is good for surface mount board work and inspection, except that its analog 480p video is quite dated by today’s standards. So [Craig] upgraded it for crystal clear 1080P/30 video and 5 megapixel images using a $35 Raspberry Pi 2 and a $26 Raspberry Pi Camera Module. After the upgrade, the unit is now a great tool for SMT rework.

There’s not a lot to the upgrade, but [Craig] gives a nice rundown in the 15 minute video of the MagniSight’s internals. He shows us the original analog camera module and its video card, which is able to do some additional processing like black and white output and reverse video (negative). As he mentions, it would be easy for him to do the same via software on the Raspberry Pi. A video camera lens takes care of magnification and two shafts coupled to it via flat belts (rubber bands?) take care of zoom and focus. A front coated mirror angled 45 degrees in front of the lens turns the optical path 90 degrees to allow the lens/camera to “look down”. After experimenting a bit to find the correct focal spot behind the lens unit for the Raspberry Pi camera, he covered the camera module with insulation tape and then just glued it to the old camera mount. After hooking it up to an HDMI monitor, the results are quite nice and he reckons he can easily work with components down to 0402 in size.

He’s got a couple of more upgrades in mind to make the system even better. He plans to replace the existing compact fluorescent lamps with a string of LED’s which will provide more uniform illumination. Plus, he can control their brightness, and selectively turn them on or off to get the optimum lighting. The other interesting upgrade would be to add stepper motors to the X-Y translation stage and automate their movement. After looking up a board file and its BoM, he may even be able to search for a part designator and move the stage to bring the part into focus.

Continue reading “Junked Inspection Camera Given 15-Year Face-lift With Raspberry Pi”

Find And Repair A 230kV 800Amp Oil-Filled Power Cable Feels Like Mission Impossible

How do you fix a shorted cable ? Not just any cable. An underground, 3-phase, 230kV, 800 amp per phase, 10 mile long one, carrying power from a power station to a distribution centre. It costs $13,000 per hour in downtime, counting 1989 money, and takes 8 months to fix. That’s almost $75 million. The Los Angeles Department of Water and Power did this fix about 26 years ago on the cable going from the Scattergood Steam Plant in El Segundo to a distribution center near Bundy and S.M. Blvd. [Jamie Zawinski] posted details on his blog in 2002. [Jamie] a.k.a [jwz] may be familiar to many as one of the founders of Netscape and Mozilla.

To begin with, you need Liquid Nitrogen. Lots of it. As in truckloads. The cable is 16 inch diameter co-axial, filled with 100,000 gallons of oil dielectric pressurised to 200 psi. You can’t drain out all the oil for lots of very good reasons – time and cost being on top of the list. That’s where the LN2 comes in. They dig holes on both sides (20-30 feet each way) of the fault, wrap the pipe with giant blankets filled with all kind of tubes and wires, feed LN2 through the tubes, and *freeze* the oil. With the frozen oil acting as a plug, the faulty section is cut open, drained, the bad stuff removed, replaced, welded back together, topped off, and the plugs are thawed. To make sure the frozen plugs don’t blow out, the oil pressure is reduced to 80 psi during the repair process. They can’t lower it any further, again due to several compelling reasons. The cable was laid in 1972 and was designed to have a MTBF of 60 years.

Continue reading “Find And Repair A 230kV 800Amp Oil-Filled Power Cable Feels Like Mission Impossible”

Android-based Reflow Brings Solder Profiles To Your Lab

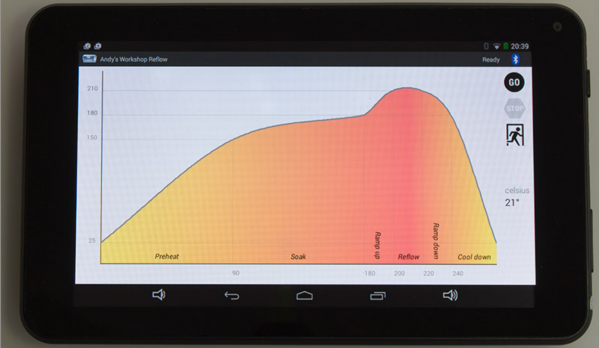
[Andy Brown] is a prolific hacker and ends up building a lot of hardware. About a year back, he built a reflow oven controller. The board he designed used a large number of surface mount parts. This made it seem like a chicken or egg first problem. So he designed a new, easy to build, Android based reflow controller. The new version uses just one, easy to solder surface mount part. By putting in a cheap bluetooth module on the controller, he was able to write an app which could control the oven using any bluetooth enabled Android phone or tablet.

The single PCB is divided into the high voltage, mains powered section separated from the low power control electronics with cutout slots to take care of creepage issues. A BTA312-600B triac is used to switch the oven (load) on and off. The triac is controlled by a MOC3020M optically isolated triac driver, which in turn is driven by a micro controller via a transistor. The beefy 12Amp T0220 package triac is expected to get hot when switching the 1300W load, and [Andy] works through the math to show how he arrived at the heat sink selection. To ensure safety, he uses an isolated, fully encased step down transformer to provide power to the low voltage, control section. One of his requirements was to detect the zero cross over of the mains waveform. Using this signal allows him to turn on the triac for specific angle which can be varied by the micro controller depending on how much current the load requires. The rectified, but unfiltered ac signal is fed to the base of a transistor, which switches every time its base-emitter voltage threshold is reached.

For temperature measurement, [Andy] was using a type-k thermocouple and a Maxim MAX31855 thermocouple to digital converter. This part caused him quite some grief due to a bad production batch, and he found that out via the eevblog forum – eventually sorted out by ordering a replacement. Bluetooth functions are handled by the popular, and cheap, HC-06 module, which allows easy, automatic pairing. He prototyped the code on an ATmega328P, and then transferred it to an ATmega8 after optimising and whittling it down to under 7.5kb using the gcc optimiser. In order to make the board stand-alone, he also added a header for a cheap, Nokia 5110 display and a rotary encoder selector with switch. This allows local control without requiring an Android device.

Gerbers (zip file) for the board are available from his blog, and the ATmega code and Android app from his Github repo. The BoM list on his blog makes it easy to order out all the parts. In the hour long video after the break, [Andy] walks you through solder tip selection, tips for soldering SMD parts, the whole assembly process for the board and a demo. He then wraps it up by connecting the board to his oven, and showing it in action. He still needs to polish his PID tuning and algorithm, so add in your tips in the comments below.

Continue reading “Android-based Reflow Brings Solder Profiles To Your Lab”

Virtual LCD Using Python

[Prashant Mohta] got hold of a Raspberry Pi, a 16×2 LCD display and got down to writing a simple game in Python. Pretty soon, he realized that it was cumbersome to have the Ras-Pi and LCD connected when all he wanted to do was write the code. So he wrote a simple Python module which renders the LCD on his computer display. A simple, quick, useful hack.

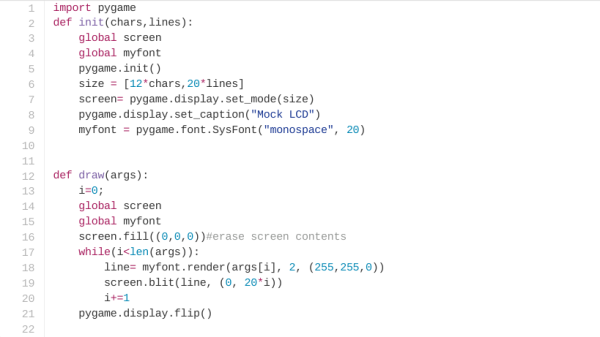
[Prashant]’s code relies on the use of Pygame, a set of Python modules designed for writing games. His code uses just two functions – one to define the LCD (characters and number of lines) while the other draws the characters on the screen by looking up an array. The code is just under 20 lines and available from his Github repo. It will be useful to those who are getting started on Python to help them understand some basics. Python is awesome and writing Python code is pretty simple.

This might draw some flak from the naysayers so if you’re commenting below on the merits, or not, of Python, just keep your comments civil and healthy. In the video below, unrelated to this hack, [Raymond Hettinger] talks about “What makes Python so Awesome”!

Continue reading “Virtual LCD Using Python”

Hackaday Prize Worldwide : Maker’s Asylum New Delhi

Join me on July 18th for Hackaday Prize Worldwide: New Delhi — a KiCad workshop, hardware show & tell, and a chance for you to meet other hackers and makers in the area.

Hacker spaces are on the rise in India, a development that really excites me. When I helped co-found India’s first, community Hacker Space – Maker’s Asylum – in Mumbai, things were pretty lonely. And this was less than 2 years back in 2013 November. Last month, we opened New Delhi’s latest, and the Maker’s Asylum’s second space. There’s already a couple of other hacker spaces in New Delhi, and you can now find hacker spaces in Mumbai, New Delhi, Pune, Bangalore, Chennai, Cochin, Meerut, Kolkatta, Surat, Ahmedabad, Dharamsala, Hyderabad, Ramachandrapuram – and the list continues to grow.

To help build the community, and to bring the opportunity presented by the Hackaday Prize to local hackers, I hosted Hackaday Prize Worldwide events at the Maker’s Asylum in Mumbai and at Workbench Projects in Bangalore. This month, on July 18th, I’ll do another Hackaday Prize Worldwide event at the Maker’s Asylum in New Delhi. I love talking about, and supporting, Open Source Hardware at every opportunity. So for this event, I’ll be doing a fairly long and detailed workshop on KiCad – the awesome, open source EDA tool – lasting several hours. At the end of the day long workshop, I hope to get fellow hackers to complete a design that can be sent off for PCB fabrication. After a short break in the evening, we will have a Show-n-Tell, getting the assembled folks to show off the projects they are working on. There are a number of them who have submitted entires for the Hackaday Prize, so it will be interesting to hear them talk about their experience and share tips and ideas.

We can hold only a limited number of folks at the event, and slots are quickly filling up. So, if you’re in New Delhi or somewhere close by, do RSVP at this link quickly. Looking forward to an interesting event. Check out some pictures from the opening party of the New Delhi Maker’s Asylum after the break.

Continue reading “Hackaday Prize Worldwide : Maker’s Asylum New Delhi”