Hackaday Prize Entry: Controlling Relays Over WiFi

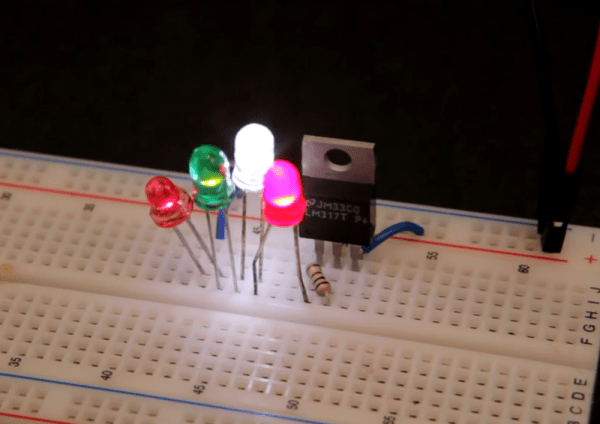
It’s been less than a year since the ESP8266 WiFi Module was released. This is a chip whose original data sheets were only available in Chinese, could only be controlled through AT commands, and was (originally) only sold through Seeed Studio and other various Chinese retailers. It had one thing going for it: it was five dollars. For the price of a crappy sub, you can blink an LED from the Internet. Needless to say, the ESP8266 is now very popular.

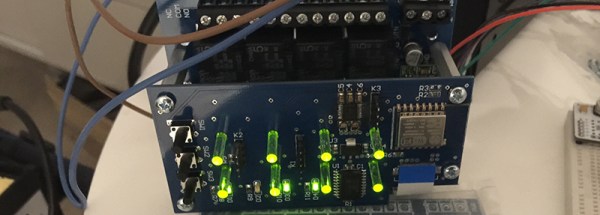
There are a lot of ESP8266 projects in The Hackaday Prize this year, and [David]’s project is making great use of the relatively meager pinout of this module. He’s built an 8-channel relay controller with a WiFi interface to control industrial equipment. It’s a great project, but just of many ESP projects in the prize this year.

The ESP doesn’t have a huge number of pins, but there are enough for some serious work with the right hardware. He’s using the ESP-12 module to get the most pins, and using an SPI port expander to drive an octet of relays. It’s a simple board, but everything you need to control a bunch of relays over WiFi is right there: LEDs, reset buttons, and RS232 level conversion.

You can check out a pair of very satisfying videos of relays clicking below.


The 2015 Hackaday Prize is sponsored by:

Continue reading “Hackaday Prize Entry: Controlling Relays Over WiFi”

High Voltage, Wood And Resin Result In Fractal Art

Wood burning, which goes by pyrography when it’s feeling fancy, has been an art form for centuries. [PapaJ06] puts a new twist on it by using a microwave oven transformer to generate fractal patterns in wood. We’ve seen these Lichtenberg figures before, but generally as electric discharges in acrylic sheets or crystal balls using multi-mega-electron volt accelerators. [PapaJ06]’s technique is considerably simpler and well within the reach of most would-be fractal artists, relying as it does on a transformer salvaged from a $20 Craigslist microwave.

But the extra twist that really brings the wow factor to the fractal patterns burned into the wood is the addition of some phosphorescent resin to fill the valleys carved by the electric discharge. [PapaJ06] carefully prepares the wood, fills the burns with glow powder mixed with epoxy resin, and finishes with a little sanding, linseed oil and polyurethane. The contrast between the charred and intact wood, and the way the resin fills the voids really brings out the fractal nature of the Lichtenberg figures.

[PapaJ06] doesn’t really show us too much about his process, but luckily [TheBackyardScientist] recently posted a video of his process for riding the lightning. Check it out after the break.

Continue reading “High Voltage, Wood And Resin Result In Fractal Art”

Exploding Multimeter Battle Royale

If you check out eBay, Amazon, or the other kinda-shady online retailers out there, you’ll quickly find you can buy a CAT III (600V) rated multimeter for under $50. If you think about it, this is incredible. There’s a lot of engineering that needs to go into a meter that is able to measure junction boxes, and factories in China are pushing these things out for an amazing price.

Over on the EEVBlog, these meters are being pushed to the limits. Last month, [joeqsmith] started a thread testing the theory that these cheap meters can handle extremely high voltages. A proper CAT III test requires a surge of electrons with a 6kV peak and a 2 ohm source. With a bunch of caps, bailing wire, JB Weld and zip ties, anyone can test if these meters are rated at what they say they are. Get a few people on the EEVBlog sending [joeqsmith] some cheapo meters, and you can have some real fun figuring out how these meters stack up.

The real experiments began with [joe smith]’s low energy surge generator, a beast of a machine that can be measured with an even beastlier high voltage scope probe. This is a machine that will send a voltage spike through anything to short out traces on poorly designed multimeters.

How did the cheapo meters fare? Not well, for the most part. There was, however, one exception: the Fluke 101. This is Fluke’s My First Multimeter, stuffed into a pocketable package. This meter is able to survive 12kV pulses when all but two of the other brands of meters would fail at 3kV.

What’s the secret to Fluke’s success? You only need to look at what the Fluke 101 can’t do. Fluke’s budget meter doesn’t measure current. If you ever look inside a meter, you’ll usually find two fuses, one for measuring Amps and the other for all the other functions on the scope. There’s quite a bit of engineering that goes into the current measurement of a meter, and when it goes wrong you have a bomb on your hands. Fluke engineers rather intelligently dropped current measurement from this budget meter, allowing them to save that much on their BOM.

There’s an impressive amount of data collected by [joeqsmith] and the other contributors in this thread, but don’t use this to decide on your next budget meter; This is more of an interesting discovery of how to make a product that meets specs: just cut out what can’t be done with the given budget.

Ducted Fan Drone Flies

A while back, we wrote about the ducted fan, single rotor, VTOL drone that [Armin Strobel] was working on. It wasn’t quite finished then, and hadn’t got off the ground yet. He’s posted an update, and from the looks of it, he’s made tons of progress, including a first flight with successful take-off and landing.

The successful flight was no coincidence. Tuning any kind of ‘copter is a tricky business. Handling them manually during testing could be outright dangerous. So he built two different test-beds from pieces of wood, some 3D printed parts and bearings. One lets him mount the drone and tune its pitch (and roll), while the other lets him tune the yaw parameters. And just like they do in wind tunnel testing, he fixed short pieces of yarn at various points on the air frame to check for turbulence. Doing this also gave him some insight into how he could improve the 3D printed air-frame in the next iteration. He repeated the tests on the two test beds, going back and forth to make sure the tuning parameters were not interfering with each other. He also modified the landing gear to improve stability during take-off and landing and to prevent tipping. [Armin] is using the PixHawk PX4 for flight control and a BeagleBone Black for higher level functions and control.

Once the first flight showed that the drone could do stable flight, he attached a Go-Pro and recorded some nice video on subsequent flights. The next steps are to fine tune the flight control parameters to ensure stable hovering with position hold and way point following. He may also 3D print an improved air-frame. For details about the build, check out our earlier blog post on the Ducted Fan Drone. Check out the two videos below – one showing the first flight of the Drone, and the other one about the test beds being used for tuning.

Continue reading “Ducted Fan Drone Flies”

DIY Spot Welder

Joining Sheet Metal Together With A DIY Spot Welder

Once in a while there comes a time that you need a tool for one specific job. In these cases, it doesn’t make much sense to buy an expensive tool to use just once or twice. For most of us, Spot Welders would fall into this category. [mrjohngoh] had the need to join two pieces of sheet metal. Instead of purchasing a commercial unit, he set out to make his own spot welder.

spotwelder 
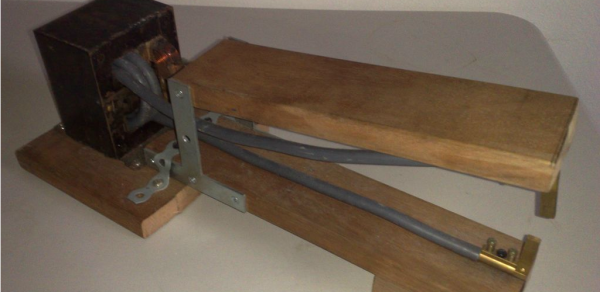
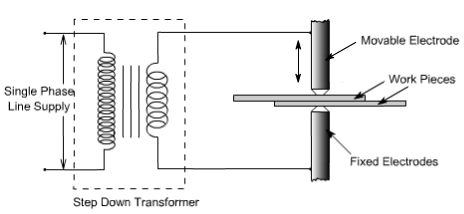
A spot welder works by passing an electric current through two thin pieces of metal. The resistance of the metal work pieces and the current passed though them creates enough heat to melt and join the two together at a single spot. To be able to get the high current needed for this project, [mrjohngoh] started with an old microwave transformer. He removed the standard secondary coil and re-wrapped it with 1cm thick wiring to get maximum current out of the transformer. The ends of the coil wire attach to electrodes, which are made from a high-current electrical plug. The electrodes are mounted at the ends of a pair of hinged arms. The weld is made when the two pieces of metal are sandwiched between the electrodes and power is applied.

Spot welding isn’t just for joining two pieces of sheet metal. It’s also used for things like welding tabs onto battery terminals. The versatility and easy of building these welders make them one of the most featured tool hack we’ve ever seen.

Caption CERN Contest – Cut The Black Wire

Week 21 of the Caption CERN Contest is now history. It’s been a great week of captions, so as always a huge thank you goes out to everyone who entered. We still have no idea what these two CERN scientists were working on. Lenses, switches, and a giant glass screen which could have anything behind it. It’s a tough one. But what we lack in facts, you all made up for in humor.

The Funnies:

  • “I spy with my quantum eye, something with a 75% probability of being spin up!”- [bbarrett90]
  • “Preping the Voight-Kampff set up, they have learnt from their unfortunately predecessors that a mirrored bullet proof glass between them and the upset replicant subject might be a good idea.” -[K.C. Lee]
  • “Mary and Steve swore that they were going to be the ones to win this year’s where’s Waldo competition, unfortunately they lost to the guys in the next lab with an SEM.” – [TrollinTeemo]

This week’s winner is [Lou] with “CERNs early attempts at a retina scanner were a bit cumbersome and time consuming. You had to get to work 20 minutes early just to get past the security check.” Lou’s bio is “Test engineer with Mechanical background who likes to tear things apart”. We bet he’s going to enjoy using his new Teensy 3.1 from The Hackaday Store to build something new with all the parts he has left over from teardowns!

Week 22

cern-22-smHoly cable gore, Batman! This image may make a network engineer or IT person weep, but it was business as usual back in the early days of CERN. 14 racks of equipment, with coaxial cables running everywhere. Let’s hope all those patches are connected to the correct ports! What were these two CERN scientists working on? It’s up to you to tell us as CERN has lost the records!

While you’re working on your captions, check out the old oscilloscope the standing scientist is using. Scope carts used to be necessary. Today all but the most powerful oscilloscopes weigh in at under 10 pounds.

This week’s prize is a Stickvise from The Hackaday Store. Add your humorous caption as a comment to this project log. Make sure you’re commenting on the contest log, not on the contest itself. As always, if you actually have information about the image or the people in it, let CERN know on the original image discussion page.

Good Luck!

Using A Voltage Regulator As A Constant Current Source

[Afroman] contacted us to share his new video on the LM317. The humble LM317 adjustable voltage regulator is everywhere. From wifi routers, to high spec lab equipment. Given a noisy input and a variable load, a voltage regulator will give a nice clean, stable output voltage. We’ve covered the basic operation and usage of the LM317 many times. But even the most common of parts can be used in new and interesting ways.

In his video [Afroman] describes how the LM317 can be used to regulate current rather than voltage to provide a constant current source under varying load. This can useful for a number of applications including driving LEDs and laser diodes. While this circuit may not be as efficient as an LED driver module or a switching solution the LM317 is cheap and readily available. [Afroman] also describes how the circuit works in detail allowing us to enjoy this ubiquitous part in this slightly unusual application.

Continue reading “Using A Voltage Regulator As A Constant Current Source”