Marionette 3D Printer Replaces Linear Rails With String

In the early days of FDM 3D printing, the RepRap project spawned all sorts of weird and and wonderful designs. In the video after the break [dizekat] gives us a throwback to those times with the Marionette 3D printer, completely forgoing linear rails in favor of strings.

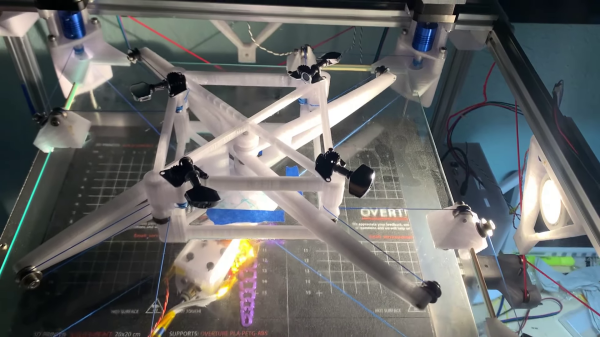
The closest thing to a linear guide found on the Marionette is a pane of glass against which the top surface of the print head slides. A pair of stepper motors drive the printhead in the XY-plane, similar in concept to the Maslow CNC router, but in this case two more strings are required to keep the mechanism in tension. To correctly adjust the length of the string across the full range of motion, [dizekat] uses a complex articulating pulley mechanism that we haven’t seen before. The strings are also angled slightly downward from the spool to the print head, holding it in place against the glass.

The bed print bed is also suspended and constrained using string, with no rigid mechanical member attaching it to the frame of the printer. Six strings connected to the sides and bottom of the bed frame constrain it in 6-DOF, and pass through another pulley arrangement to three more strings and finally to a single stepper driven belt.

We can’t see any particular advantage to forgoing the linear rails, especially when the mechanisms have to be this complex, but it certainly make for an interesting engineering challenge. Whatever the reason, the end result is fascinating to watch move, and the print quality even looks decent.

Continue reading “Marionette 3D Printer Replaces Linear Rails With String”

Tabletop Basketball With Tentacles

Unlike football/soccer and foosball, basketball doesn’t really lend itself to being turned into a tabletop game quite that easily. [The Q] has found a way around that, employing tentacle mechanisms to create a two-player, basketball-like game.

Each player uses a pair of two-axis control sticks and a foot pedal to operate a cable-driven tentacle with a gripper on the end. These are two stage tentacles, meaning that the top and bottom halves are independently controlled. The tentacles consist of a series of laminated foam discs clued onto bicycle cable sleeves. The cables are open in the section they control, and operate in a push-pull arrangement. The spring-loaded grippers are operated by the foot pedals, with a single cable running down the center of the tentacle.

The game looks quite fun and challenging, and we can imagine it being even more entertaining with teams of two or three people operating each tentacle. Add a bit of alcohol to adult players, and it might become downright hilarious, although the mechanisms would need to be beefed up a bit to survive that level of punishment.

We suspect [The Q] read [Joshua Vasquez]’s incredibly detailed three-part guide on two-stage tentacle mechanisms. Combine that with his guide to cable mechanism math, and you’d be well-equipped to build your own. Continue reading “Tabletop Basketball With Tentacles”

Humanoid Robot Has Joints That Inspire

One of the challenges with humanoid robots, besides keeping them upright, is finding compact combinations of actuators and joint mechanisms that allow for good range of smooth motion while still having good strength. To achieve that researchers from the IRIM Lab at Korea University of Technology and Education developed the LIMS2-AMBIDEX robotic humanoid upper body that uses a combination of brushless motors, pulleys and some very interesting joint mechanisms. (Video, embedded below.)

The wrist mechanism. Anyone willing to tackle a 3D printed version?

From shoulder to fingers, each arm has seven degrees of freedom which allows the robot to achieve some spectacularly smooth and realistic upper body motion. Except for the wrist rotation actuator, all the actuators are housed in the shoulders, and motion is transferred to the required joint through an array of cables and pulleys. This keeps the arm light and its inertia low, allowing the arms to move rapidly without breaking anything or toppling the entire robot.

The wrist and elbow mechanisms are especially interesting. The wrist emulates rolling contact between two spheres with only revolute joints. It also allows a drive shaft to pass down the centre of the mechanism and transfer rotating motion from one end to the other. The elbow is a rolling double jointed affair that allows true 180 degrees of rotation.

We have no idea why this took two years to end up in our YouTube feed, but we’re sure glad it finally did. Check out some of the demo videos after the break. Continue reading “Humanoid Robot Has Joints That Inspire”

Two-Stage Tentacle Mechanisms Part III: Putting It All Together

Welcome back to the final chapter in our journey exploring two-stage tentacle mechanisms. This is where we arm you with the tools and techniques to get one of these cretins alive-and-kicking in your livingroom. In this last installment, I’ll guide us through the steps of building our very own tentacle and controller identical to one we’ve been discussing in the last few weeks. As promised, this post comes with a few bonuses:

29323707092_28d8bd1eb8_z
Nothing like a fresh batch o’ parts.

Design Files

  1. The Almighty Bill-o’-Materials
  2. Vector Drawings for laser cutting
    1. DXF files pre-offset (0.003″)
    2. DXF files original
  3. STL Models for 3D Printing
  4. Original Tentacle CAD Model Files
  5. Original Controller CAD Model Files

Depending on your situation, some design files may be more important than others. If you just want to get parts made, odds are good that you can simply cut the pre-offset DXFs from the right plate thicknesses and get rolling. Of course, if you need to tune the files for a laser with a slightly different beam diameter, I’ve included the original DXFs for good measure. For the heavy-hitters, I’ve also included the original files if there’s something about this design that just deserves a tweak or two. Have at it! (And, of course, let us know how you improve it!)

Ok, now that we’ve got the parts on-hand in a pile of pieces,let’s walk through the last-mile tweaks to making this puppet work: assembly and tuning. At this point, we’ve got a collection of parts, some laser-cut, some off the shelf. Now it’s time to string them together.

Continue reading “Two-Stage Tentacle Mechanisms Part III: Putting It All Together”