Keeping A Mazda’s Radio On After The Engine Shuts Off

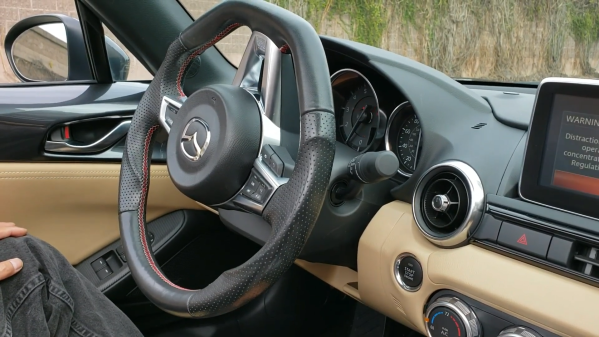
Have you ever pulled into a car park with your favorite song blaring, only to lament the fact that the music cut out when you stopped the engine? Some modern cars are smart enough to keep the radio on until you open the door. [ssh16] decided to hack that very functionality into their Mazda MX-5.

The device uses a microcontroller to read the CAN bus of the vehicle. The microcontroller also has the ability to keep the vehicle’s ACC (accessory) relay energized at will. Thus, when the engine is turned off, the microcontroller keeps the ACC relay on, maintaining power to the stereo and infotainment system. Then, after ten minutes, or when it receives a CAN message that the driver’s door has been opened, it cuts power to the relay, shutting the accessories off. It’s a simple build, but one that [ssh16] executed cleanly. By putting the microcontroller on a neat PCB with a harness that can clip into the stock Mazda one, it’s possible to install the hack without needing to cut any wires. Plus, with a small modification, it was even possible to use the same hack with a Mazda CX-5.

Whether you’re jamming out to a cool song, or you just want to finish a phone call over Bluetooth, it’s a nifty feature to have in a vehicle. We’ve seen some other neat infotainment hacks before, too. Video after the break.

Continue reading “Keeping A Mazda’s Radio On After The Engine Shuts Off”

Retro Gadgets: I Swear Officer, I Was Listening To 45

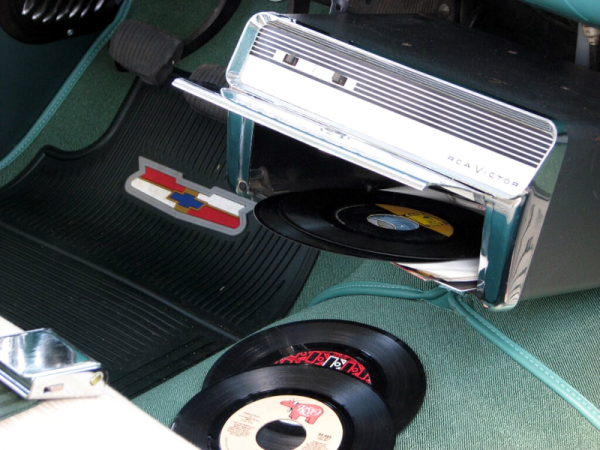
Audio in cars has a long history. Car radios in the 1920s were bulky and expensive. In the 1930s, there was the Motorola radio. They were still expensive — a $540 car with a $130 radio — but much more compact and usable.  There were also 8-tracks, cassettes, CDs, and lately digital audio on storage media or streamed over the phone network. There were also record players. For a brief period between 1955 and 1961, you could get a car with a record player. As you might expect, though, they weren’t just any record players. After all, the first thing to break on a car from that era was the mechanical clock. Record players would need to be rugged to work and continue to work in a moving vehicle. As you might also expect, it didn’t work out very well.

It all started with Peter Goldmark, the head of CBS Laboratories. He knew a lot about record players and had been behind the LP — microgroove records that played for 22 minutes on a side at 33.3 RPM instead of 5 minutes on a side at 78 RPM. He knew that a car record player needed to be smaller and shock-resistant. Of course, in those days, it would have tubes, but that could hardly be helped.

The problem turned into one of size. A standard 10- or 12-inch disk is too big to easily fit in the car. A 45 RPM record would be more manageable, but who wants to change the record every three or four minutes while driving?

Continue reading “Retro Gadgets: I Swear Officer, I Was Listening To 45”

Bluetooth 8-Track Adapters Are A Thing

When it comes to classic cars, the entertainment options can be limited. You’re often stuck with an old cassette deck and AM/FM radio, or you can swap it out for some hideous flashy modern head unit. [Jim] had a working 8-track deck in his Corvette, and didn’t want to swap it out. Thus, he set about building himself a simple Bluetooth to 8-track adapter.

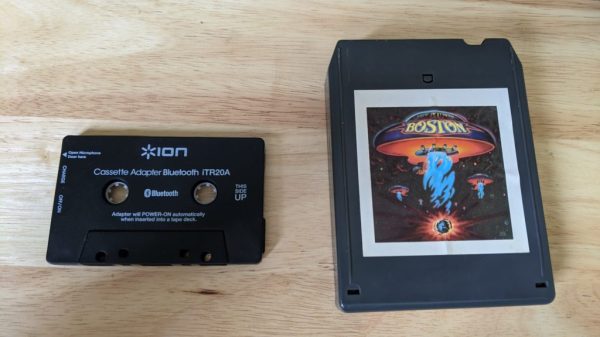
The hack is straightforward, with [Jim] grabbing a Bluetooth-to-cassette adapter off the shelf. These simply take in audio over Bluetooth, and pipe the analog audio out to a magnetic head, which is largely similar to the head that reads the cassette. Pumping the audio to the magnetic coils in the adapter’s head creates a changing magnetic field essentially the same as the audio tape moving past the cassette reader head. It doesn’t really matter whether you’re working with an 8-track player or a regular cassette. Get the magnetic field in the right spot, and it’ll work.

The electronics from the cassette adapter are simply placed inside an old 8-track tape, with holes cut in the chassis for the charge port and on switch. Then, all you need to do is pop the adapter into the 8-track deck, pair with it over Bluetooth, and you can get the tunes pumping.

Others have had success with hilarious Rube Goldberg methods, too. [Techmoan] took a classic cassette-to-8-track adapter, which is actually self-powered by the deck, and simply popped a Bluetooth cassette inside. That worked surprisingly well, and it was interesting to see how it all worked on the inside. We even saw a 3D-printed device on TikTok.

Thus, if you’ve got an old Corvette, particularly of that era with the Doug Nash 4+3 transmission, this might just be the hack for you. Alternatively, you can hack Bluetooth in to just about any classic stereo; we’ve got a guide on how to do just that. Video after the break.

Continue reading “Bluetooth 8-Track Adapters Are A Thing”

Salvaging Audio Amplifiers From Vintage Volvos

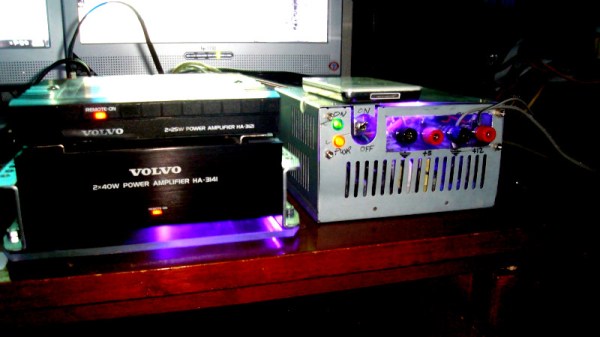
The common automotive scrap yard is a land of plenty for the enterprising hacker., where many items that would be prohibitively expensive elsewhere can often be had for a song. This isn’t just limited to strictly automotive parts either, as the modern vehicle is full of all kinds of hardware. [Nikita] managed to salvage a pair of audio amplifiers from an old Volvo, and put them to good use. It’s a great idea if you’re looking for cheap audio hardware!

The amplifiers are from a Volvo 760 made in 1984. There’s one rated at 40 watts per channel, and a smaller device rated at 25 watts per channel – likely to drive the front and rear speakers from separate amps. The amplifiers take 12 volts nominally, as one would expect. After some initial testing with a car battery and unsticking old relays, things began to crackle into life.

With the hardware now functioning, it was simply a case of bolting the amplifiers into a frame, hooking them up to a converted ATX power supply, and wiring up some connectors for speakers and audio input. With a few bits and pieces invested, [Nikita] now has a good quality amplifier to run audio in the workshop.

There’s plenty of useful hardware you can score down at the wreckers, and we see these parts used in hacks all the time – from peculiar milling machines to automated watering systems.

Quiet Your Car The Cheap And Effective Way

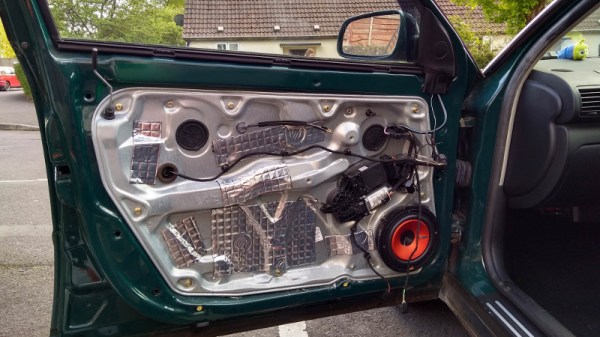
If you’ve been on the Earth for a couple of decades or more, or have just grown up riding around in some older metal, you’d know that cars can be incredibly noisy. If you’re unfamiliar, buy yourself a nice car like a 2000 Honda Civic, strip out all the carpet and interior panels, and go for a drive. Huge amounts of research and development have gone into making modern cars as quiet and comfortable as possible. Through the correct use of sound deadening materials and techniques, a car can be made much quieter and audio quality from the sound system can be improved too. [camerajack21] decided to get to work on their Volkswagen to see what could be done.

The project in question pays special attention to the door panels. These are where the primary speakers are housed, and there were issues with rattles if the speakers were allowed to operate at frequencies below 100 Hz. Weather stripping, foam, and improved fasteners were pressed into service to reduce this issue.

Think of a musical bell. If you touch a small part of the bell with just your finger, it no longer can ring true. You don’t need to wrap your entire hand around a bell to keep it from ringing. Your finger is not absorbing sound, just preventing the bell from ringing.

Focus then moved to the body panels. Special sound deadening material (in this case, Silent Coat brand) was then applied to the insides of the doors and trunk to bring the sound level down. The key to effective application of such materials is not to waste money covering entire panels – the Reddit comments are particularly enlightening here. It only takes a small amount of material to stop a panel from vibrating, with most testing suggesting anymore than 30% coverage of a panel brings diminishing returns.

With your car’s sound environment tidily improved, you might be looking for ways to improve your sound system. There’s plenty of ways to go about it – you can even use guitar effects.

A Retro Car Stereo With Arduino Inside

For some car enthusiasts whose passions run towards older vehicles, only originality will do. [RetroJDM] for instance has an RA28 Toyota Celica from the mid 1970s for which he has gone to great lengths to source a pristine center console to replace a damaged original.

There is only one problem with the center console on a 1970s Toyota, it doesn’t have a DIN cut-out for the standard-sized car radios that have become universal in the decades since its manufacture. Instead it has a cut-out for a Toyota-specific radio in the old style with holes for volume and tuning knobs to either side of a protruding center unit that would have contained a tuning dial and a slot for cassettes or maybe 8-track cartridges.

His solution is an interesting one, he’s put together his own car stereo in an enclosure suitable for the Toyota cut-out. Inside the radio there is an Arduino Mega controlling the breakout boards for an Si4703 FM tuner and a VMusic3 MP3/USB music player, and a PT2314 audio processor. For display there is a set of retro LED seven-segment modules, and an MSGEQ7 spectrum analyser. The result is a modern radio with FM, line-input, and MP3 player, with all the functions you’d expect. There is no onboard amplifier though, but this function is fulfilled by an external unit.

The finished unit is topped off with a very professional front panel, which you can see in his demo video below the break.

Continue reading “A Retro Car Stereo With Arduino Inside”

Better Car Audio With Guitar Effects

Automotive sound is a huge deal; for many people, it’s the place to listen to music. Back in the 80s, you were lucky to get anything more than two door speakers in the front of the car. Fast forward to today, and you can expect a 10-speaker system in an up-spec’d family sedan.

[Josh] has a car, and wanted to improve the sound. In particular, the aim was to improve the sense of space felt when listening. A car is a relatively small space, and the driver sits in close proximity to the front speakers, so it’s difficult to get a good soundstage.

[Josh]’s approach was to create a “surround” effect for the car stereo, by feeding a left/right difference signal to the rear speakers. This was achieved by the use of a series of op-amps that buffer and then generate a mono signal that represents the difference between the left and right channel. For optimum results, [Josh] wanted to delay the signal being sent to the rear speakers, with a longer delay making the soundstage feel bigger, as if reflections are coming from farther away in a bigger room. To do this, [Josh] simply hooked up the signal to a Boss DD-3 Digital Delay guitar pedal – an off-the-shelf solution to an otherwise sticky problem. The DD-3 gives [Josh] a variable delay time with reasonably high fidelity, so it’s a perfect way to get the project done quickly.

The final piece of the puzzle is a filter. The difference signal doesn’t actually sound all that pleasant to the ears by itself, especially when it comes to transient high-pitched sounds like cymbals, so a lowpass filter is implemented to cut these higher frequencies down.

[Josh] made everything adjustable, from the filter to the delay, so it’s simple to dial things in until they’re just right, rather than relying on calculation or guesswork. The general idea is to feed the difference signal into the rear speakers at a low enough volume and with a subtle delay so that it adds to a general feeling of being in a larger room with the sound coming from all around, as opposed to listening to very loud point sources of audio.

It’s a cool project that we imagine would be very satisfying to dial in and enjoy on the road. What’s more, it’s a fairly straightforward build if you want to experiment with it yourself on your own car. Perhaps your problem is that you need an auxiliary input to your head unit, though – in that case, check out this Subaru project.