A Modernized Metric Clock

Much to the chagrin of many living in North America who still need to do things like keep two sets of wrenches on hand, most of the rest of the world has standardized to a simpler measurement system using metric units exclusively. The metric system is widely adopted worldwide, but we still use a base-60 system for timekeeping that predates the rest of the metric system. The French did attempt to “decimalize” timekeeping as well with the French Republican Calendar at around this same time, but this “metric” timekeeping system never caught on particularly well. It’s still an interesting historical tidbit, and [ClassTech] built this modern metric clock to explore it a little more.

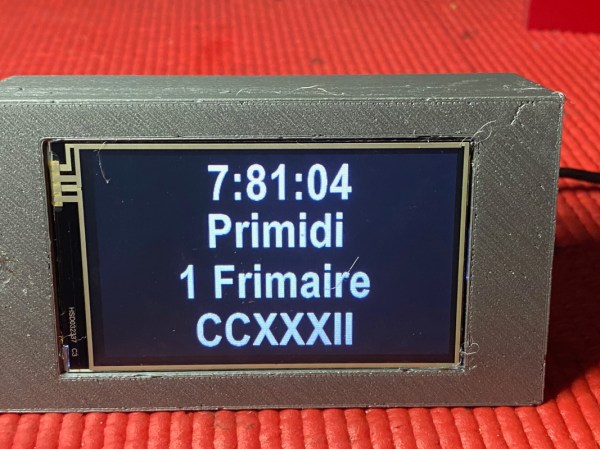
The system itself uses ten-day weeks, ten-hour days, and 100-minute hours which makes it more in line with the base-10 system common to the rest of the metric system. But this means that a second in the French Republican system actually works out to a little less than one and a half SI seconds, meaning that a modern timekeeping computer needs to do a little more math to display the correct time at the correct interval. [ClassTech] is using a Particle Photon IoT processor getting the time from a NTP server, converting it to “metric time”, and displaying the time on a Nextion touch display.

While the device is reported to update the time once per second, we’re not sure if this is every SI second or every French Republican second. Either way, there are plenty of reasons this timekeeping system never gained widespread adoption, and a surprising one is that timekeeping tends to be easier in a base-60 system due to its capability of having more divisors. Many other reasons are less technical and more cultural, and timekeeping tends to be surprisingly difficult to coordinate even among shared numbers systems and languages.

Thinkpad IBM Laptop Case

Once upon a time, laptops and other computer hardware often came with a fancy leather case for protection. That’s not really the case anymore, but it was in the golden era of the IBM ThinkPad. [polymatt] found a rare example, but wanted another one, so he decided to try and replicate it from scratch.

Leathercraft was a new discipline for [polymatt], and so the whole build was a learning experience. He started out by measuring the existing design and creating a diagram to guide his own work. He then traced the design on to a large piece of quality leather, carefully rounding the edges and adding a plastic stiffening plates to support the laptop where needed. Additional layers of leather were added to seal these in, and the leather was formed over guides to take the right shape. A slight misstep resulted in the case being too long, but a cut-and-shut job rectified the problem.

The finished result is a clean, impressive thing. Throughout the build, [polymatt] showed a certain mastery of the leatherworking tools that belied his lack of experience, too. The project should serve as a great inspiration to any other aspiring crafters who have contemplated creating their own custom leather goods for protecting their electronics. Video after the break.

Continue reading “Thinkpad IBM Laptop Case”

Machining A Reciprocating Solenoid Engine

The reciprocating engine has been all the rage for at least three centuries. The first widely adopted engine of this type was the steam engine with a piston translating linear motion into rotational motion, but the much more common version today is found in the internal combustion engine. Heat engines aren’t the only ways of performing this translation, though. While there are few practical reasons for building them, solenoid engines can still do this job as well and, like this design from [Maciej Nowak Projects], are worth building just for the aesthetics alone.

The solenoid engine is built almost completely from metal stock shaped in a machine shop, including the solenoids themselves. The build starts by making them out of aluminum rod and then winding them with the help of a drill. The next step is making the frame to hold the solenoids and the bearings for the crankshaft. To handle engine timing a custom brass shutter mechanism was made to allow a set of infrared emitter/detector pairs to send signals that control each of the solenoids. With this in place on the crankshaft and the connecting rods attached the engine is ready to run.

Even though this solenoid engine is more of a project made for its own sake, solenoid engines are quite capable of doing useful work like this engine fitted into a small car. We’ve seen some other impressive solenoid engine builds as well like this V8 from [Emiel] that was the final iteration of a series of builds from him that progressively added more solenoid pistons to an original design.

Continue reading “Machining A Reciprocating Solenoid Engine”

ESP32 Used As Wireless CAN Bus Reader

The CAN bus, accessible through the OBD-II port, is the channel that holds all the secrets of the modern automobile. If you want to display those for your own perusal, you might consider this nifty tool from [EQMOD].

Yes, it’s an OBD-II dongle that you can build using an ESP32 WROVER module. It’s designed to read a car’s CAN bus communications and display them on a self-hosted web page, accessible over WiFi. The build relies on the dual-core nature of the ESP32, with the first core handling CAN bus duties via the SN65HVD230 CAN bus transceiver chip. The second core is responsible for hosting the web page. Data received via the CAN bus is pushed to the web user interface roughly every 60 to 100 milliseconds or so for information like RPM and speed. Less time-critical data, like temperatures and voltages, are updated every second.

It’s a neat little thing, and unlike a lot of dongles you might buy online, you don’t need to install some dodgy phone app to use it. You can just look at the ESP32’s web page for the data you seek. The graphics may be a little garish, but they do the job of telling you what’s going on inside your car. Plus, you can always update them yourself.

Getting to grips with the CAN bus is key if you want to diagnose or modify modern vehicles. Meanwhile, if you’ve been cooking up your own electronic vehicular hacks, don’t hesitate to drop us a line!

Turning A Saxophone Into A MIDI Controller

Most of the time, if you’re looking for a MIDI controller, you’re going to end up with some kind of keyboard or a fancy button pad. The saxophone is an altogether more beguiling instrument that makes for one hell of an interface, but there’s a problem: they’re seldom MIDI-compatible. This build from [AndrewChi] changes all that.

This digitized sax relies on a SparkFun ESP32 Thing as the brains of the operation. It uses Hall effect sensors, the digital switch type, to detect the action of the keys of the sax. Choosing parts that are quick to respond is key for musical use, so [AndrewChi] selected the Texas Instruments DRV5023 for its unipolar operation, short output delay and fast rise time. Beyond setting up the basic keys to send MIDI notes, the instrument also received additional octave controls for greater range. With sensors and magnets attached to the saxophone and keys with Sugru, the instrument is ready to serve as a capable MIDI controller. Thanks to the ESP32, it’s capable of sending MIDI data wirelessly over Bluetooth for the maximum freedom of performance.

It’s a nifty build, and a great way for wind players to get into the world of controlling digital synthesizers in an intuitive fashion. We’ve seen some great MIDI controller builds before, too.

Continue reading “Turning A Saxophone Into A MIDI Controller”

Linux Fu: Easy Kernel Debugging

It used to be that building the Linux kernel was not easy. Testing and debugging were even worse. Nowadays, it is reasonably easy to build a custom kernel and test or debug it using virtualization. But if you still find it daunting, try [deepseagirl’s] script to download, configure, build, and debug the kernel.

The Python program takes command line arguments so you can select a kernel version and different operations. The script can download the source, patch the configuration, build the kernel, and then package it into a Debian package you can boot under qemu. From there, you can test and even debug with gdb. No risk of hosing your everyday system and no need to understand how to configure everything to run.

Continue reading “Linux Fu: Easy Kernel Debugging”

Freshening Up Google’s USB-C PD Sniffer

USB-C Power Delivery has definitely made the big mess of wires a bit smaller but not all cables are created equal — some of them can handle upwards of 100 W while the cheapest can handle only 10. To accommodate this, USB-C cables need to actively tell both ends what their capabilities are, which turns an otherwise passive device into a hidden chip in a passive looking cable.

[Greg Davill] has decided to unravel the mystery of why your laptop isn’t charging by creating a USB-PD sniffer. Based on Google’s Twinkie sniffer, the FreshTwinkie makes the design more accessible by reducing the number of layers in the PCB and replacing the BGA variant of the STM32 for a more DIY-friendly QFN version. Interestingly, this isn’t the first time we’ve seen somebody try and simplify the Twinkie; back in 2021, the Twonkie from from [dojoe] hit a number of similar notes.

USB-C Power Delivery is just one of many protocols spoken over the CC pins, and the FreshTwinkie might be able to detect when some of those are enabled and why or why not. With future development, it could potentially provide useful information as to why a Thunderbolt 4 or tunneled PCIe device isn’t working correctly.